Work Areas in Xrefs
Quick video
- Setting Up Your Work Areas Within Xrefs
- Moving Existing Work Areas Into Xrefs
- Nested Work Areas
- Troubleshooting
Work Areas divide your drawing into distinct regions, allowing you to set different scales, easily check for errors, and limit your schedules to selected plants, irrigation components, or site amenities. We've enabled our software to respect Work Areas within Xrefs.
Setting Up Your Work Areas Within Xrefs
Step 1: Creating Your Work Areas in a Clean Drawing
Start a blank drawing, and Xref your base file into that drawing.
In the drawing you've just created (which now contains an Xref of your site base), draw the main Work Areas you anticipate needing throughout your site.

Save this drawing.
Step 2: Xrefing Your Base File and Work Area Drawing Into Your Main Drawing
Open a new drawing – or the drawing where you want to create your planting plan.
Use the Xref command to attach your base file directly to this drawing.
Then use the Xref command again to attach the drawing you created above, which contains your Work Areas.


Attach the Xref as an Overlay, then click OK.
You should now be able to see the drawing containing your Work Areas within the Xref Manager.

Your Work Areas should also now be visible in your drawing.

Step 3: Placing the Xref on the Work Area Layer
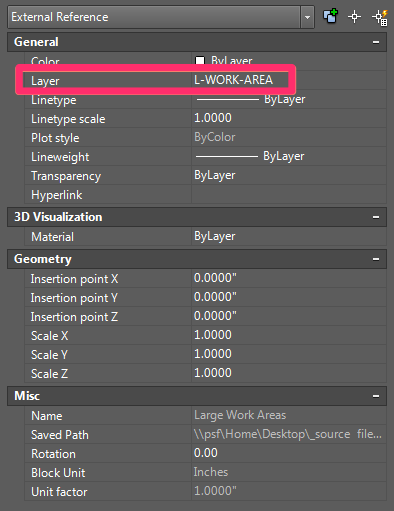
Now that you have your Work Areas Xrefed into your planting plan drawing, you'll need to place the Xrefs on the Work Area layer. In most cases, this layer will be named L-WORK-AREA. To ensure that you're placing your Xrefs on the correct Work Area layer, draw a new Work Area in the planting plan drawing. You can give it a name such as Test.


Select that Work Area, and type Properties in the Command line.

Look in the Properties panel to verify the layer that contains your Work Areas.
In our example, the correct layer is, in fact, the typical Work Area layer L-WORK-AREA.
In some cases, the Work Area may be on our old Work Area layer, LG-ANNO-BRDR if so, just make sure that layer matches the layer settings in the current Preference Set.
You can then move your Xrefs onto that layer using the Properties panel.

Then delete the test Work Area you just drew.
Step 4 (Optional): Creating Work Areas Within Your Work Areas
Need to create Work Areas within your Work Areas? No problem – you now have this capability. You'll just need to create those Work Areas in another drawing and bring it in as an Xref.
Open another new drawing, and Xref in your base file.
Draw any Work Areas you would like to have within your existing Work Areas.

Save this drawing, and Xref it into the main drawing. Now, when you want to work on these smaller Work Areas, unload the Xref containing the larger Work Areas. When you want to work within the larger Work Areas, unload the Xref containing the smaller Work Areas, and reload the Xref containing the larger Work Areas.


Step 5: Design Your Site and Place Your Schedules When Ready
You can now begin planting, placing plants within the boundaries of your Work Areas as needed. Those Work Areas will be treated as if they're in the main drawing, effectively dividing your planting plan into distinct regions based on the Work Areas.
When you generate a schedule, for example, the system will treat those Work Areas as if they're within the main drawing, rather than in the Xref. When you run a schedule, the Command line will give you the following options: Select Work Area, [All Work Areas], <Entire drawing>. You can select any of these options, and the system will act as if the Work Areas are in the current drawing.

For information on generating a Plant Schedule using Work Areas, see our Limiting the Plant Schedule documentation.
This technique also works with RefNotes Schedules and Irrigation Schedules.
Moving Existing Work Areas Into Xrefs
If you've already created Work Areas in the main drawing, you can easily move them into a clean file using the WBLOCK ;(Write Block) command.
Select the Work Area(s) as the object to WBLOCK.
You can easily select all Work Areas in the drawing by selecting one Work Area, right-clicking, and selecting the Select Similar option from the menu that opens.

All Work Areas in the drawing will now be selected. Type WBLOCK in the Command line, and press Enter.

In the Write Block dialog box, select Objects. Click the ... button (shown to the left) to begin saving the Work Areas into a separate DWG file.
Give the file a name you'll remember, and click Save to save it.


You'll now have a new drawing with the name you created above.
If you open this drawing, you'll see that its content consists of the Work Areas you copied over using WBLOCK.

Open your main drawing, and type XREF in the Command line.

Bring in the drawing containing your Work Areas as an Overlay, and click OK.
Your Work Areas should now be visible in your main drawing, from within the Xref you created.


You should also see the Xref containing your Work Areas in the Xref panel.
Remember to move this Xref onto the Work Area layer.
Nested Work Areas
In response to client requests, we've added the ability to create nested Work Areas – that is, Work Areas within Work Areas. Our schedule tools (Plant Schedule, Irrigation Schedule, Reference Notes Schedules, etc.) will now recognize objects within these nested Work Areas. More information
Troubleshooting
General Work Area troubleshooting
Issue: Work Areas are not recognizing or calculating a hatch
Issue: Layers from one or more of your Xrefs are not visible within a viewport or Work Area


