How to Use the Land F/X Portal
Quick video
- Accessing the Portal
- Registering for the Portal
- Submitting a Ticket
- Editing or Deleting Custom Plants
- Adding and Editing Custom Groups and Fields
- Adding a New Custom Plant Group
- Adding a New Custom Plant Field
- Selecting Data Fields to List in the Plant Schedule
- Adding Plant Photos to Our Database
- Looking Up Your Payment History
- Restoring Your Land F/X Project Data (Cloud Data Only)
- Changing Permissions for Land F/X Projects and Preference Sets
- Installing Land F/X Software, Including Plugins and F/X CAD
- Managing Your Land F/X Licenses
- Portal FAQs for Land F/X Users
- Manufacturers & the Portal
- Related Webinars
Our Portal tool instantly brings you to the Land F/X Portal, where you can access your Land F/X account information. Our Portal allows you to:
- Manage your licenses
- Send a technical support ticket or view your existing tickets
- Access and, if necessary, restore your project data
- Install purchased licenses of Land F/X plugins
- View and edit your custom plants and plant user fields
- See your billing history, renewal date, and Support ID
- Edit your contact information
Trial users:
You'll need to install Land F/X before you can use the Portal. Why? The Portal requires your account to have a valid support date, which won't be set until you've installed the software.
Accessing the Portal
Open the Land F/X Portal:

F/X Admin ribbon, Portal flyout
Type FX_Portal in the Command line

F/X Admin menu, Portal option
Or visit our Land F/X Portal page
You'll be brought to the Land F/X Portal, where you can access your account information.
Registering for the Portal
You won't automatically have a Portal profile if you're a Land F/X user or manufacturer. If you haven't registered for the Portal, you'll need to do so before you use it.

After entering the portal, click Create a New Account.
Fill out the account registration form, including your company's Support ID.
Don't know your Support ID? Here's how to find it.

An email message from Land F/X will be sent to the email address you used when registering. Click the verification link in this message to activate your account.
The email message from Land F/X will have the subject Account Details for (your username) at Land F/X.
Can’t find the email message from Land F/X? Try looking in your spam folder.
After you've verified your email, you can log in with the credentials you entered when registering.
Submitting a Ticket
Quick video
Need technical support? Have a question about the software or just need help? We've made it easy to submit a ticket to our system using the Portal.

To begin submitting ticket to technical support or sales team, select the Support tab in the Portal.
You can also choose to submit a technical support from within CAD using our Support tool.
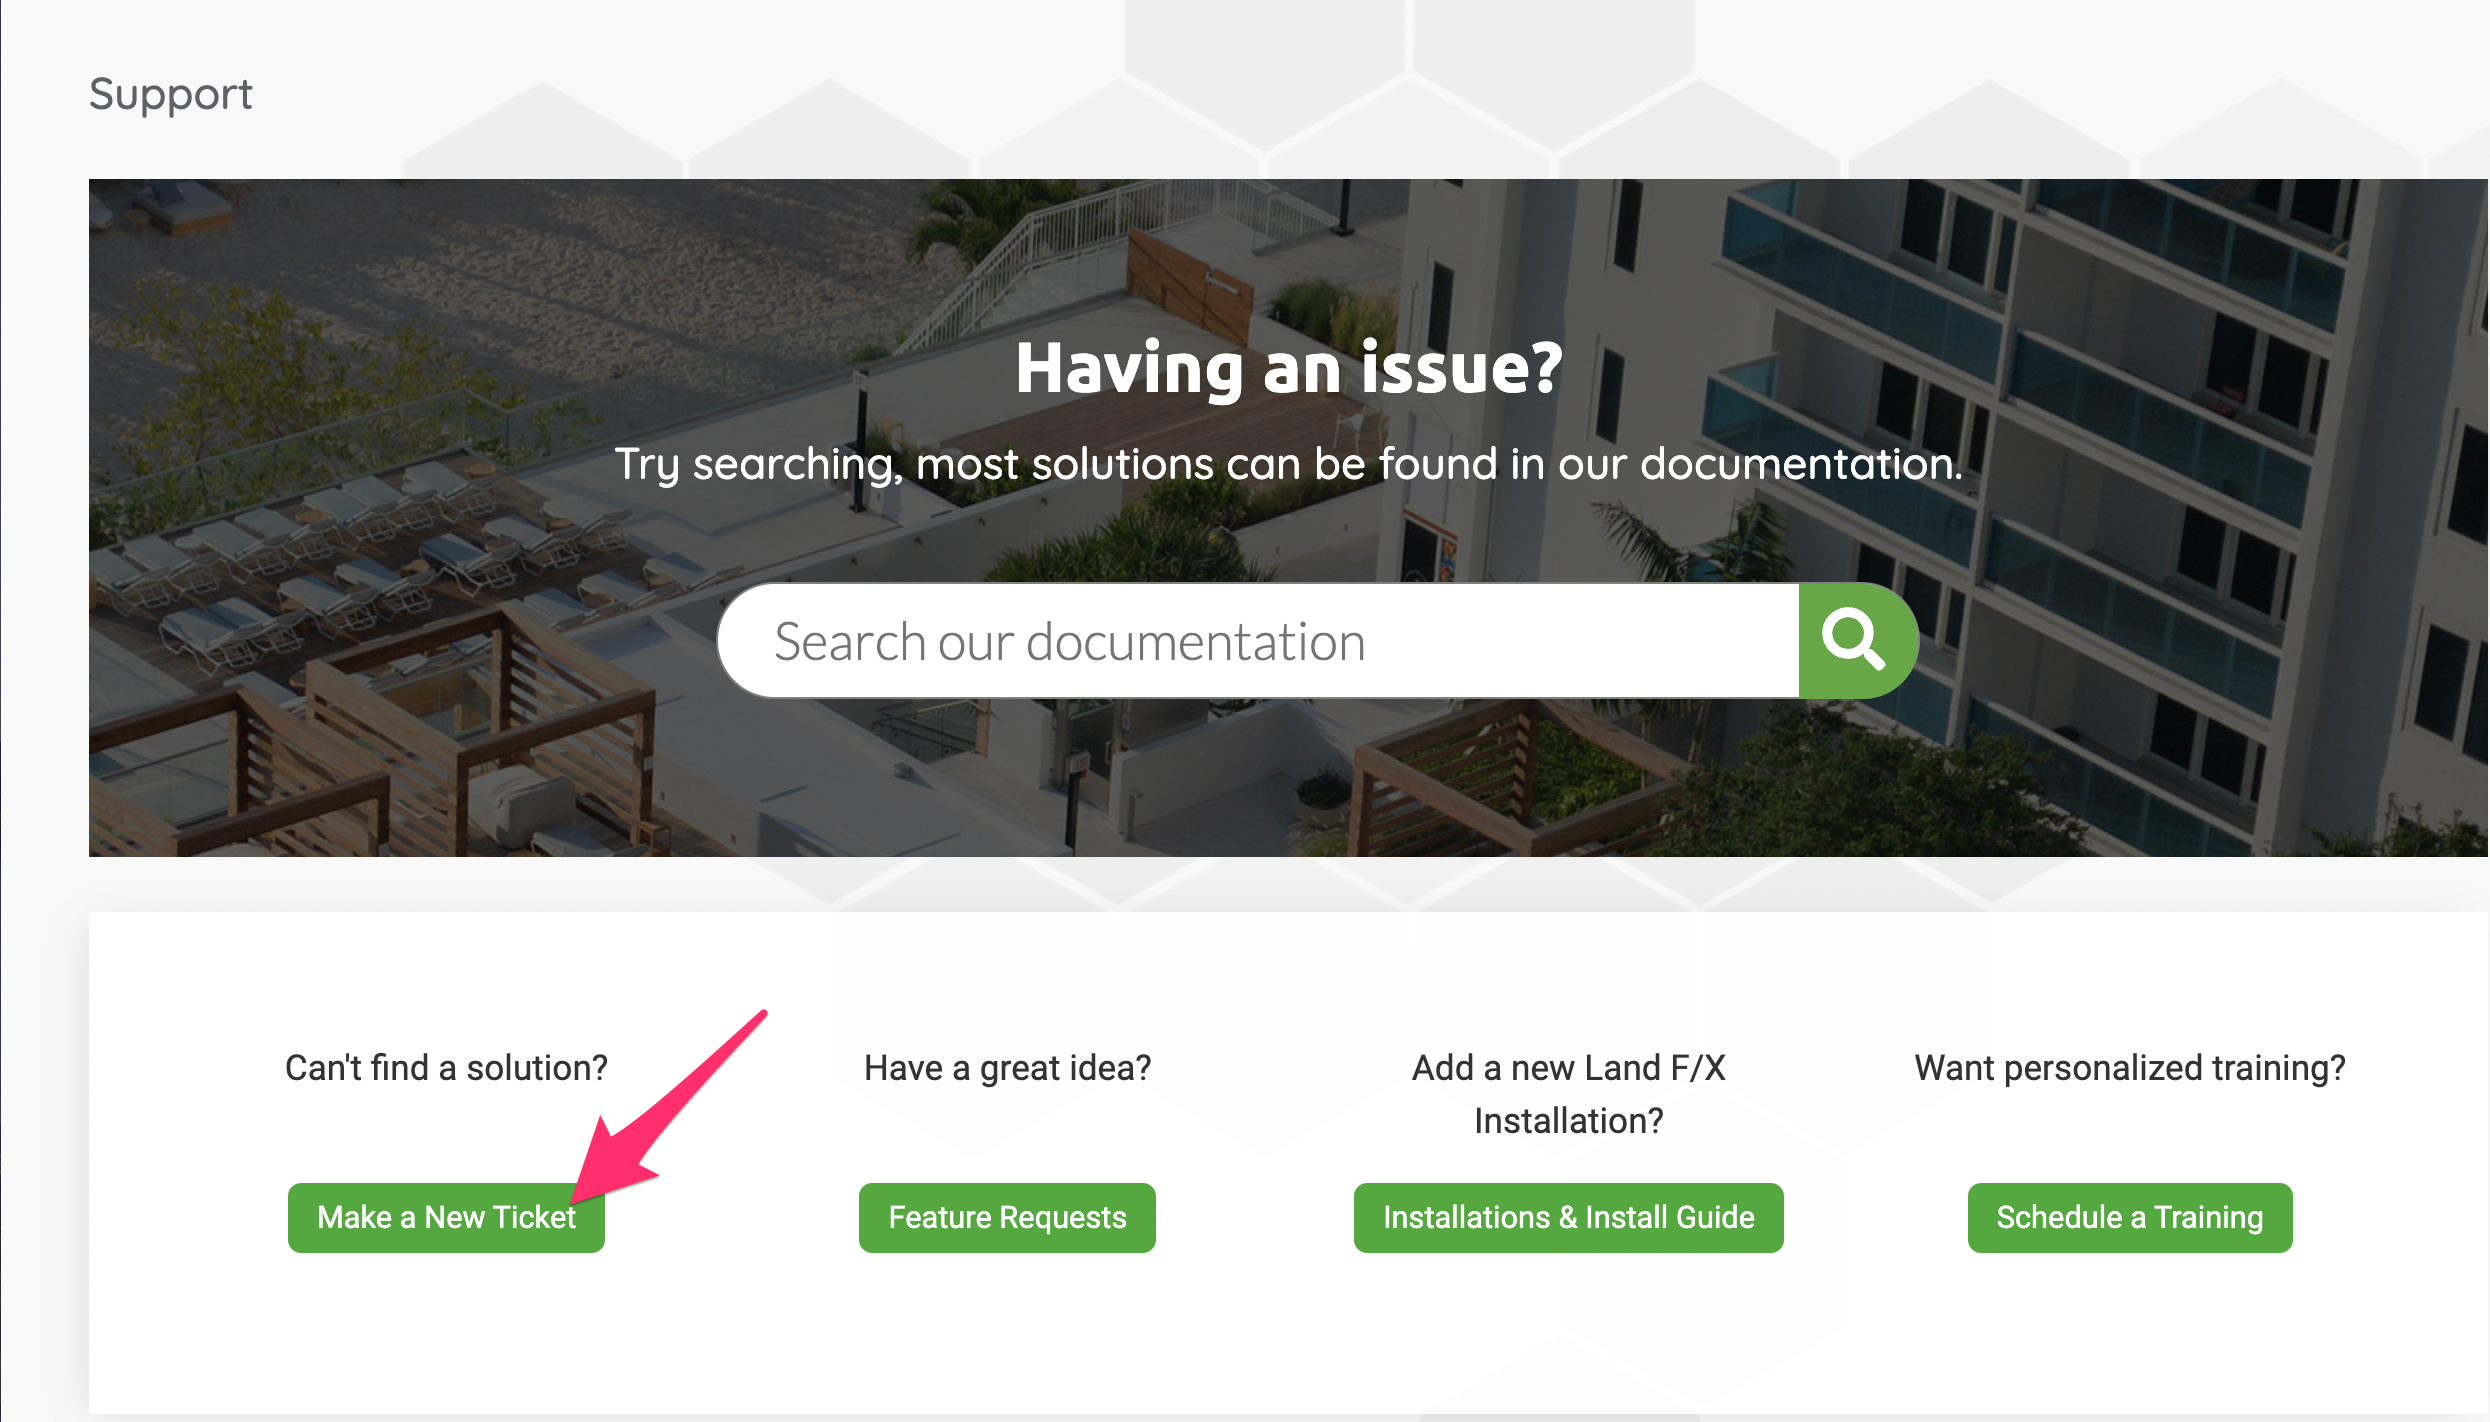
In the Support screen, click Make a New Ticket.
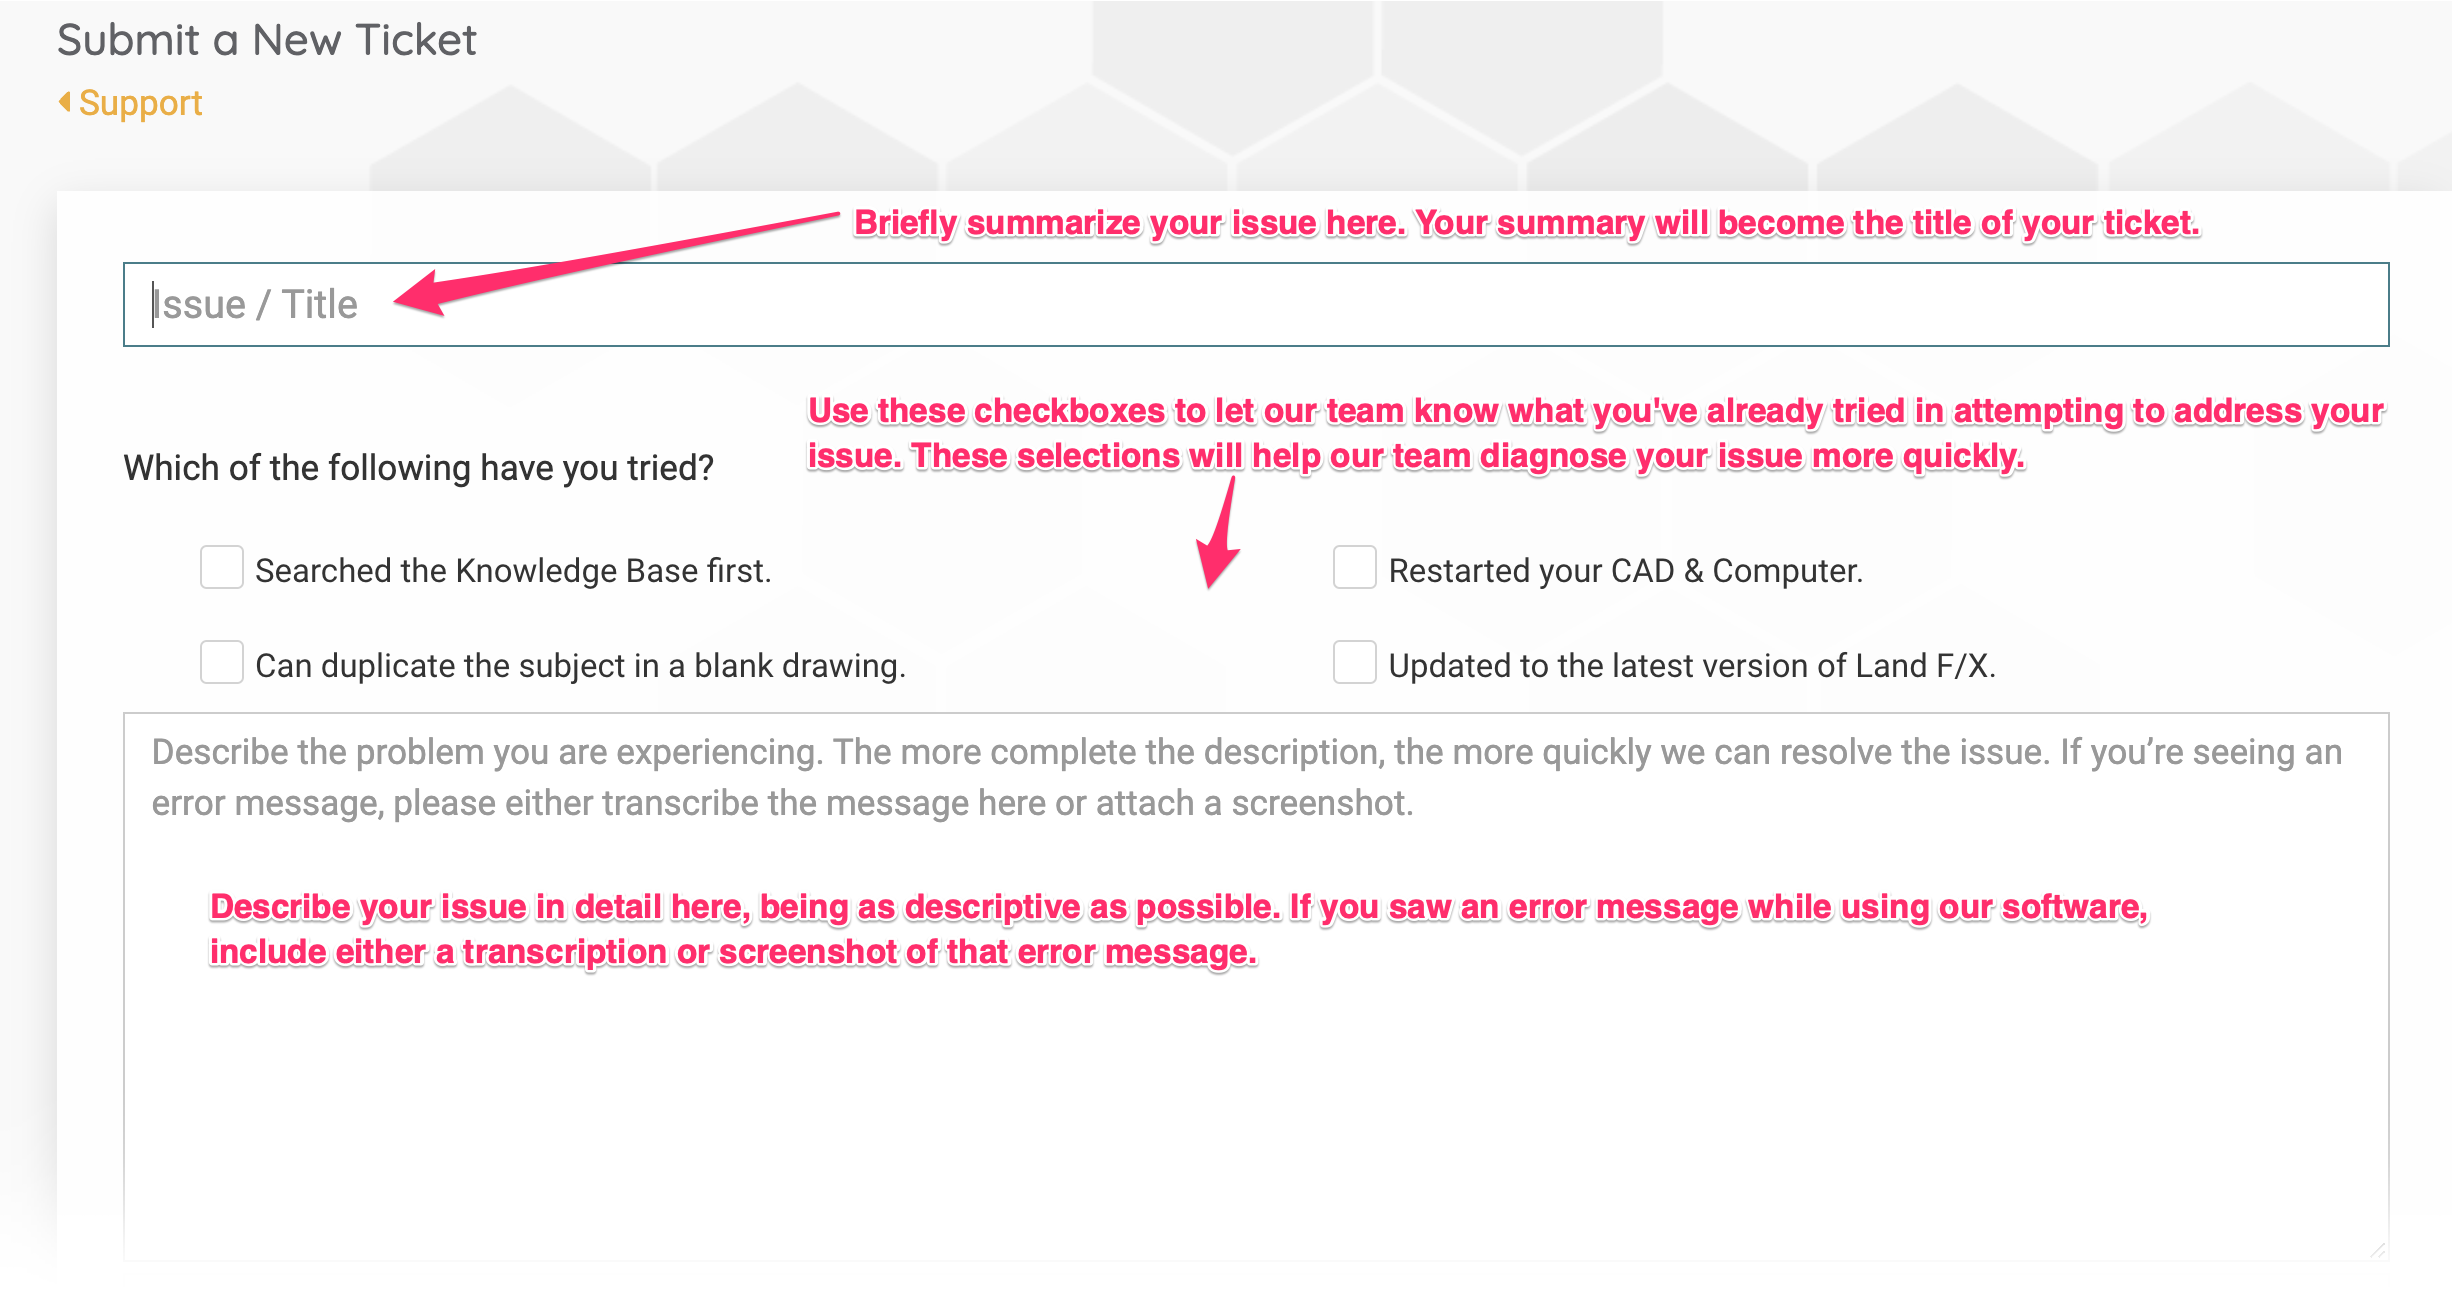
You'll be brought to a screen where you can create and submit your technical support ticket. Provide a title for your ticket that briefyly describes your issue. Use the checkboxes to let us know what you've already tried in attempting to address your ticket, and provide a detailed description of the issue you're experiencing, including transcriptions or screenshots of any error messages you're seeing.
Use the Choose file button to create a zip file containing your drawing file and attached Land F/X data, which will allow our team to investigate and diagnose your issue more quickly. Click Submit when you're ready to submit your ticket.

Attachment too large?
Our system only allows the attachment of files smaller than 7.5 megabytes. If you see a message that your zip file is too large to attach, see our suggestions for reducing the size of the zip file containing your drawing file and Land F/X data.
Editing or Deleting Custom Plants
Our Portal includes the capabilities to edit plant information and delete custom plants you've added to the Land F/X database.

After logging in to the Portal, select the Data tab in the left column.
To edit your custom plant data, click Edit Plants.
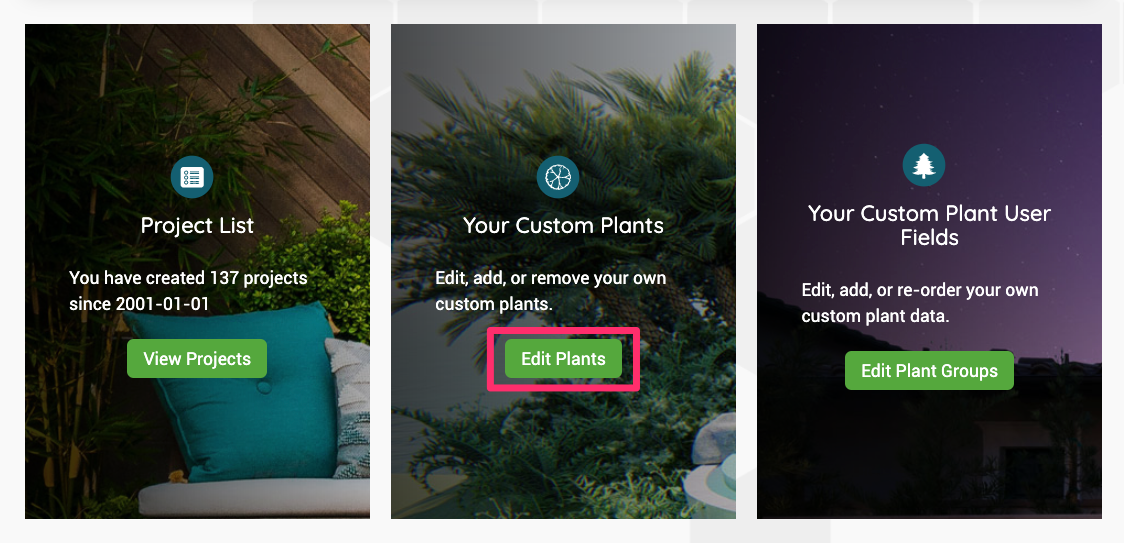
Click Edit to edit your custom plant data.
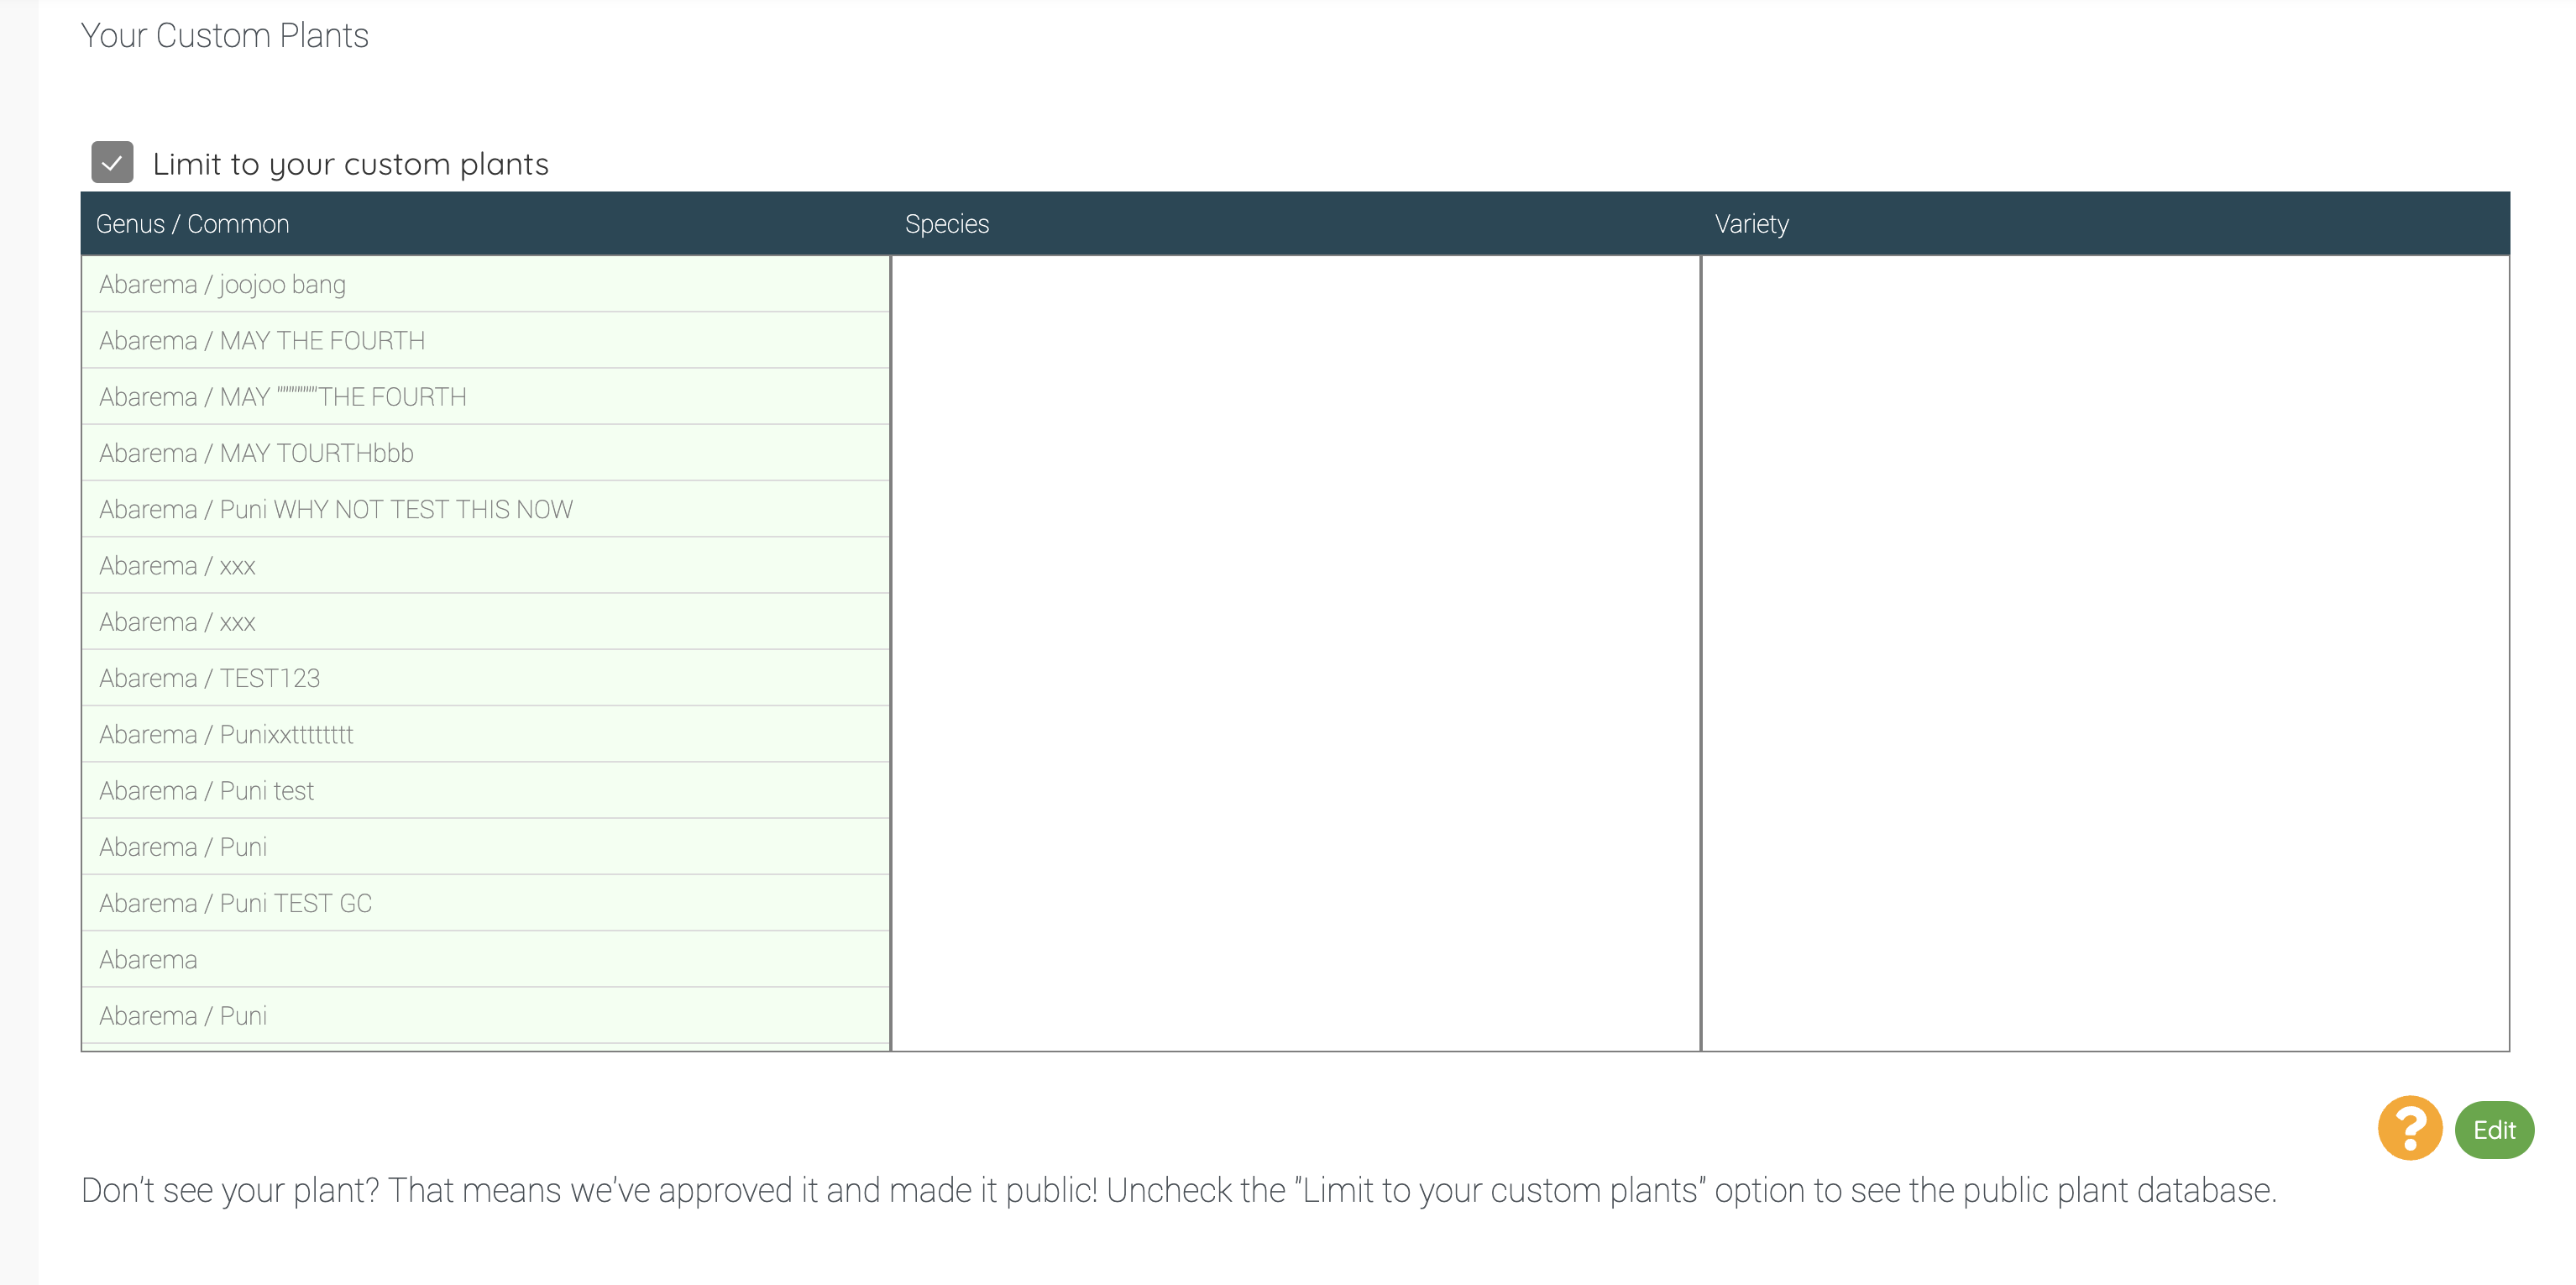
Don't see your plant? If not, it means we've approved it and added it to our public plant database.
Adding and Editing Custom Groups and Fields
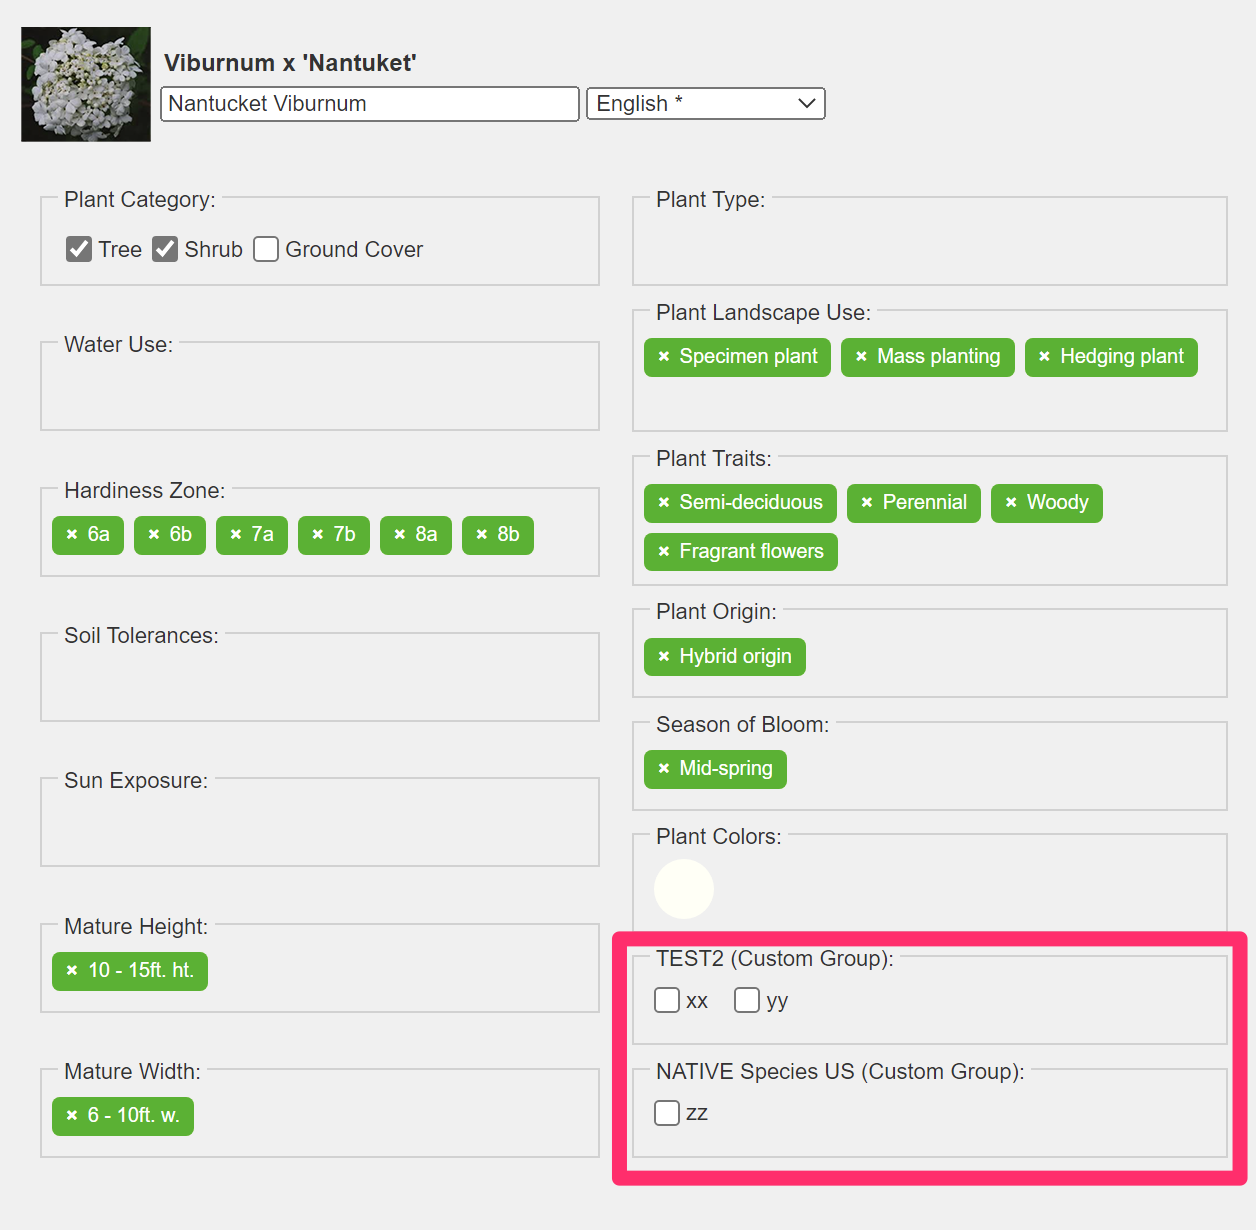
Our plant data tagging system offers the ability to add custom plant groups and fields for adding specific data to plants (pictured in the example to the right). These data fields will be included in your Plant Schedule.
You can configure these items in the Portal.
More information about custom plant groups and fields
Note that custom fields are no longer really needed because you can type anything into the tag system and save that data.

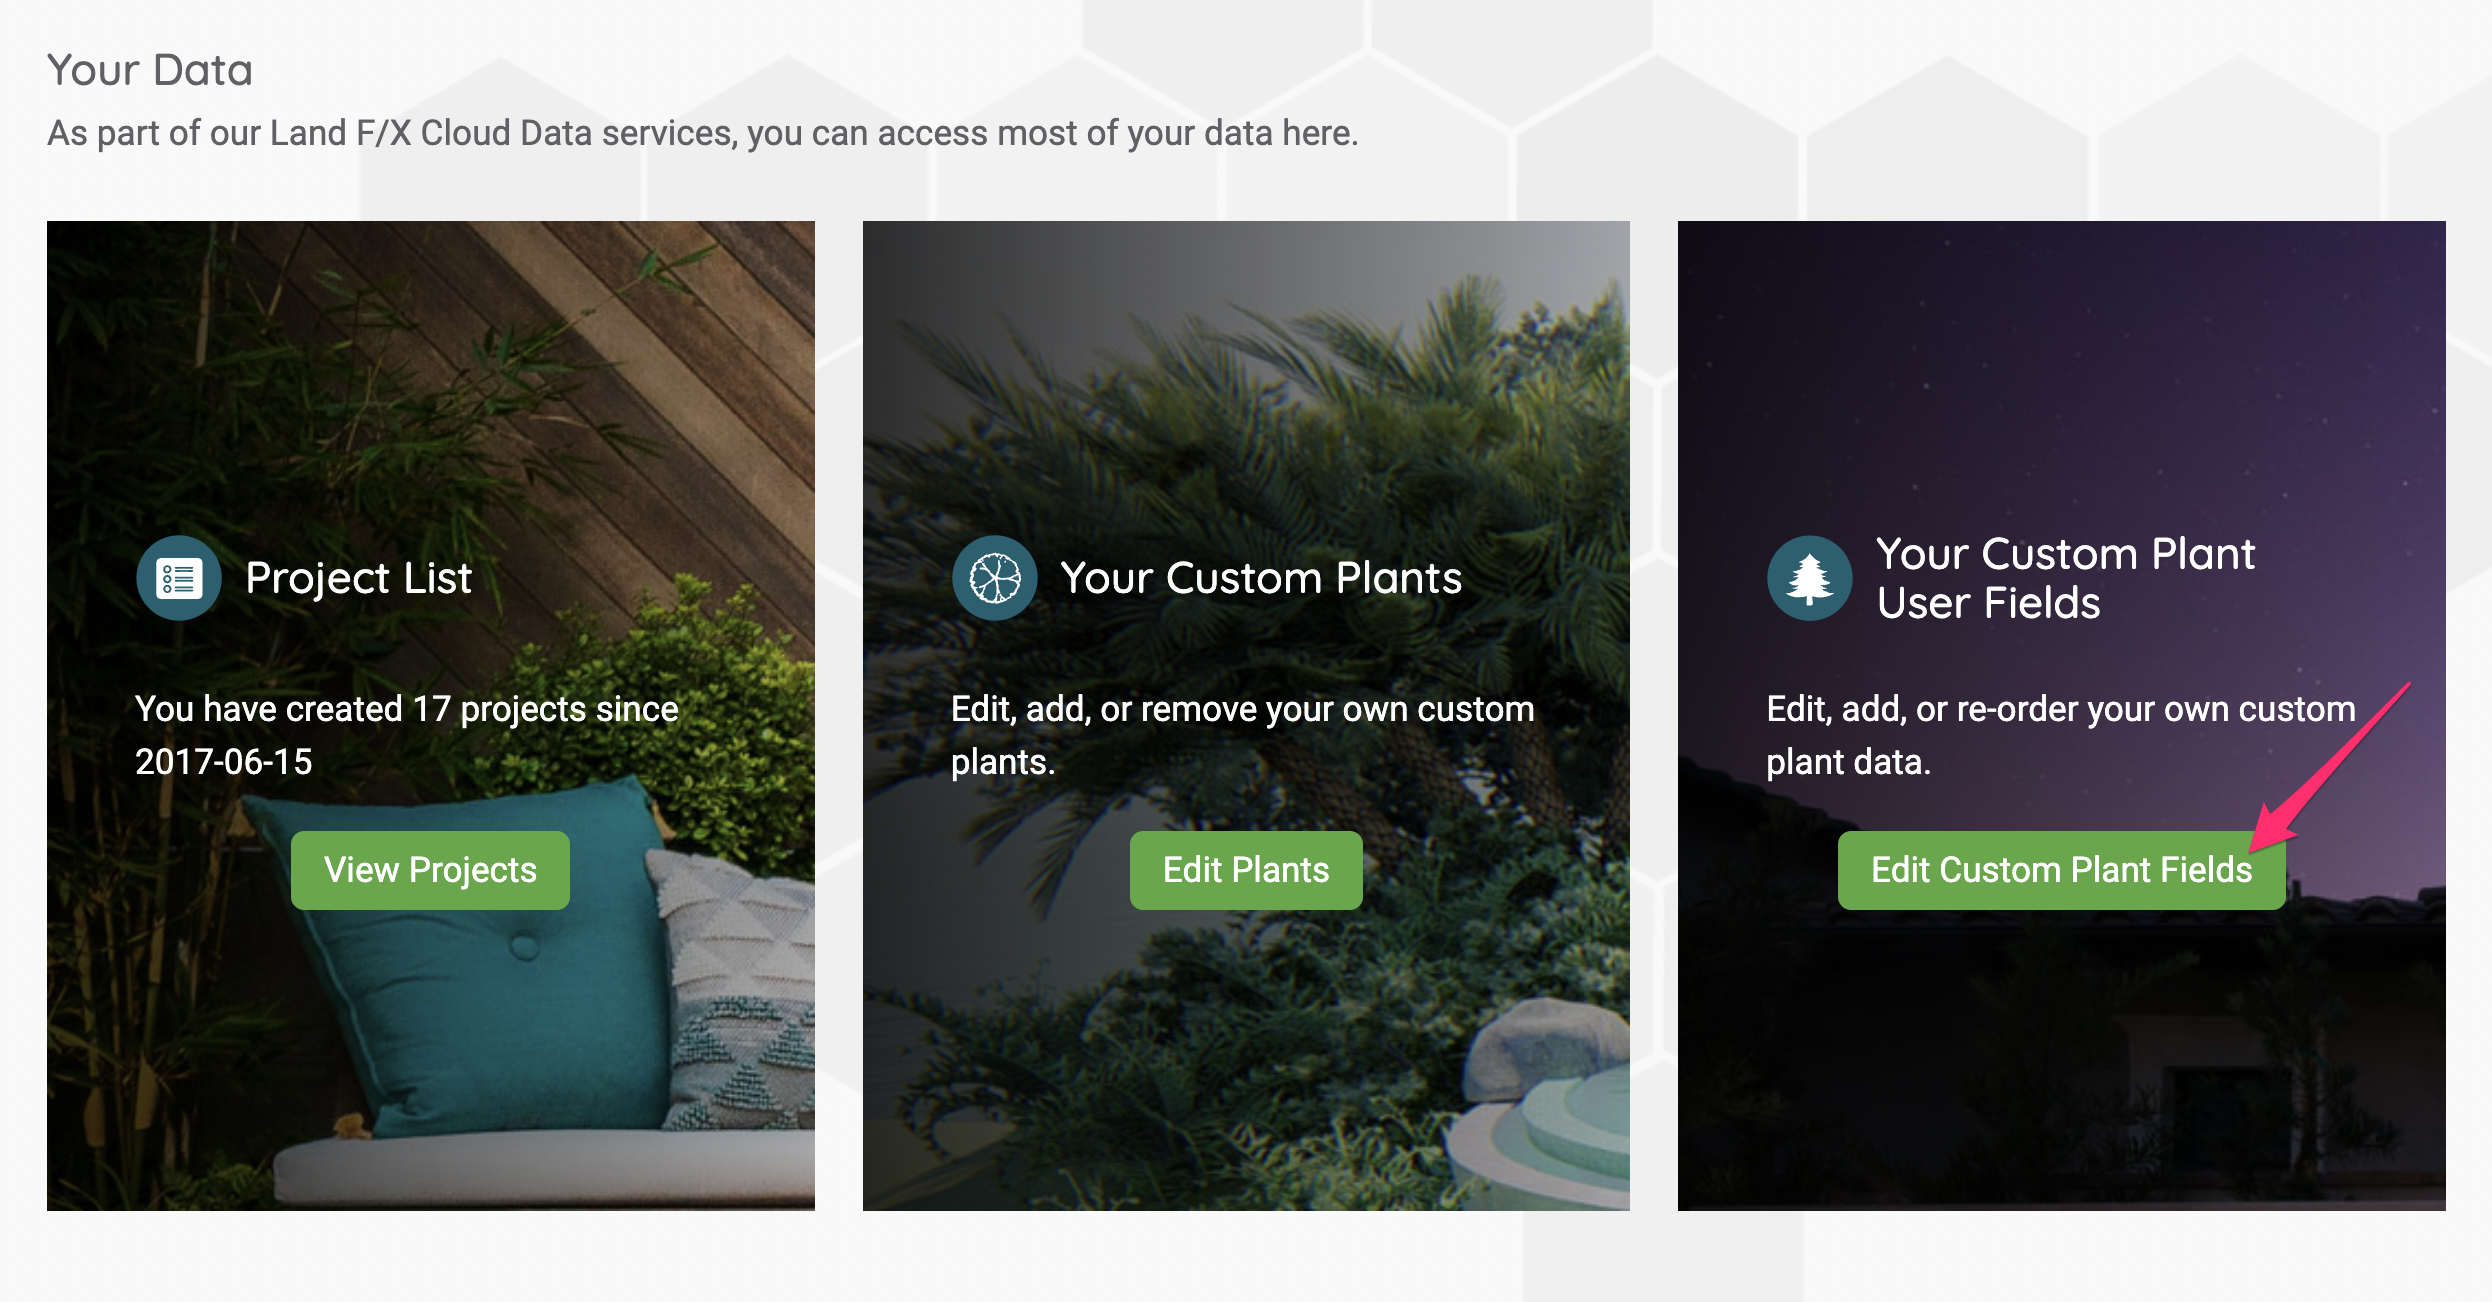
After logging in to the Portal, select the Data tab in the left column.
To add or edit custom plant groups or fields, click Edit Custom Plant Fields.
Adding a New Custom Plant Group
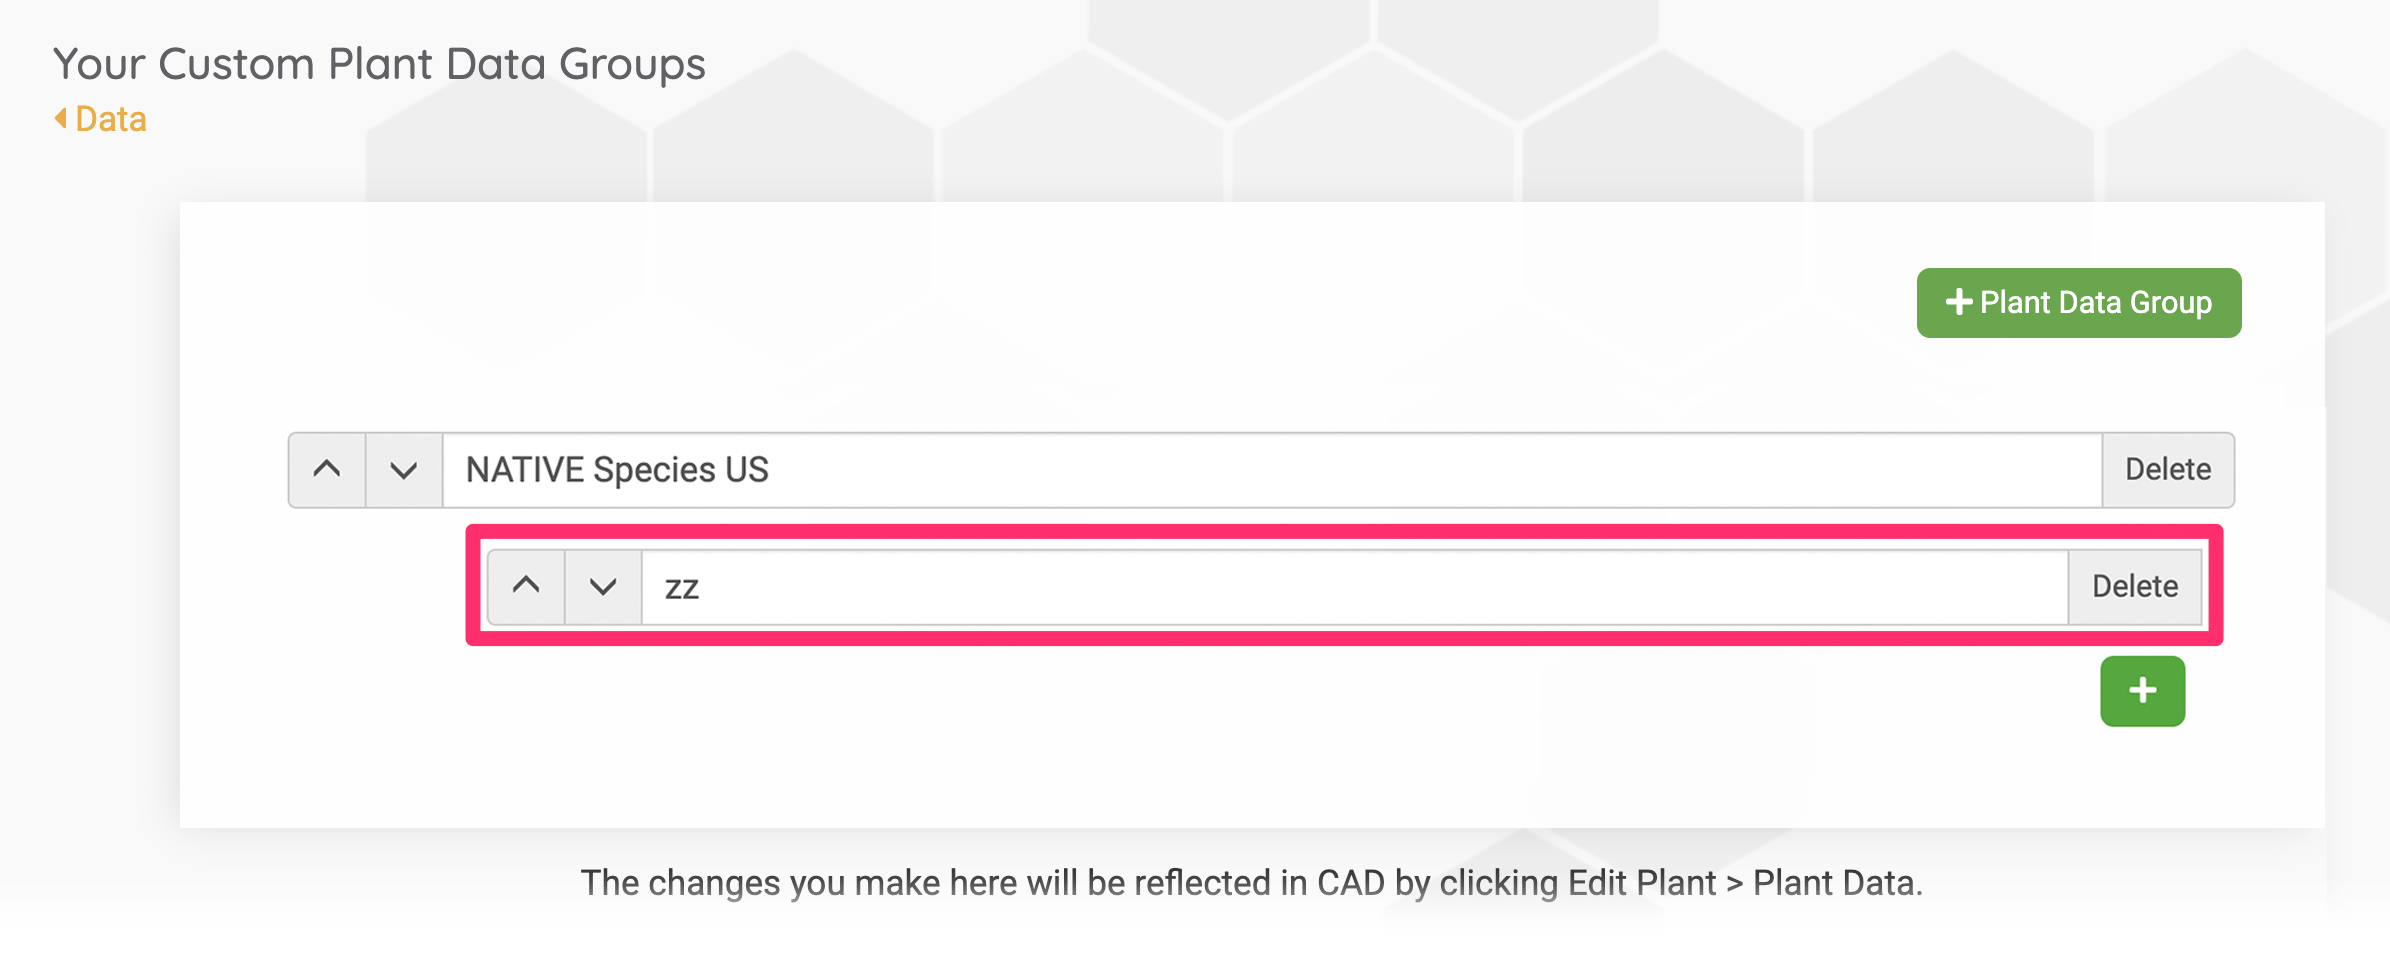
Click + Plant Data Group to add a new plant data group.

Type a name for your new plant data group, then click Save.

Your plant group will now appear in the list.

Adding a New Custom Plant Field
Click the + button under a to add a new plant data field to that group. The field will appear as a checkbox under the group in our plant data dialog box (pictured above).

Type a name for your new plant data field, then click Save.
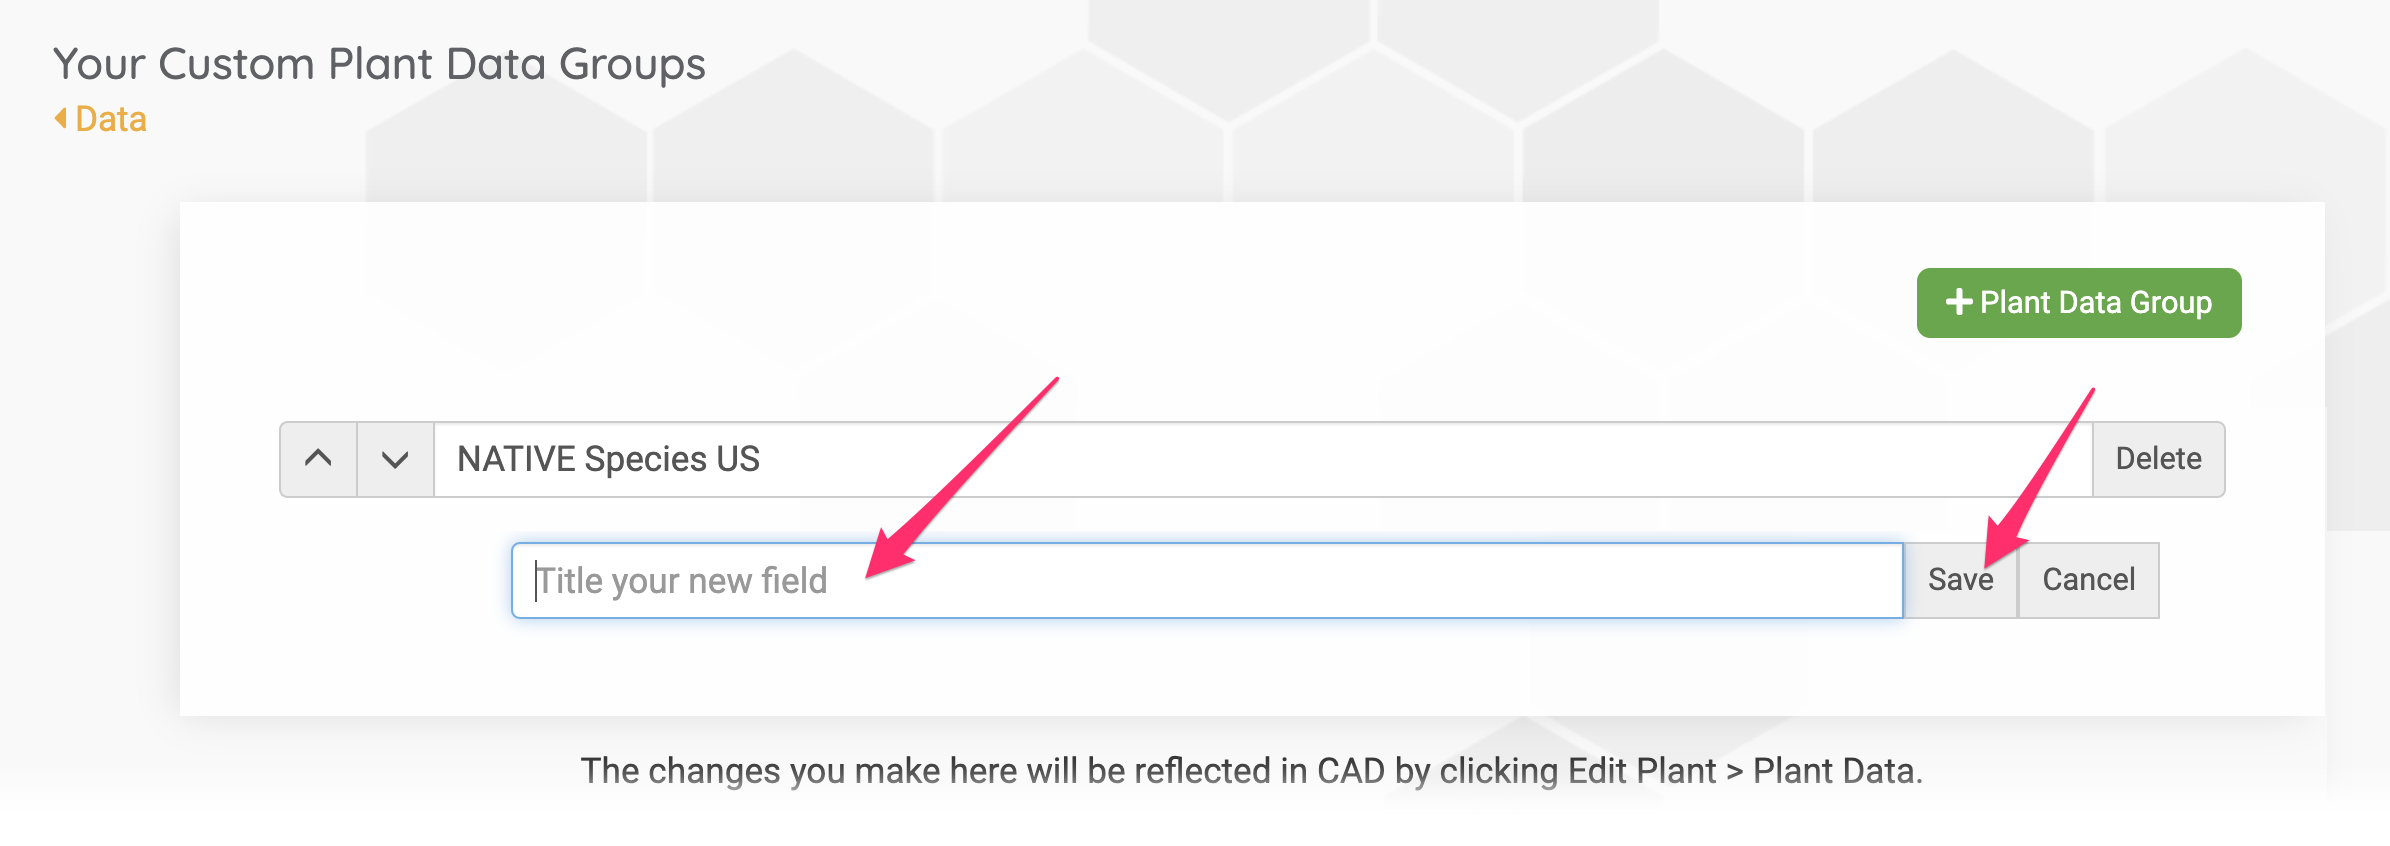
Your plant field will now appear beneath the plant group where you created it.
Selecting Data Fields to Show Up in the Plant Schedule
After adding data fields to your plants, you can select them to show up in the Plant Schedule. More information
Adding Plant Photos to Our Database
You can now add your own plant photos to our database, making them selectable for all Land F/X users to assign to plants using our Photo Callout tool.
For more information and instructions, see the Adding Your Own Plant Photos section of our Plant Data Tagging documentation.
Some notes on uploaded photos:
- Every photo you upload will be available to all other Land F/X users.
- Some users have expressed a desire to have exclusive access to their own photos they upload – that is, not allowing other Land F/X users to access their uploaded photos. This capability is not available at this time, but we'll assess the demand and, if we see a widespread desire for this capability, may possibly offer exclusive access to your uploaded photos in future releases. However, keep in mind that we would still heavily vet uploads for copyright issues at that time.
- We are extremely concerned about copyright issues. We do not want to store any copywritten materials on our servers, and will vet all uploaded photos carefuly for copyright infringements.
- Stay tuned for a new system of points rewards for uploaded photos, which is currently in the works and should be coming soon.
- We will continue to evolve this feature as more Land F/X users take advantage of it.
Looking Up Your Payment History

After logging in to the Portal, select the Licenses tab to begin looking up your purchase history.
Only users who are marked as an Administrator in the Portal can view your office's payment history.
To find out whether you are an administrator, select the Users tab.

Click Payment History to see your payment history.
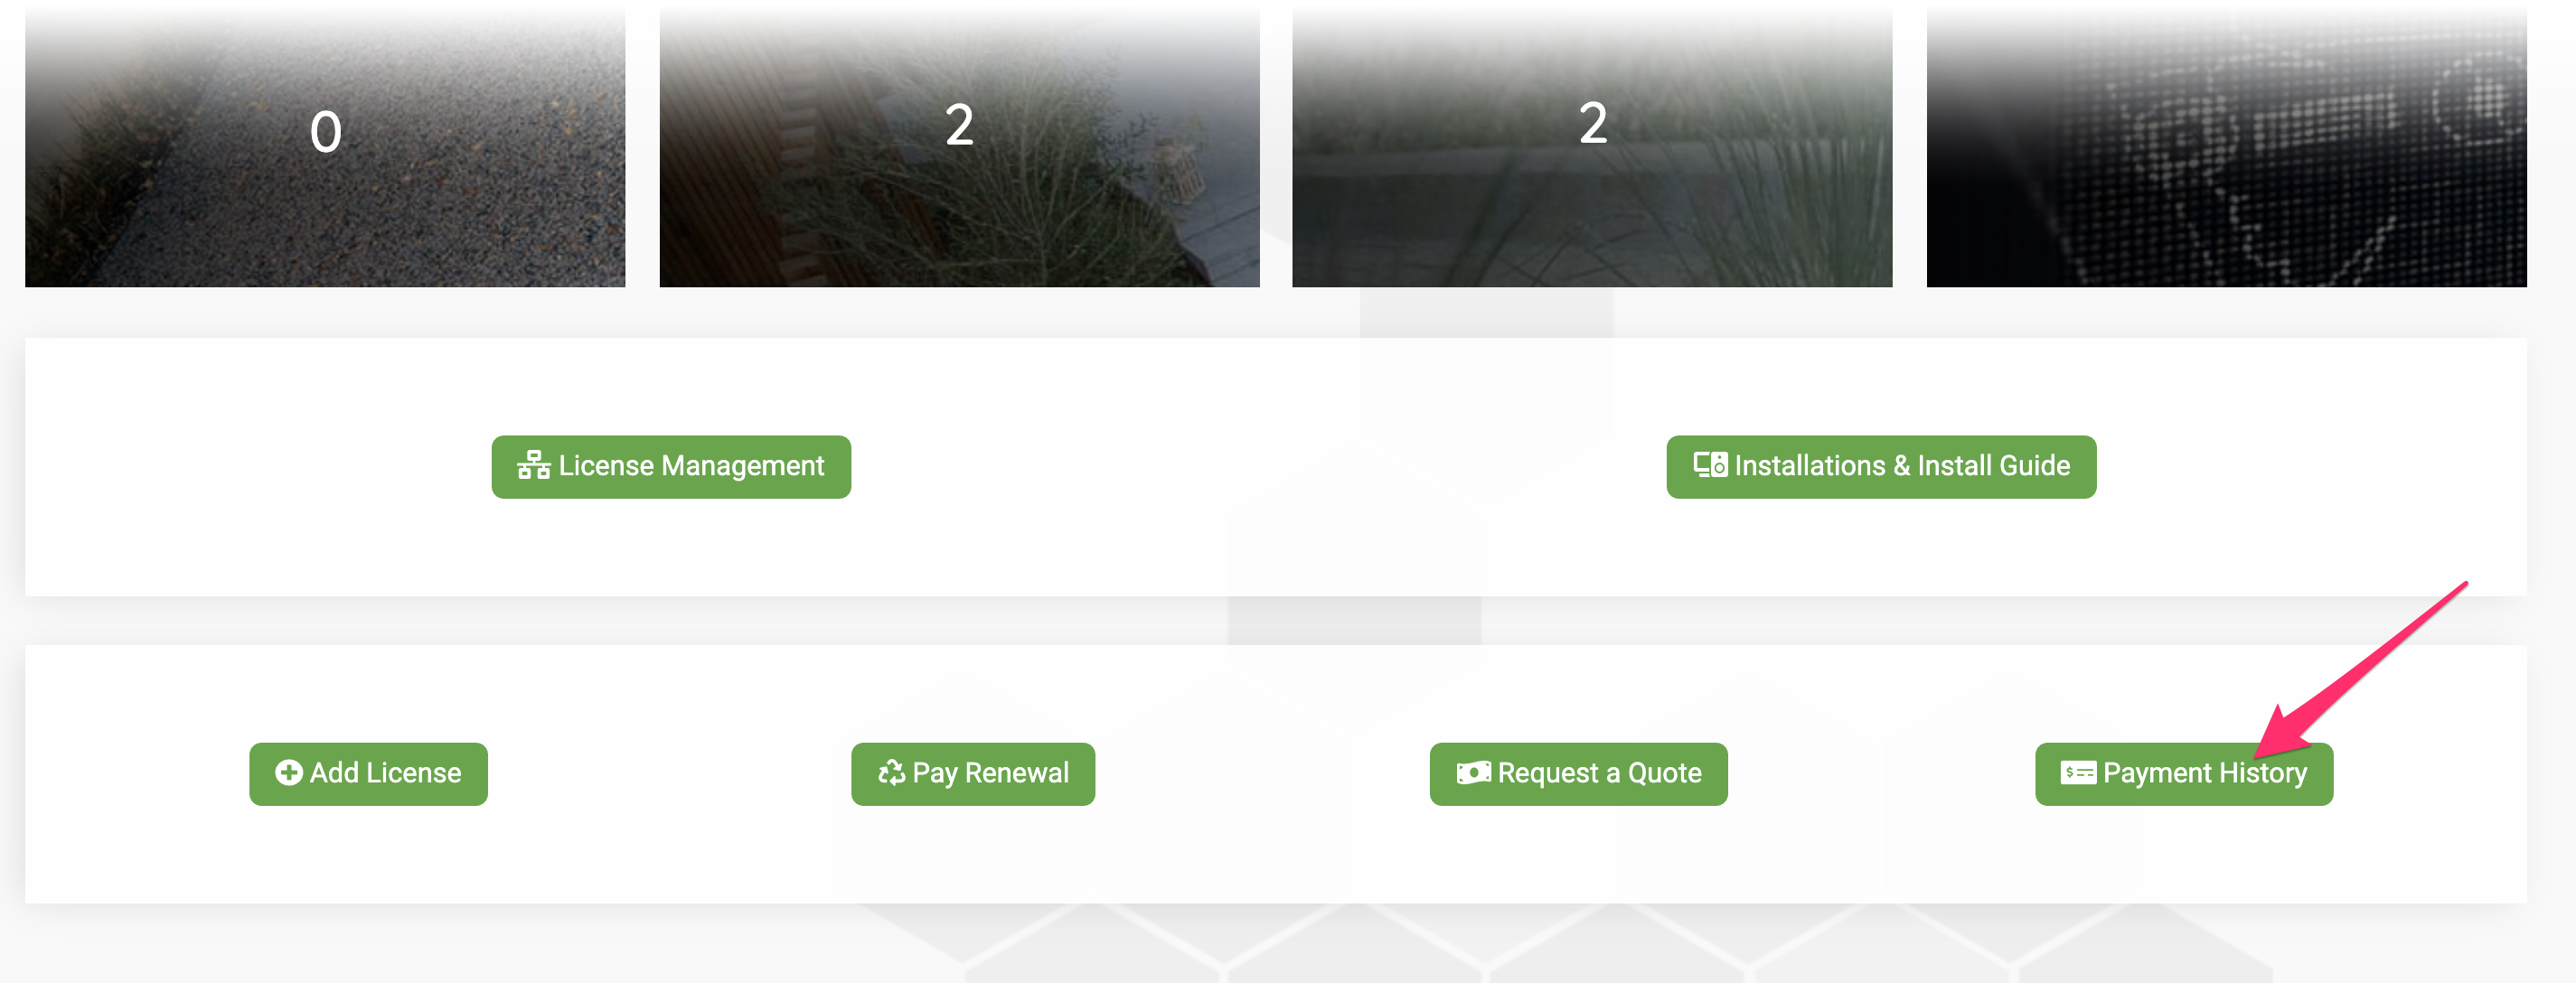
In the next screen that pops up, you can see a list of payments your office has made to Land F/X under Invoices: (your company name Purchase History.

Restoring Your Land F/X Project Data (Cloud Data Only)

After logging in to the Portal, select the Data tab in the left column.
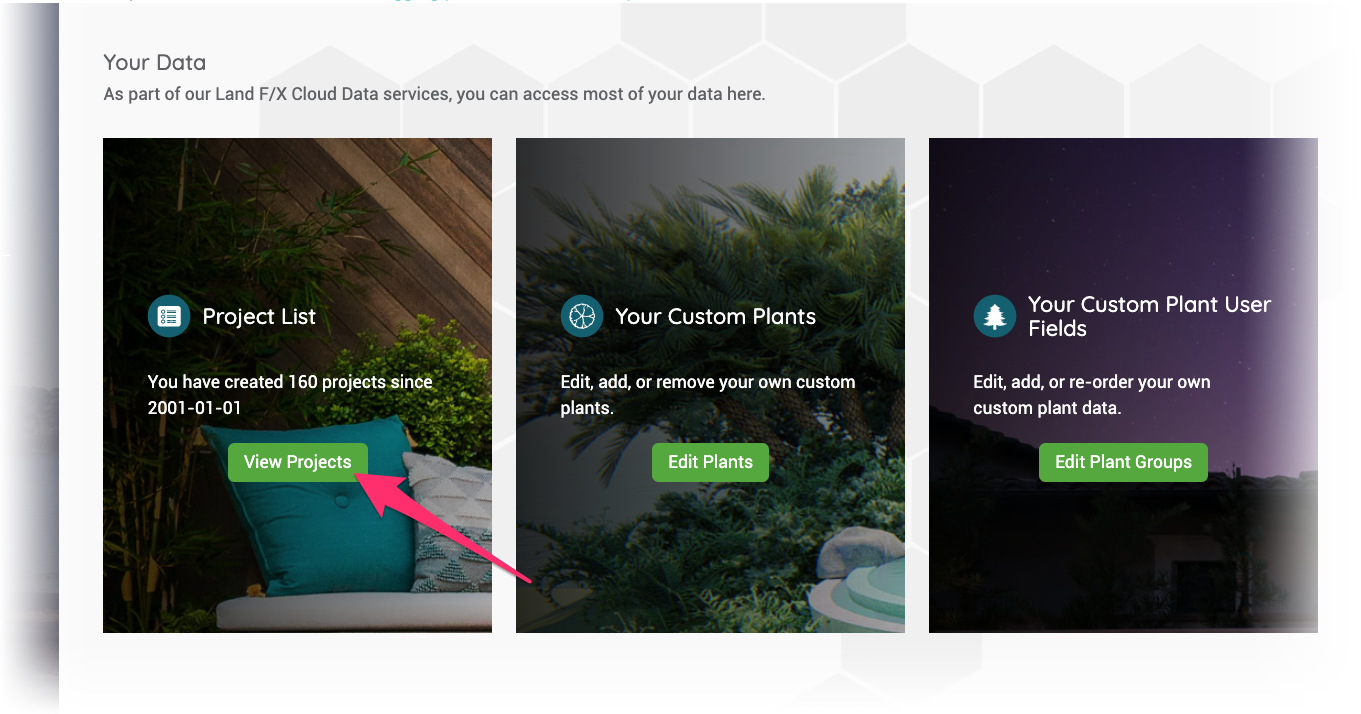
Click View Projects to open your Land F/X data, which includes your projects, templates, and Preference Sets.
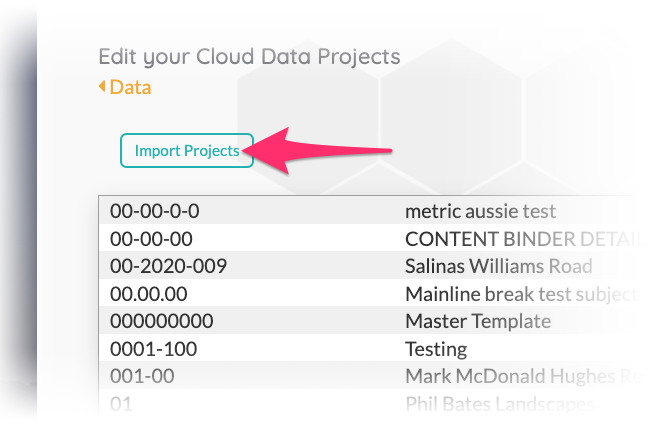
Click Import Projects.
Drag and drop your Land F/X data (LFX files) into the area provided, then click Upload files.

A green check mark and a File imported message will indicate that the listed projects, templates, and/or Preference Sets have imported successfully.

Changing Permissions for Land F/X Projects and Preference Sets

After logging in to the Portal, select the Data tab.
Click View Projects on the next screen.
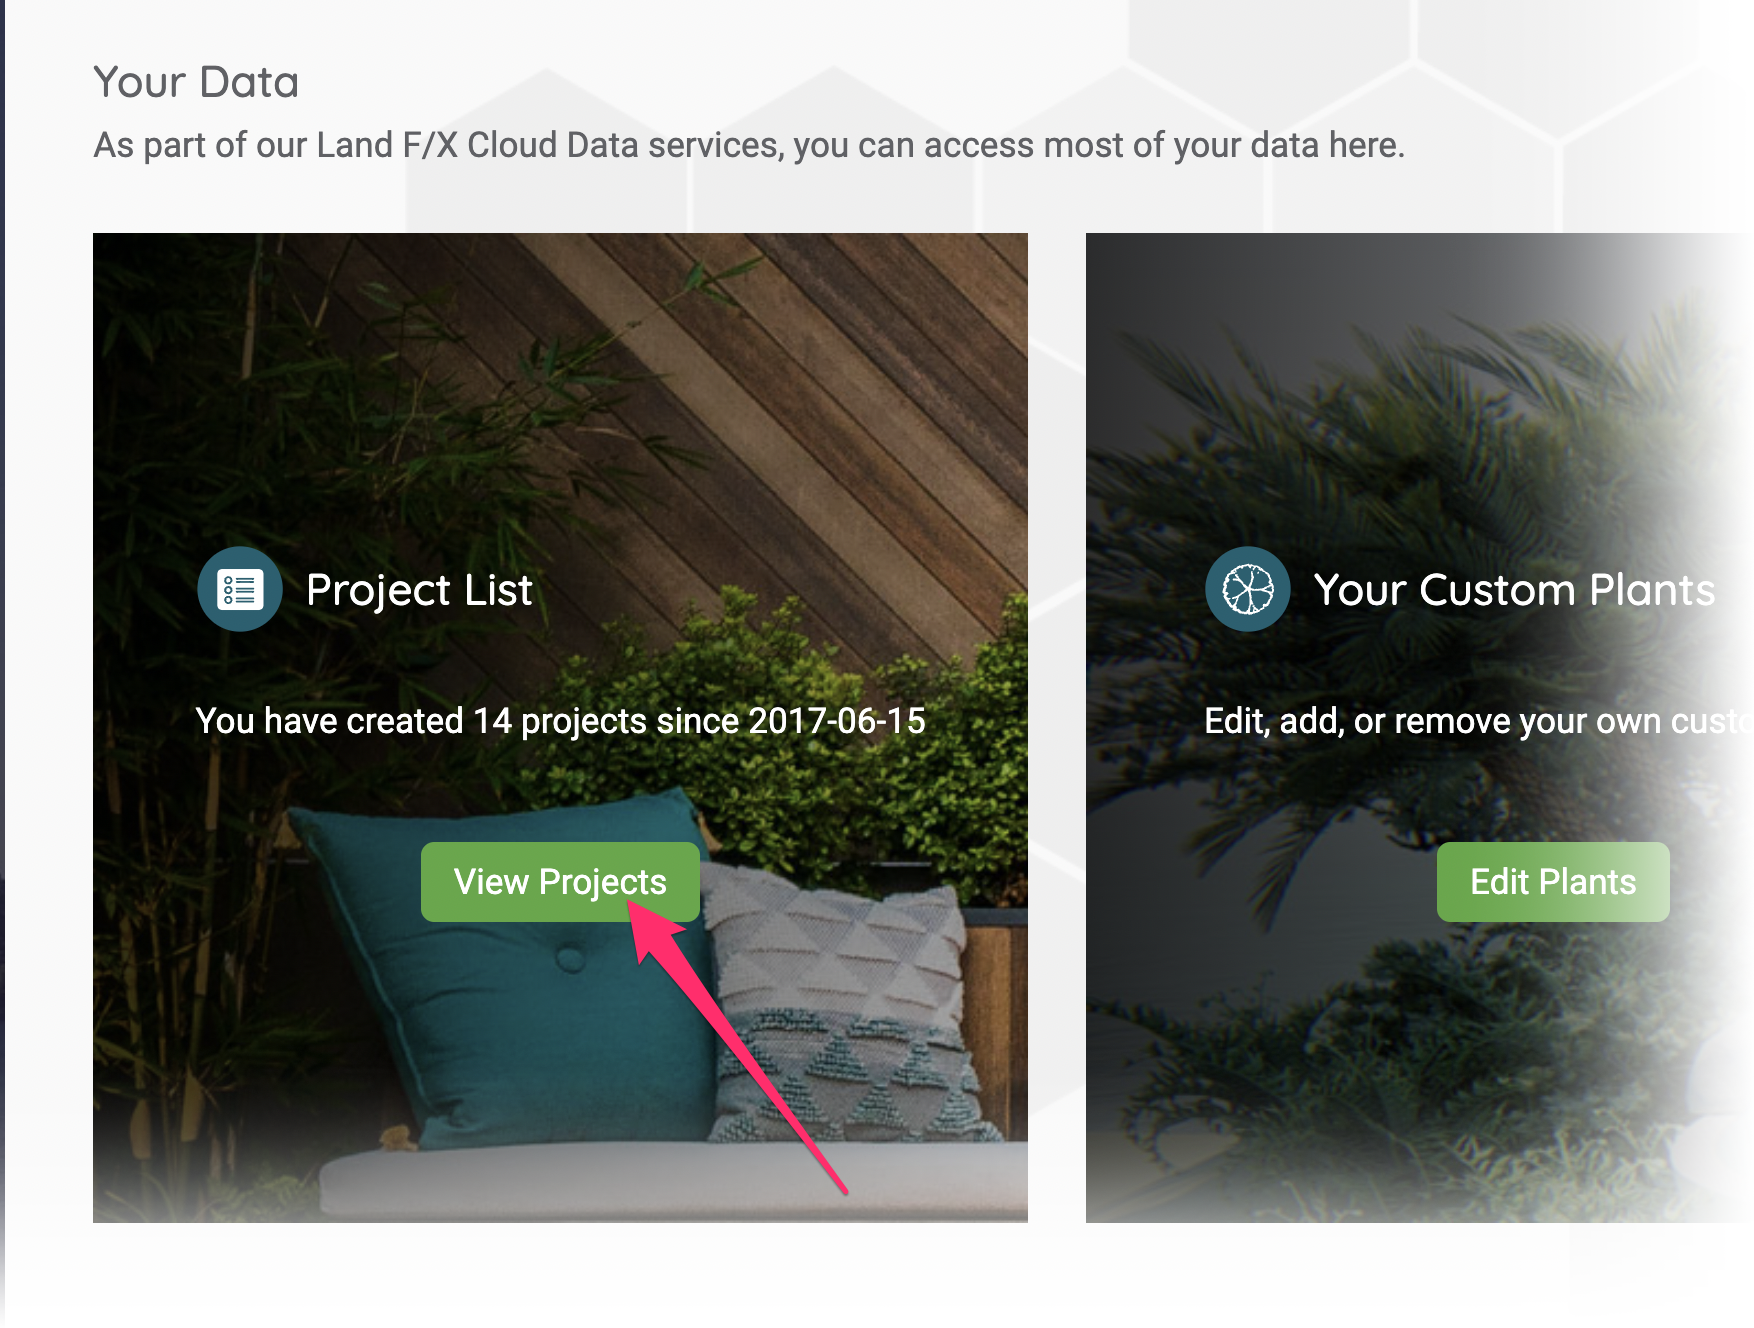
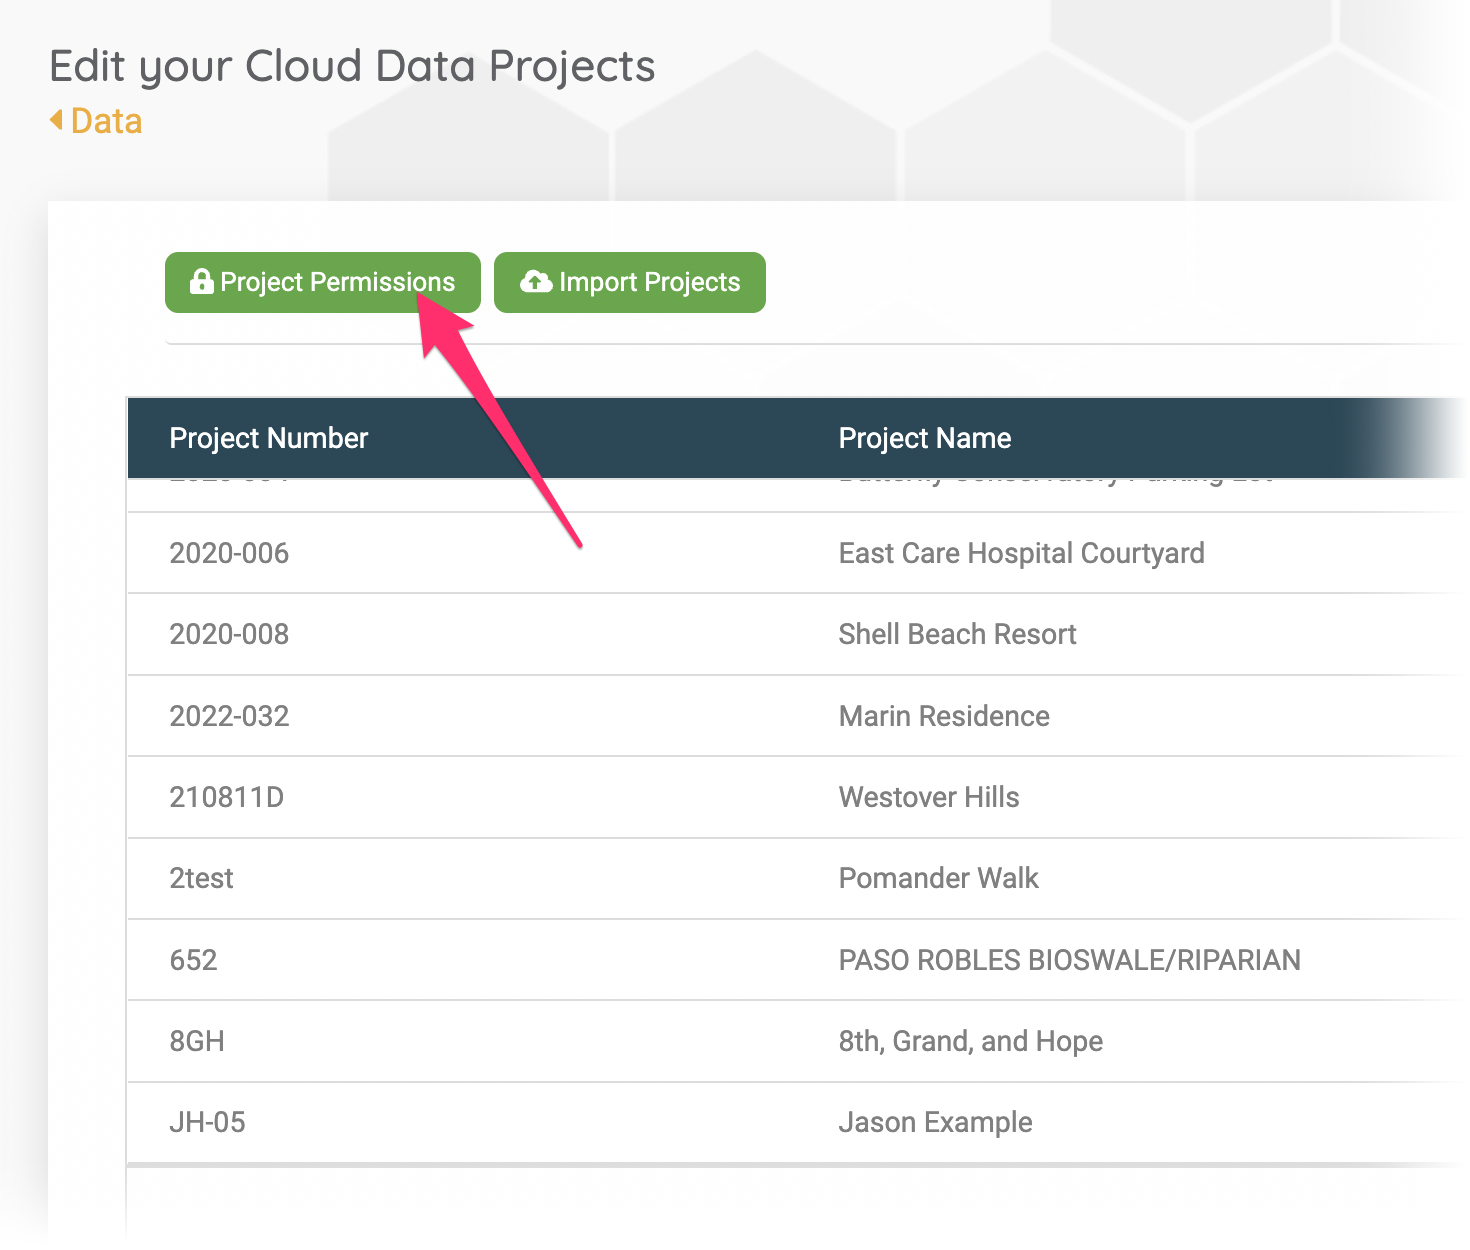
Then click Project Permissions.
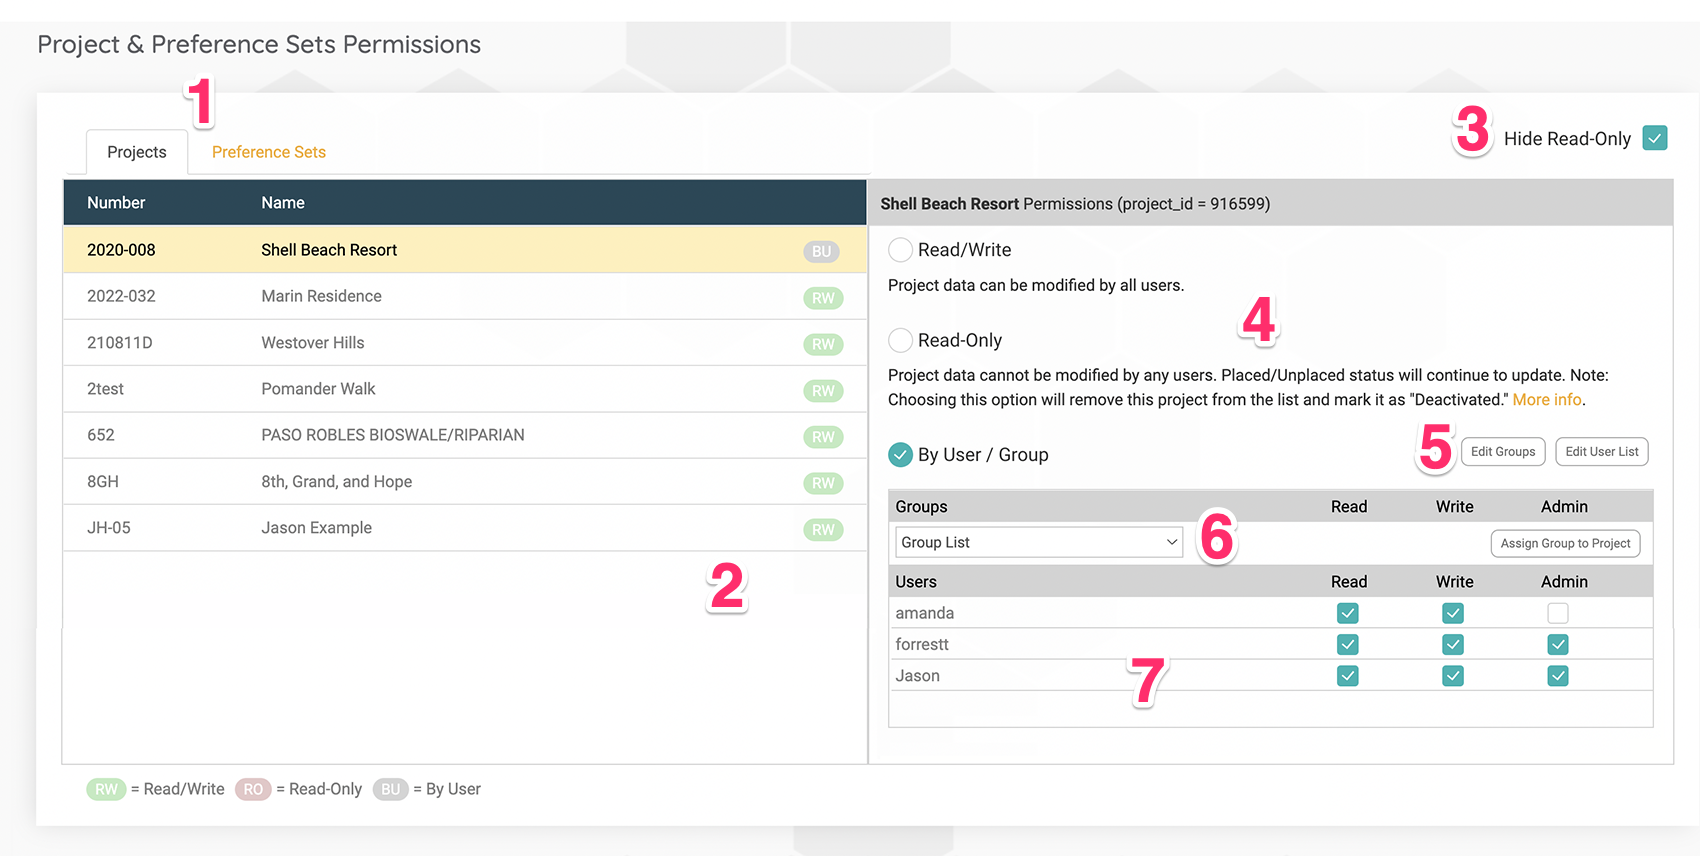
You'll now be on the Projects & Preference Sets Permissions page.
Quick video
1. Select the Projects tab to set permissions for your Land F/X projects. Select the Preference Sets tab to set permissions for your Preference Sets.
2. Your list of Land F/X projects or Preference Sets, depending on which tab you have selected.
3. Check this box to exclude projects or Preference Sets designated as Read-Only from the list.
4. Choose a permission designation for a selected project or Preference Set:
- Read/Write: Data in the selected project or Preference Set can be modified by all users.
- Read-Only: Data in the selected project or Preference Set cannot be modified by any users.
- By User / Group: Only users or groups of users selected from the lists below will be able to modify the selected project or Preference Set.
5. Buttons to Edit Group and Edit User List
6. Assign user groups to projects and Preference Sets. You can then give all users in that group specific permissions for those projects and Preference Sets.
7. List of Land F/X users in your office. While the By User / Group option is selected above, you can assign each user with specific permissions for the selected project or Preference Set by checking or unchecking the Read, Write, and Admin boxes to the right of the user's name.
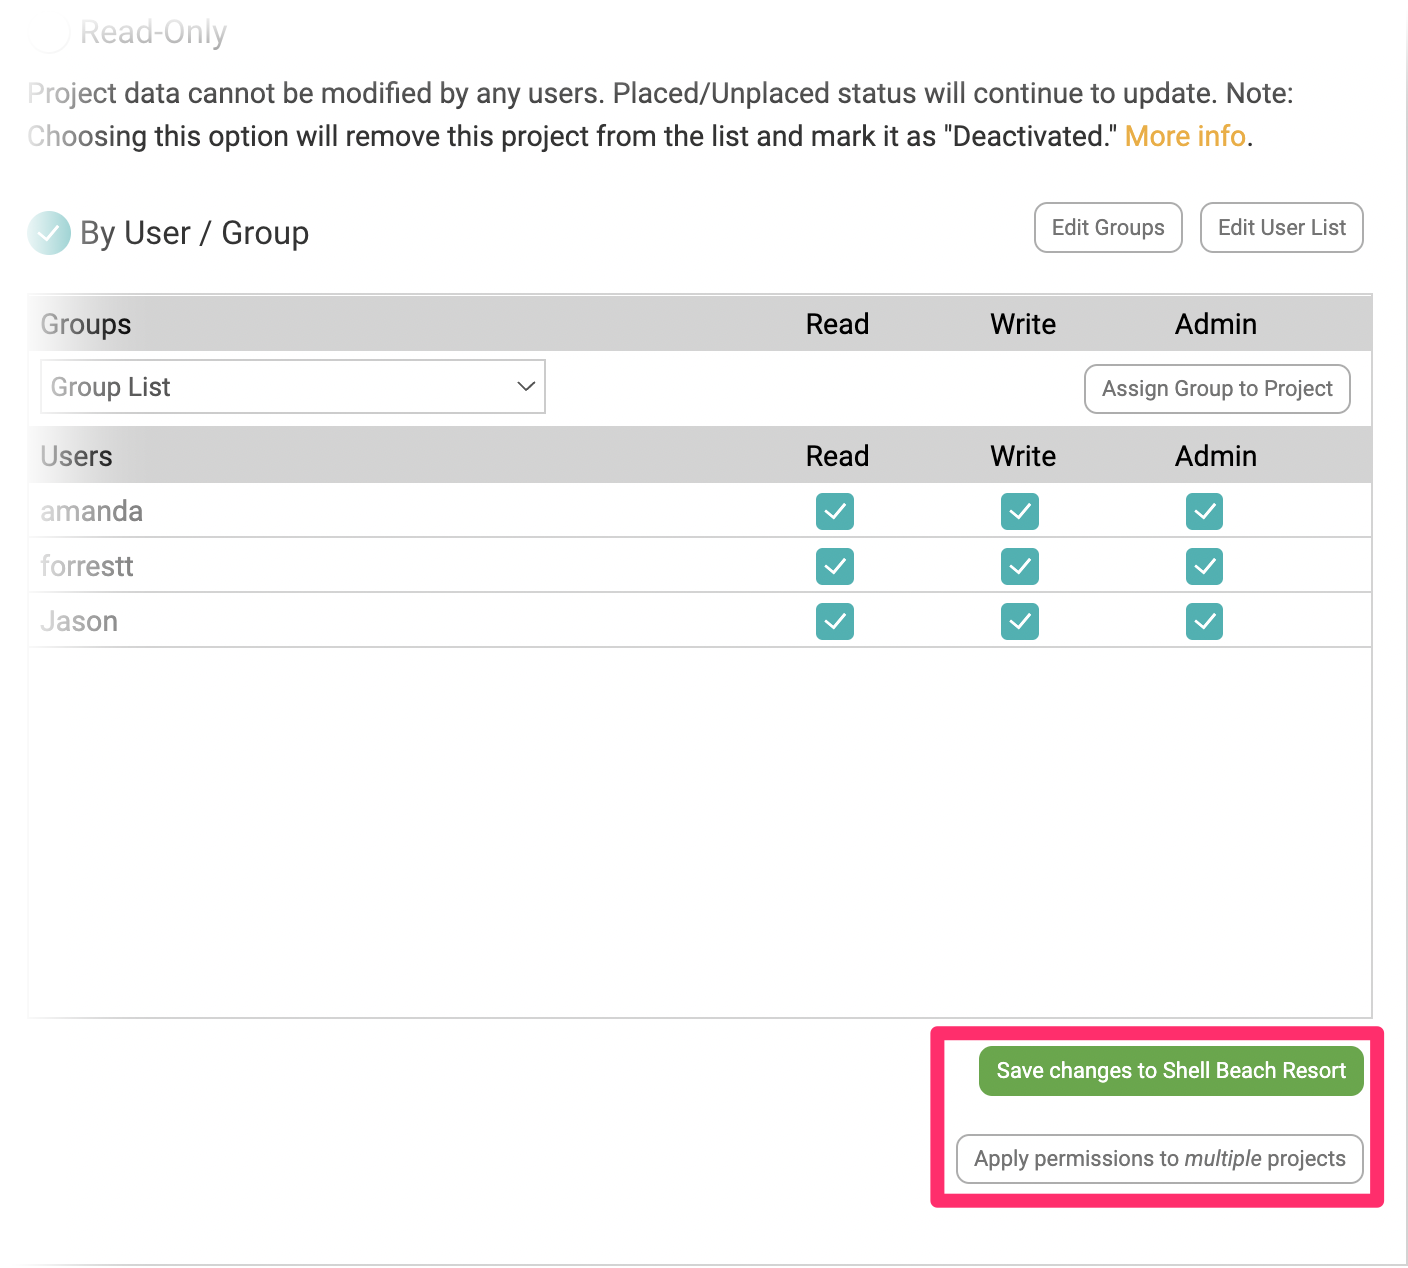
After you've made changes to the selected project or Preference Set, the following buttons will appear below the list of users and groups:
- Save changes to (project name): Click this button to save the edits you've just made.
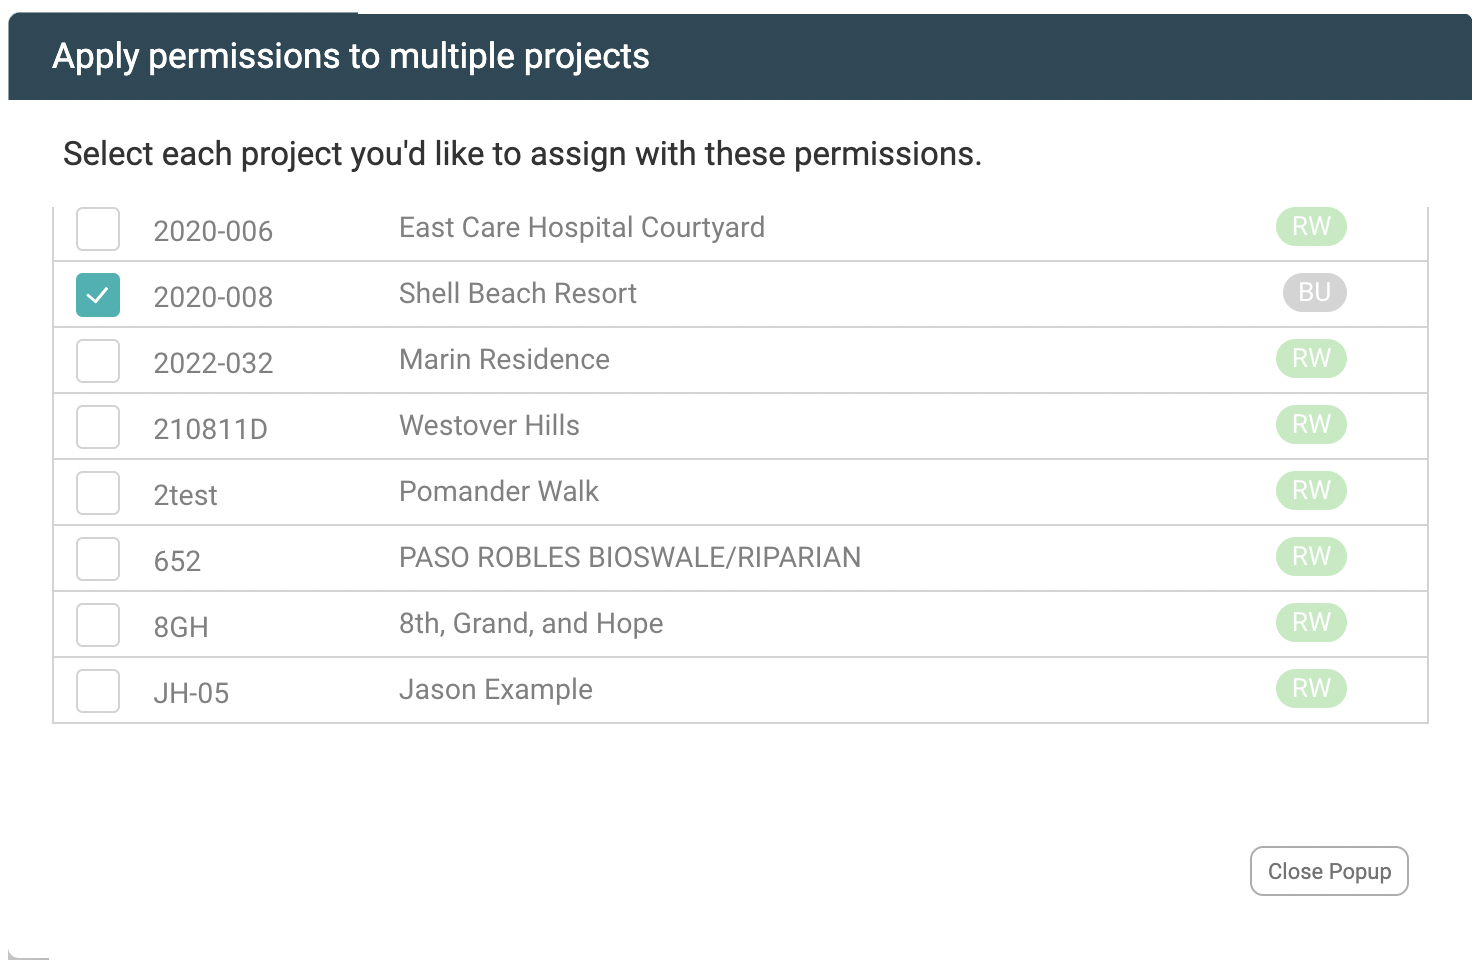
- Apply permissions to multiple projects: After setting the permissions for a project or Preference Set, click this button to open the menu pictured below, where you can assign tose same permissions to several other projects or Preference Sets.
You'll see the menu pictured to the right after clicking Apply permissions to multiple projects button.
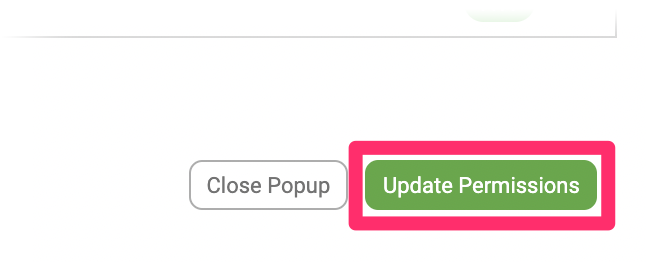
Check the box next to each additional project or Preference Set you'd like to have the same permissions you've just set. After making your selections, you'll see an Update Permissions button in the bottom right corner of the popup. Click this button to apply the permissions to each project or Preference Set you've selected.
Edit & Assign Groups
A group is a collection of Land F/X users in your office you can configure and then assign to specific projects and Preference Sets with your chosen permissions. For example, you can create a group named Admin, add users to that group, and then give that group Read/Write permissions for any number of projects or Preference Sets, which will prevent the need to assign permissions for each individual user separately.
.
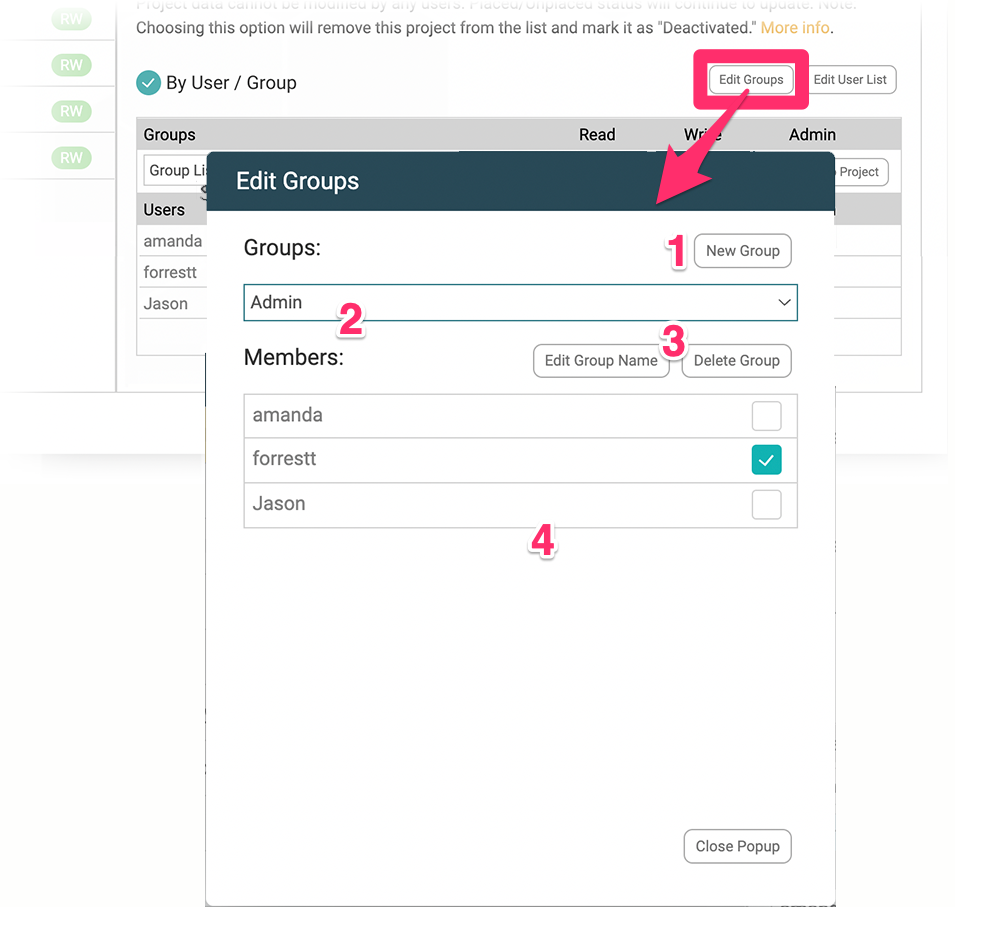
Click Edit Groups to open the Edit Groups popup, where you can make changes to your office's list of user groups.
1. Add a New Group of users.
2. Open this menu to see your list of user groups. Select a group from the menu to make changes to that group.
3. Buttons to edit the name of a selected group and delete the group.
4. List of Land F/X users in your office who are assigned to the selected group. In this example, the Admin group includes the users listed here.
When you create, edit, and delete groups, those changes will be reflected in the Group List menu.
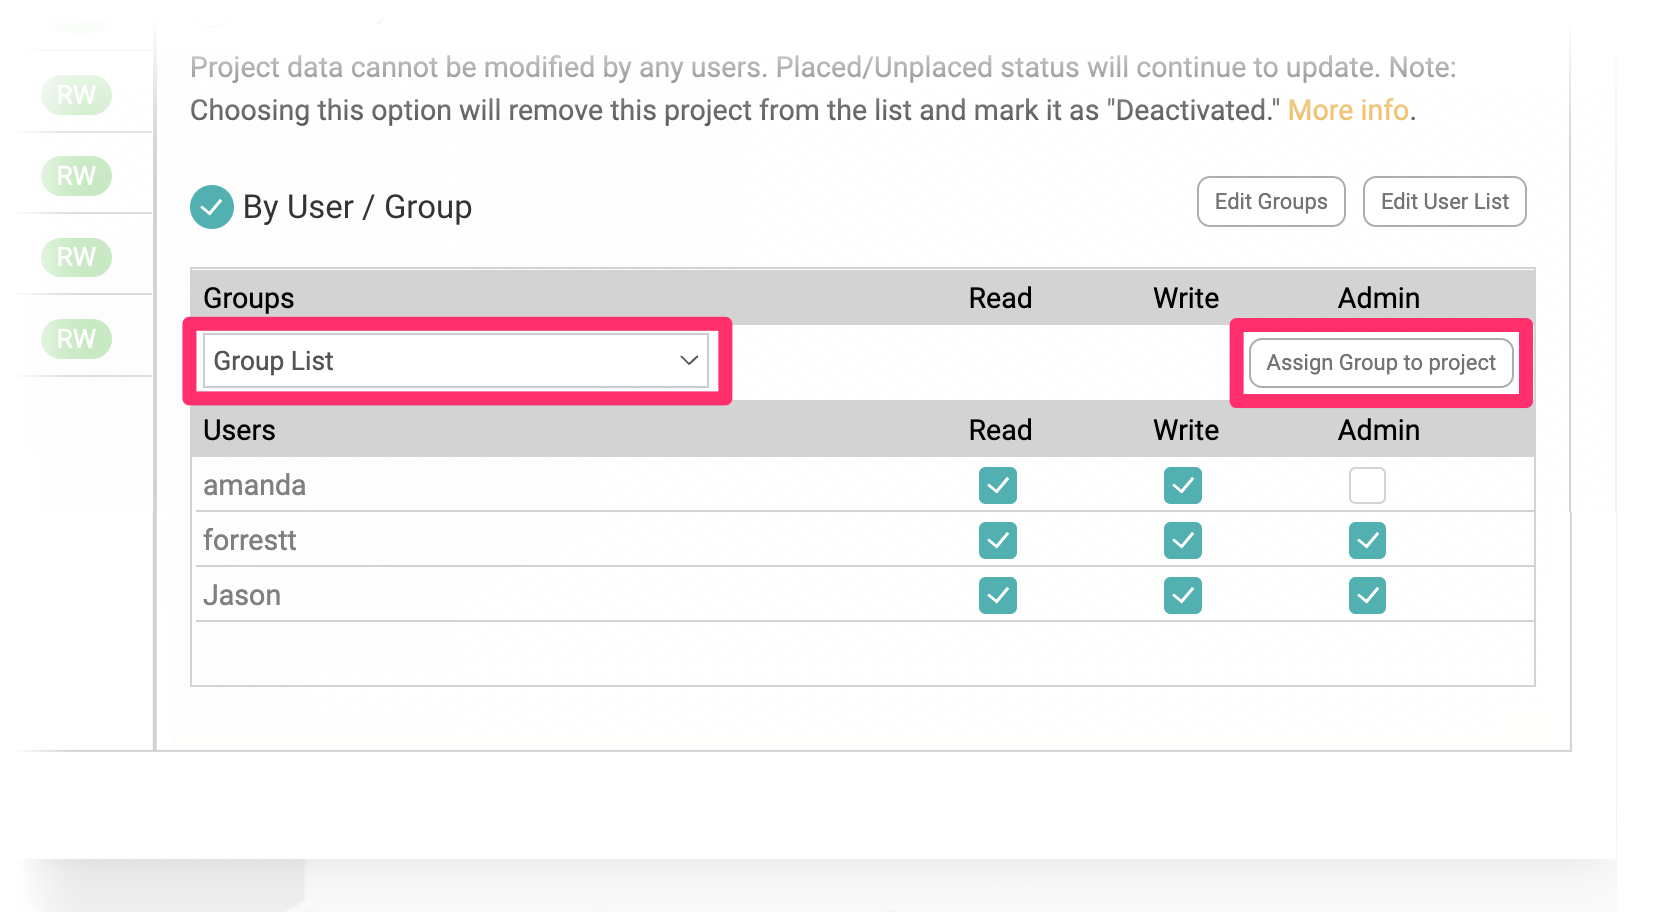
To assign a group to a project or Preference Set, select that project or Preference Set from the list to the left, then select the group and click Assign Group to Project.
You can then use the Read, Write, and Admin checkboxes below to configure each group's permissions for that project or Preference Set.
Edit Your User List
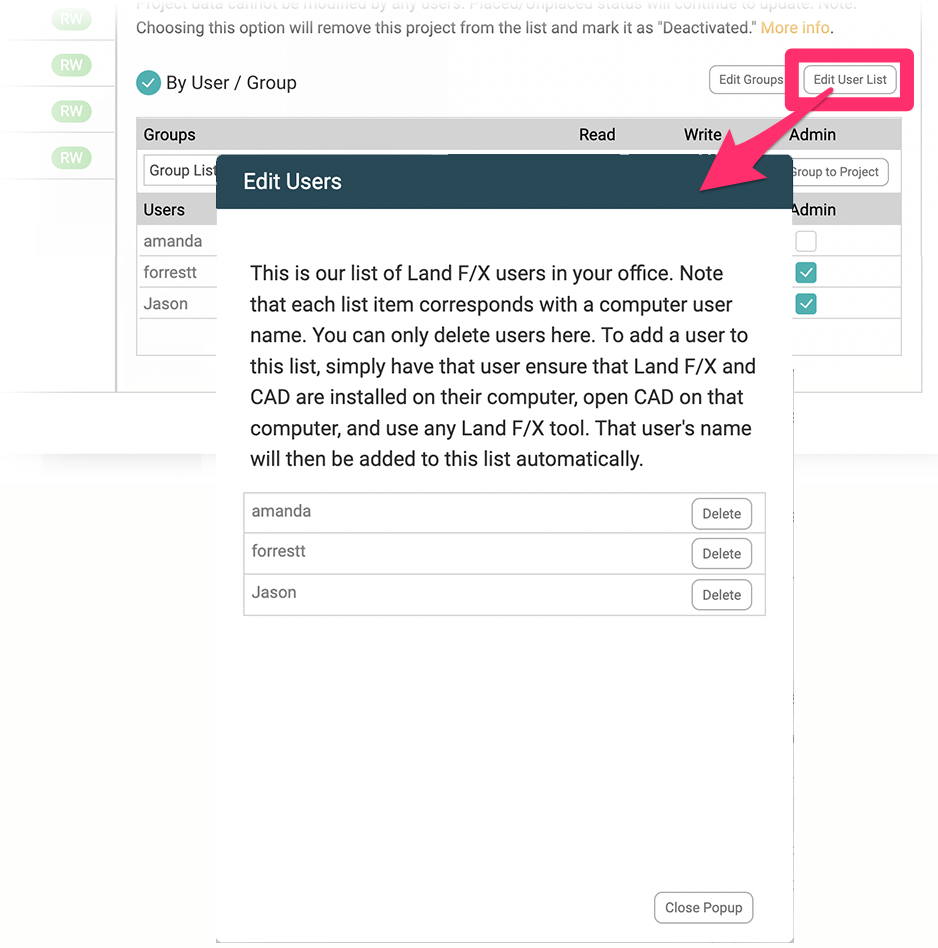
Click Edit User List to open the Edit Users popup, where you can delete users from your firm or organization's list of Land F/X users – for example, an employee who is no longer with the company.
To delete a user from the list, click the Delete button next to that user's name.
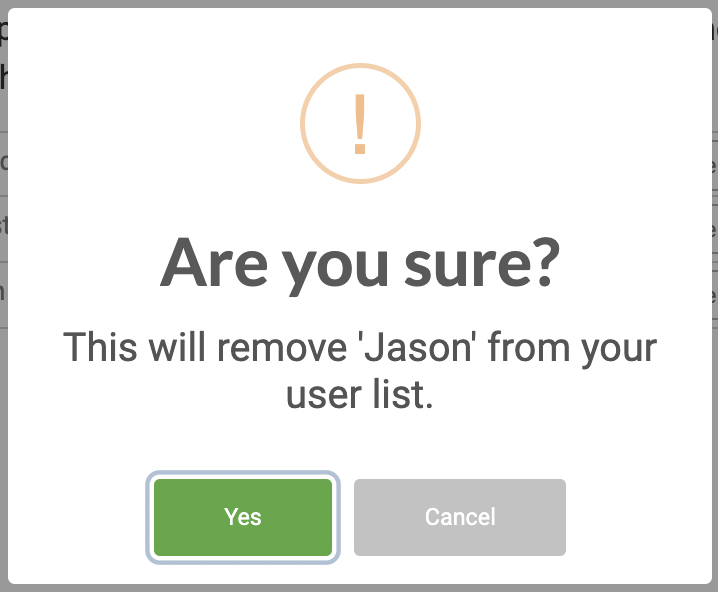
You'll be asked whether you're sure you want to delete that user. Click Yes to delete the user, or Cancel to keep the user in your list.
Note that you can only delete users here. To add a user to your list, have that user verify that CAD and Land F/X are installed on their computer and then simply open CAD and use any Land F/X tool. That user will be added to your list automatically.
Installing Land F/X Software, Including Plugins and F/X CAD
We've built our installers for the Land F/X plugins (Design F/X, Planting, F/X, and Irrigation F/X) as well as F/X CAD into the Portal as well. For instructions, see our article on installing Land F/X from the Portal.
Managing Your Land F/X Licenses
We've built our License Manager right into the Portal, and you can manage your licenses just as you would in CAD. Just remember to click the Save License Changes button after making any changes to your licenses in the Portal. See our documentation on managing your licenses in the Portal.
Portal FAQs for Land F/X Users
Q. Can I use the account I made for the landfx.com community forum?
A: Yes. You'll just need to visit the Portal, log in with your existing account, and enter your company Support ID.
Q: How can I let a new user into my Portal?
A: Have your new user visit landfx.com/portal and register for a new account using your company's Land F/X Support ID. How to register for an account
Note: If the user is not using a company email address, you'll need to visit the Users section of the Portal and change his or her role from No access to User or Admin.
Q: How do I find an old ticket in my Portal?
A: Under the Support tab of the Portal, click the Ticket History link at the bottom of the Recent Tickets section. You can find your ticket in the ticket history that opens.
Manufacturers & the Portal
Viewing Custom Product Reports
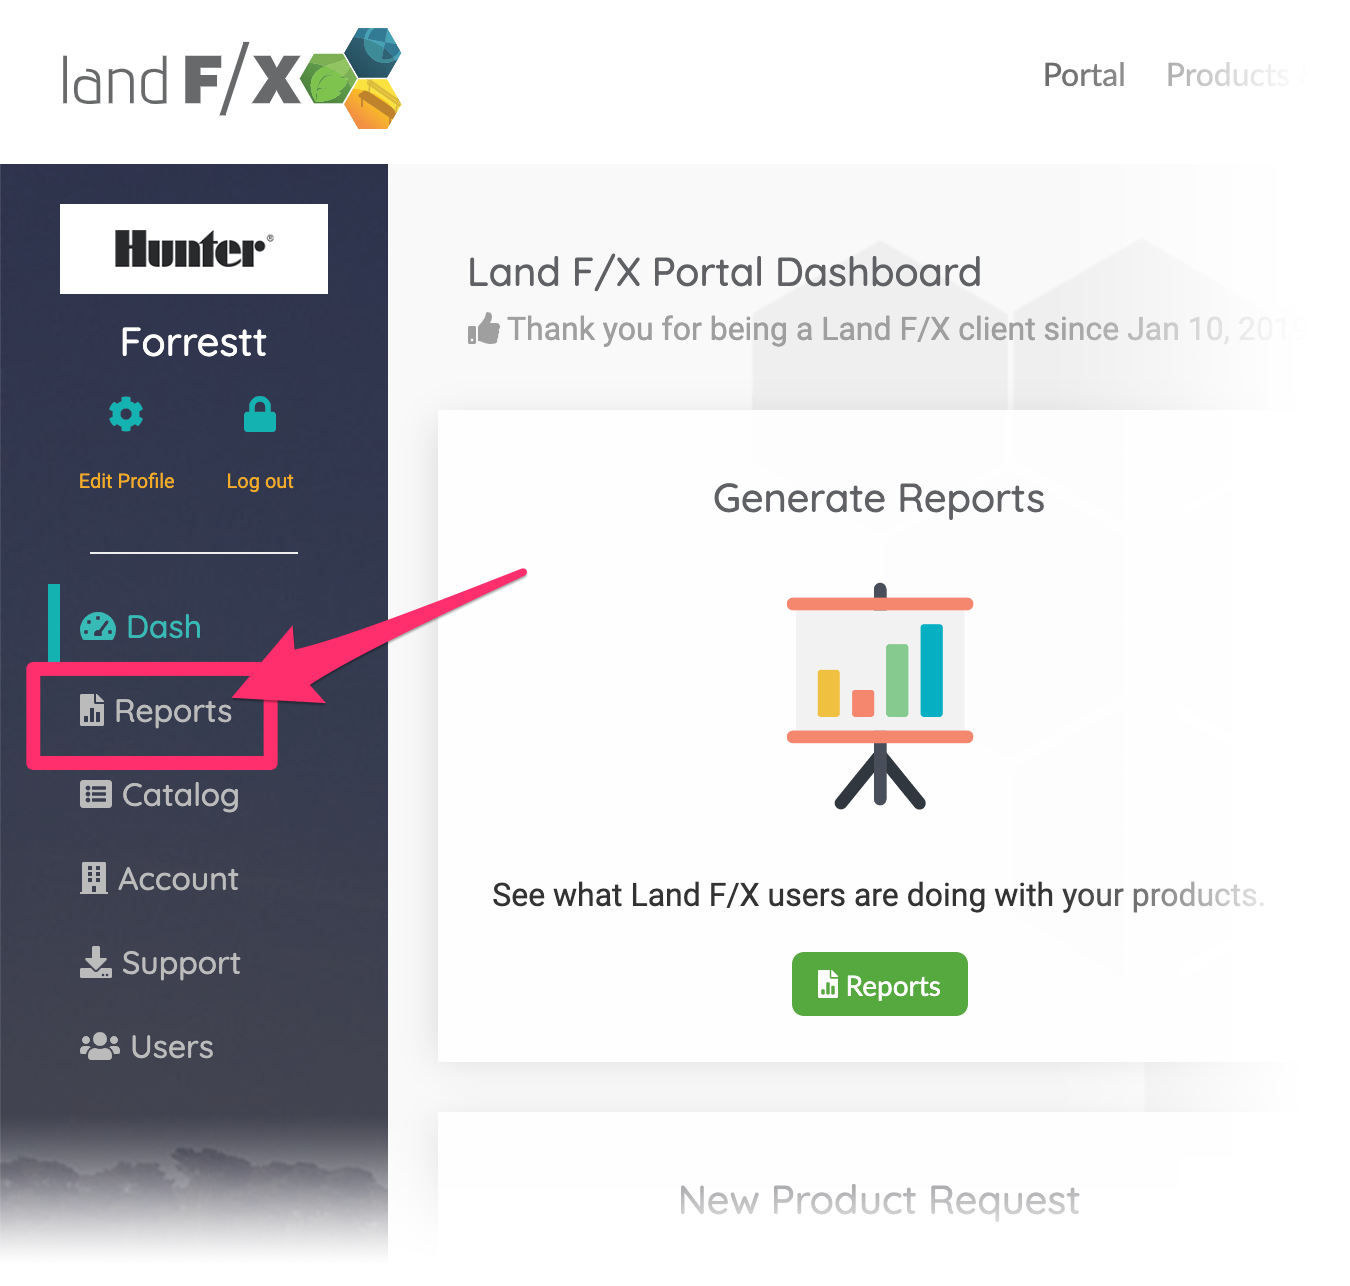
After logging in to the Portal, you’ll see your Manufacturer Dashboard.
Select the Reports tab.
The Manufacturer Reports screen will open. Here, you can access all reports we’ve sent you in the past.
If you’ve signed up to receive custom reports, click Access Custom Reports to see them.
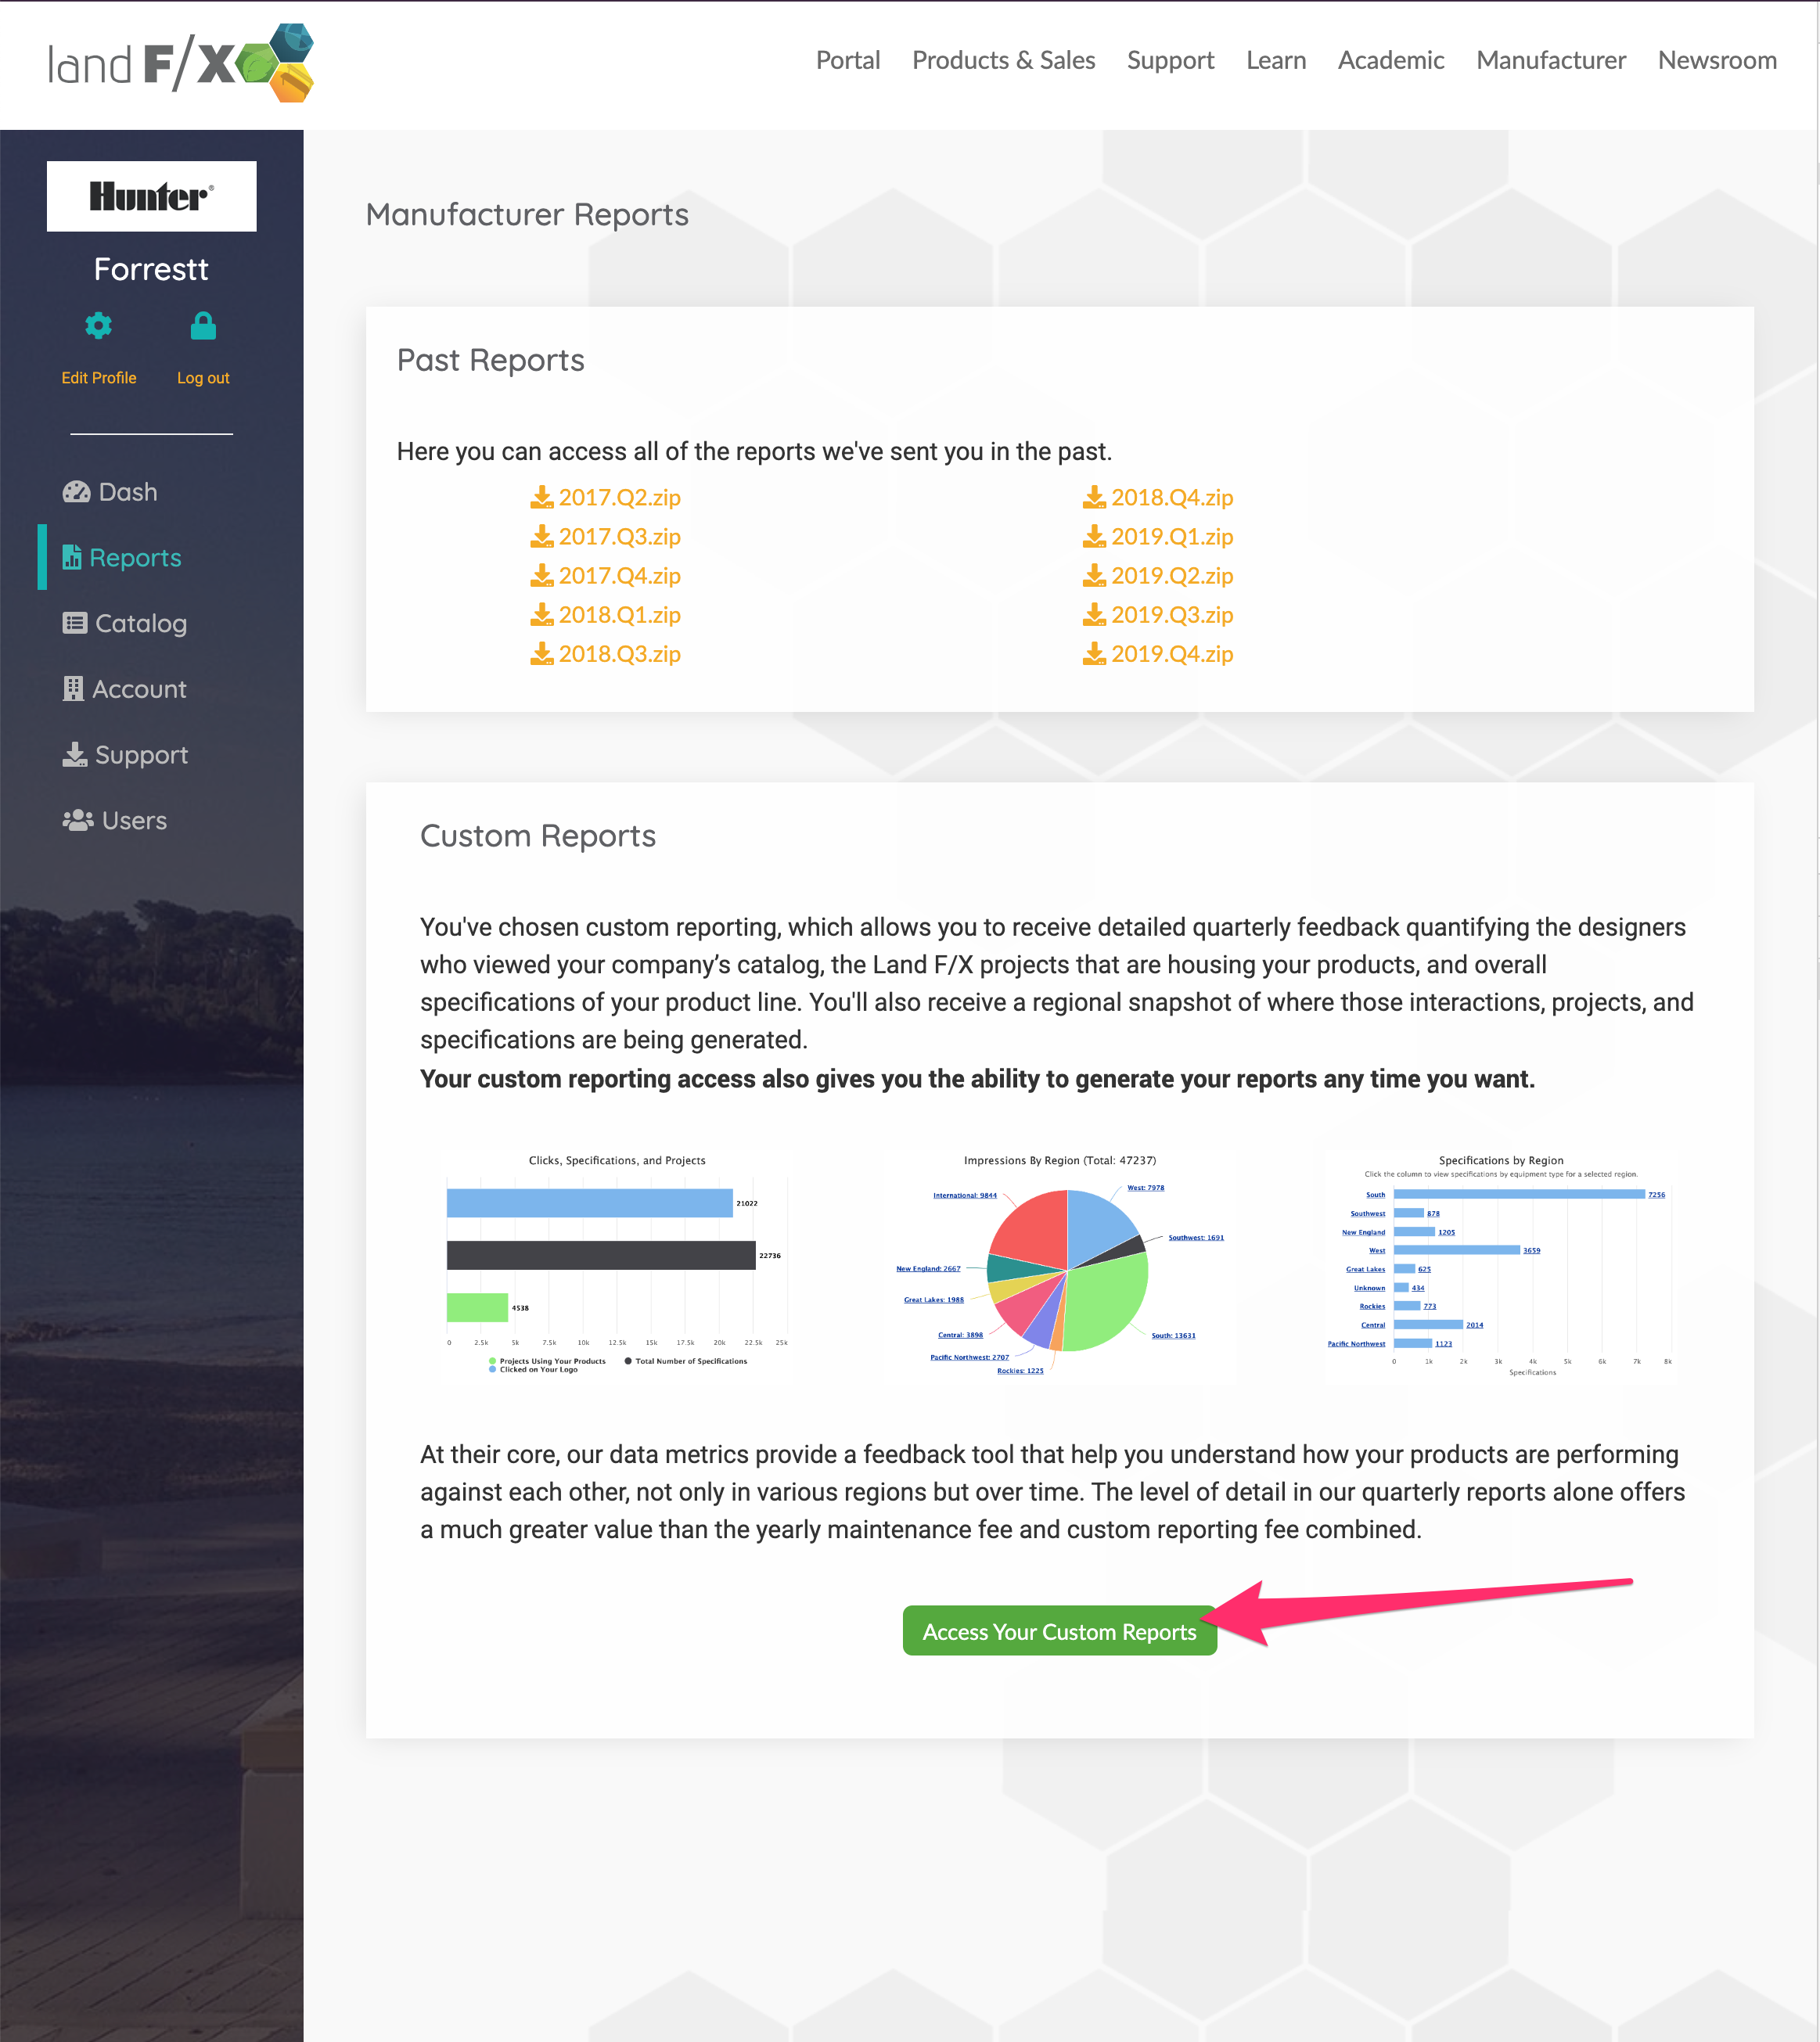
In the Custom Reports screen, you can view reports at any time, for whichever dates you choose. Here's an example:
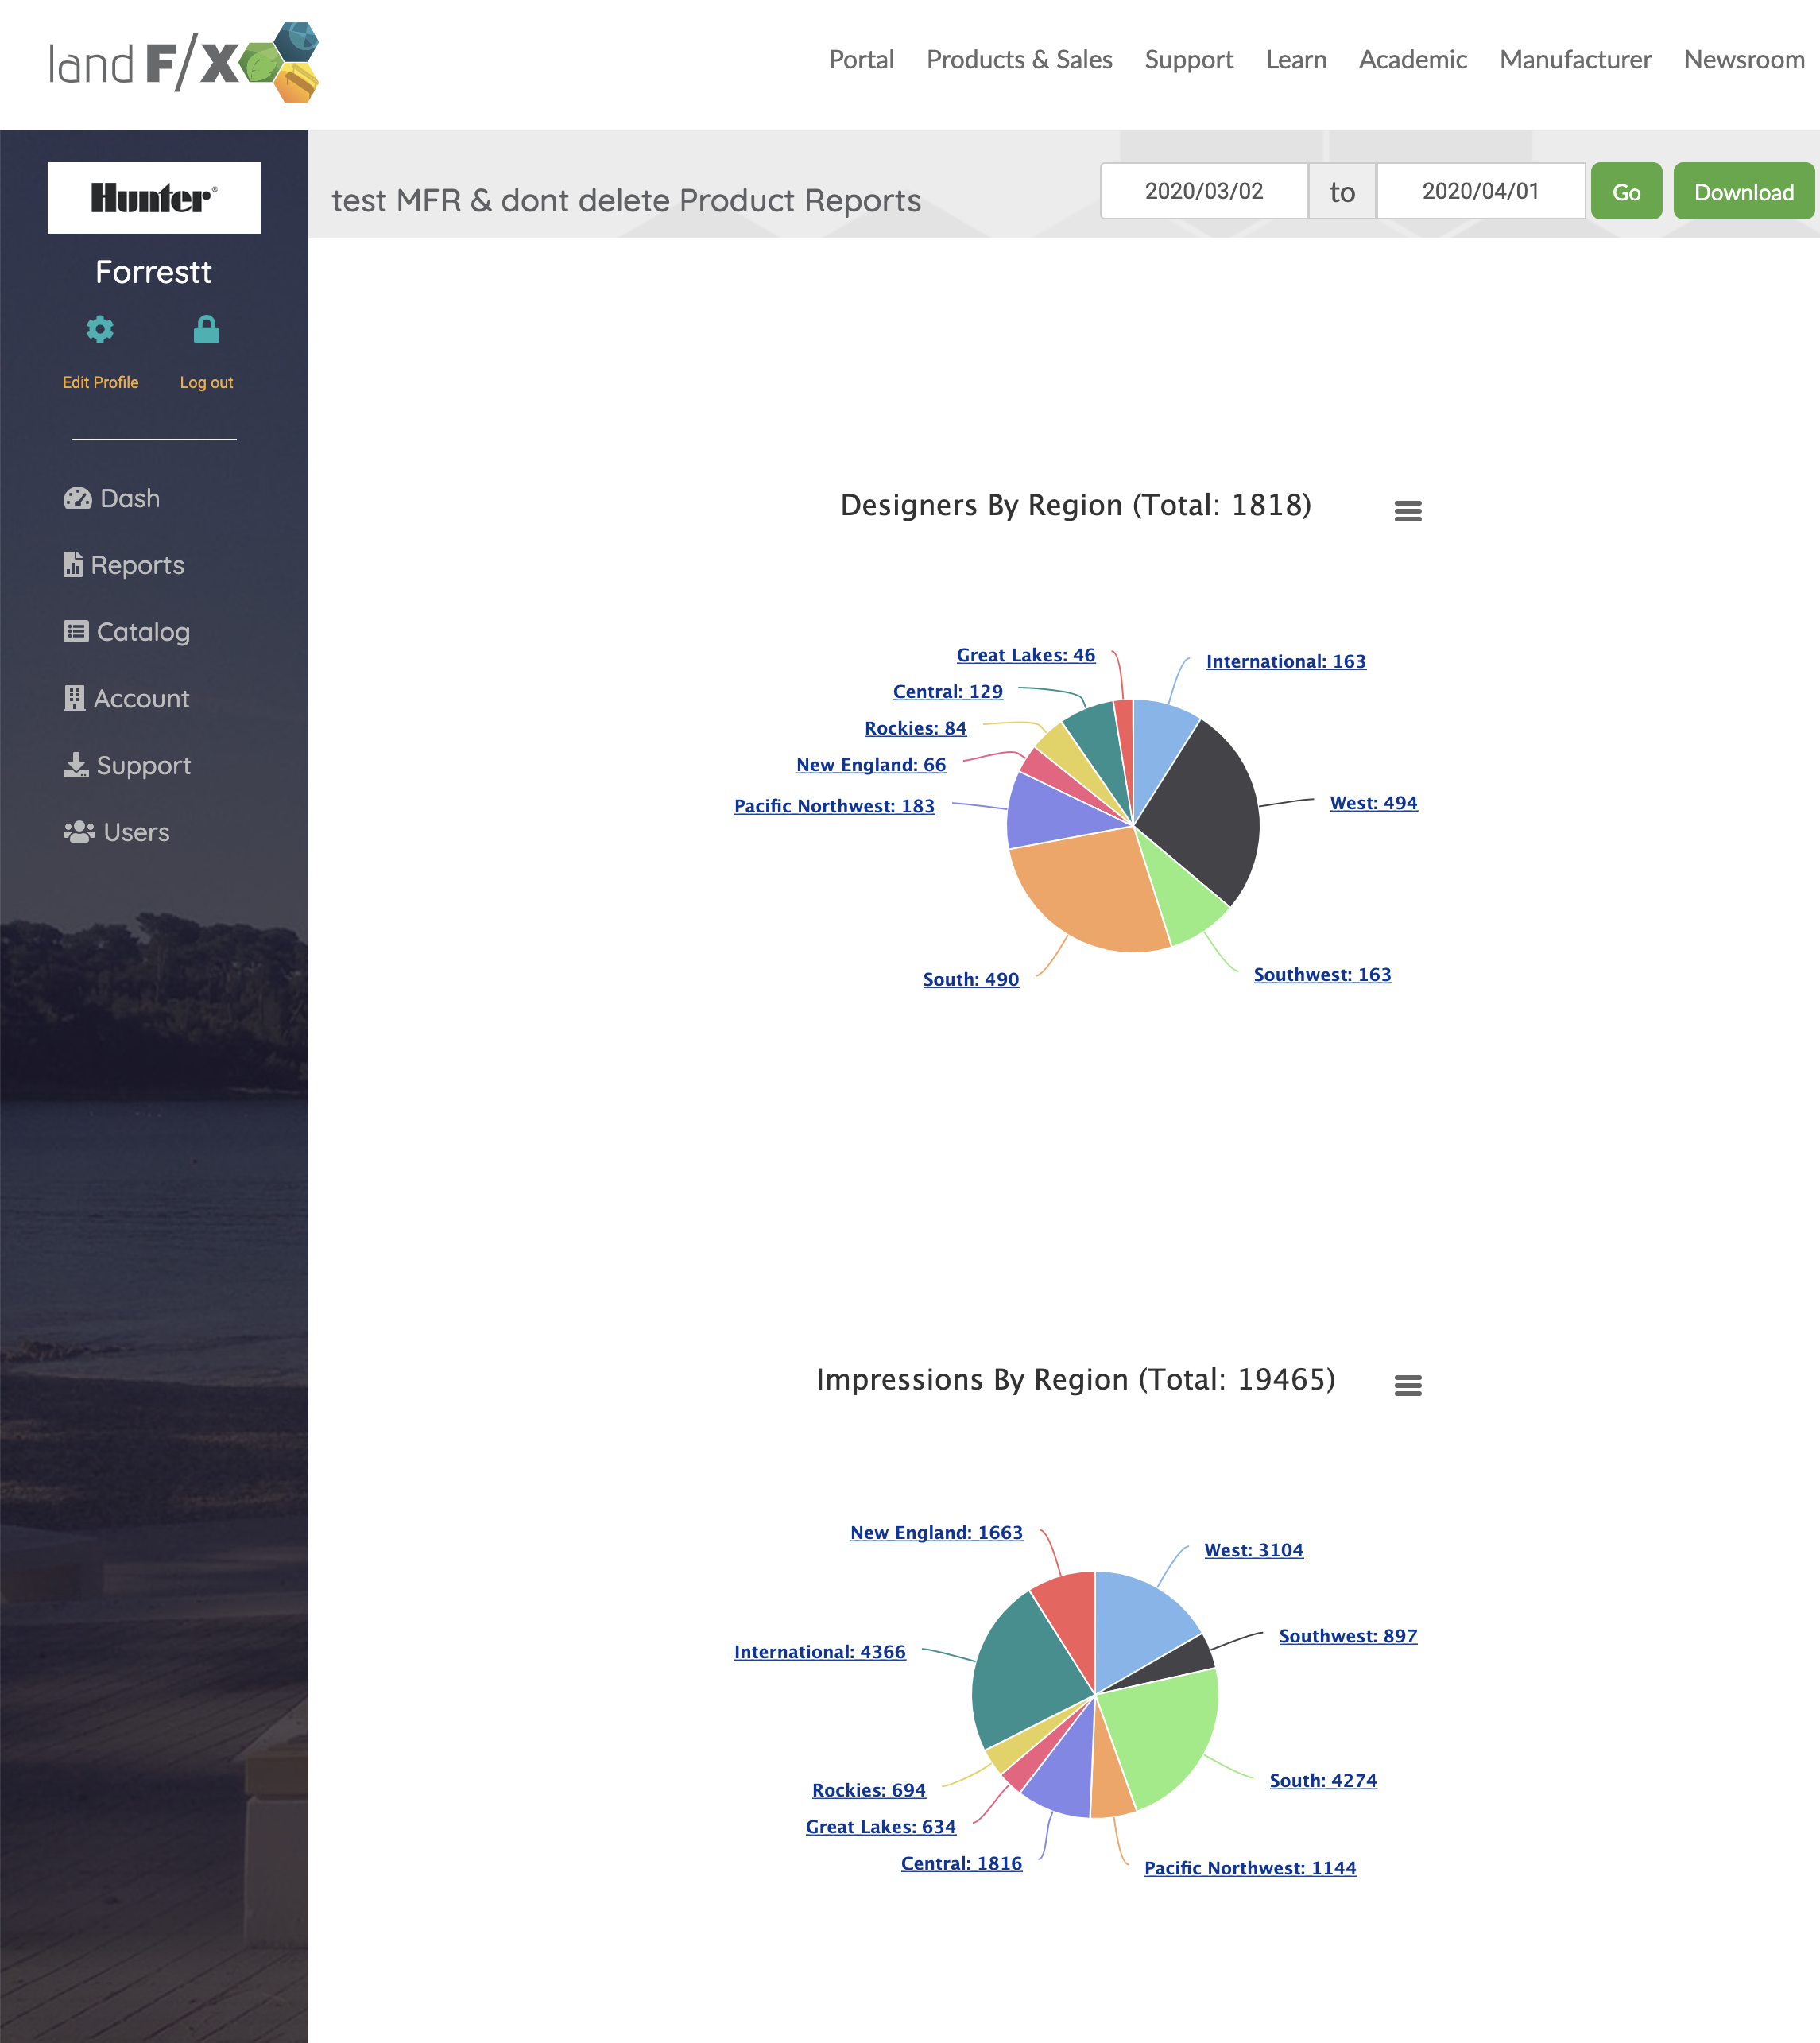
This valuable feature allows you to analyze your product data and Land F/X usage at a moment's notice, comparing your product specifications with each other, as well as with themselves during different time periods. It's well worth the cost!
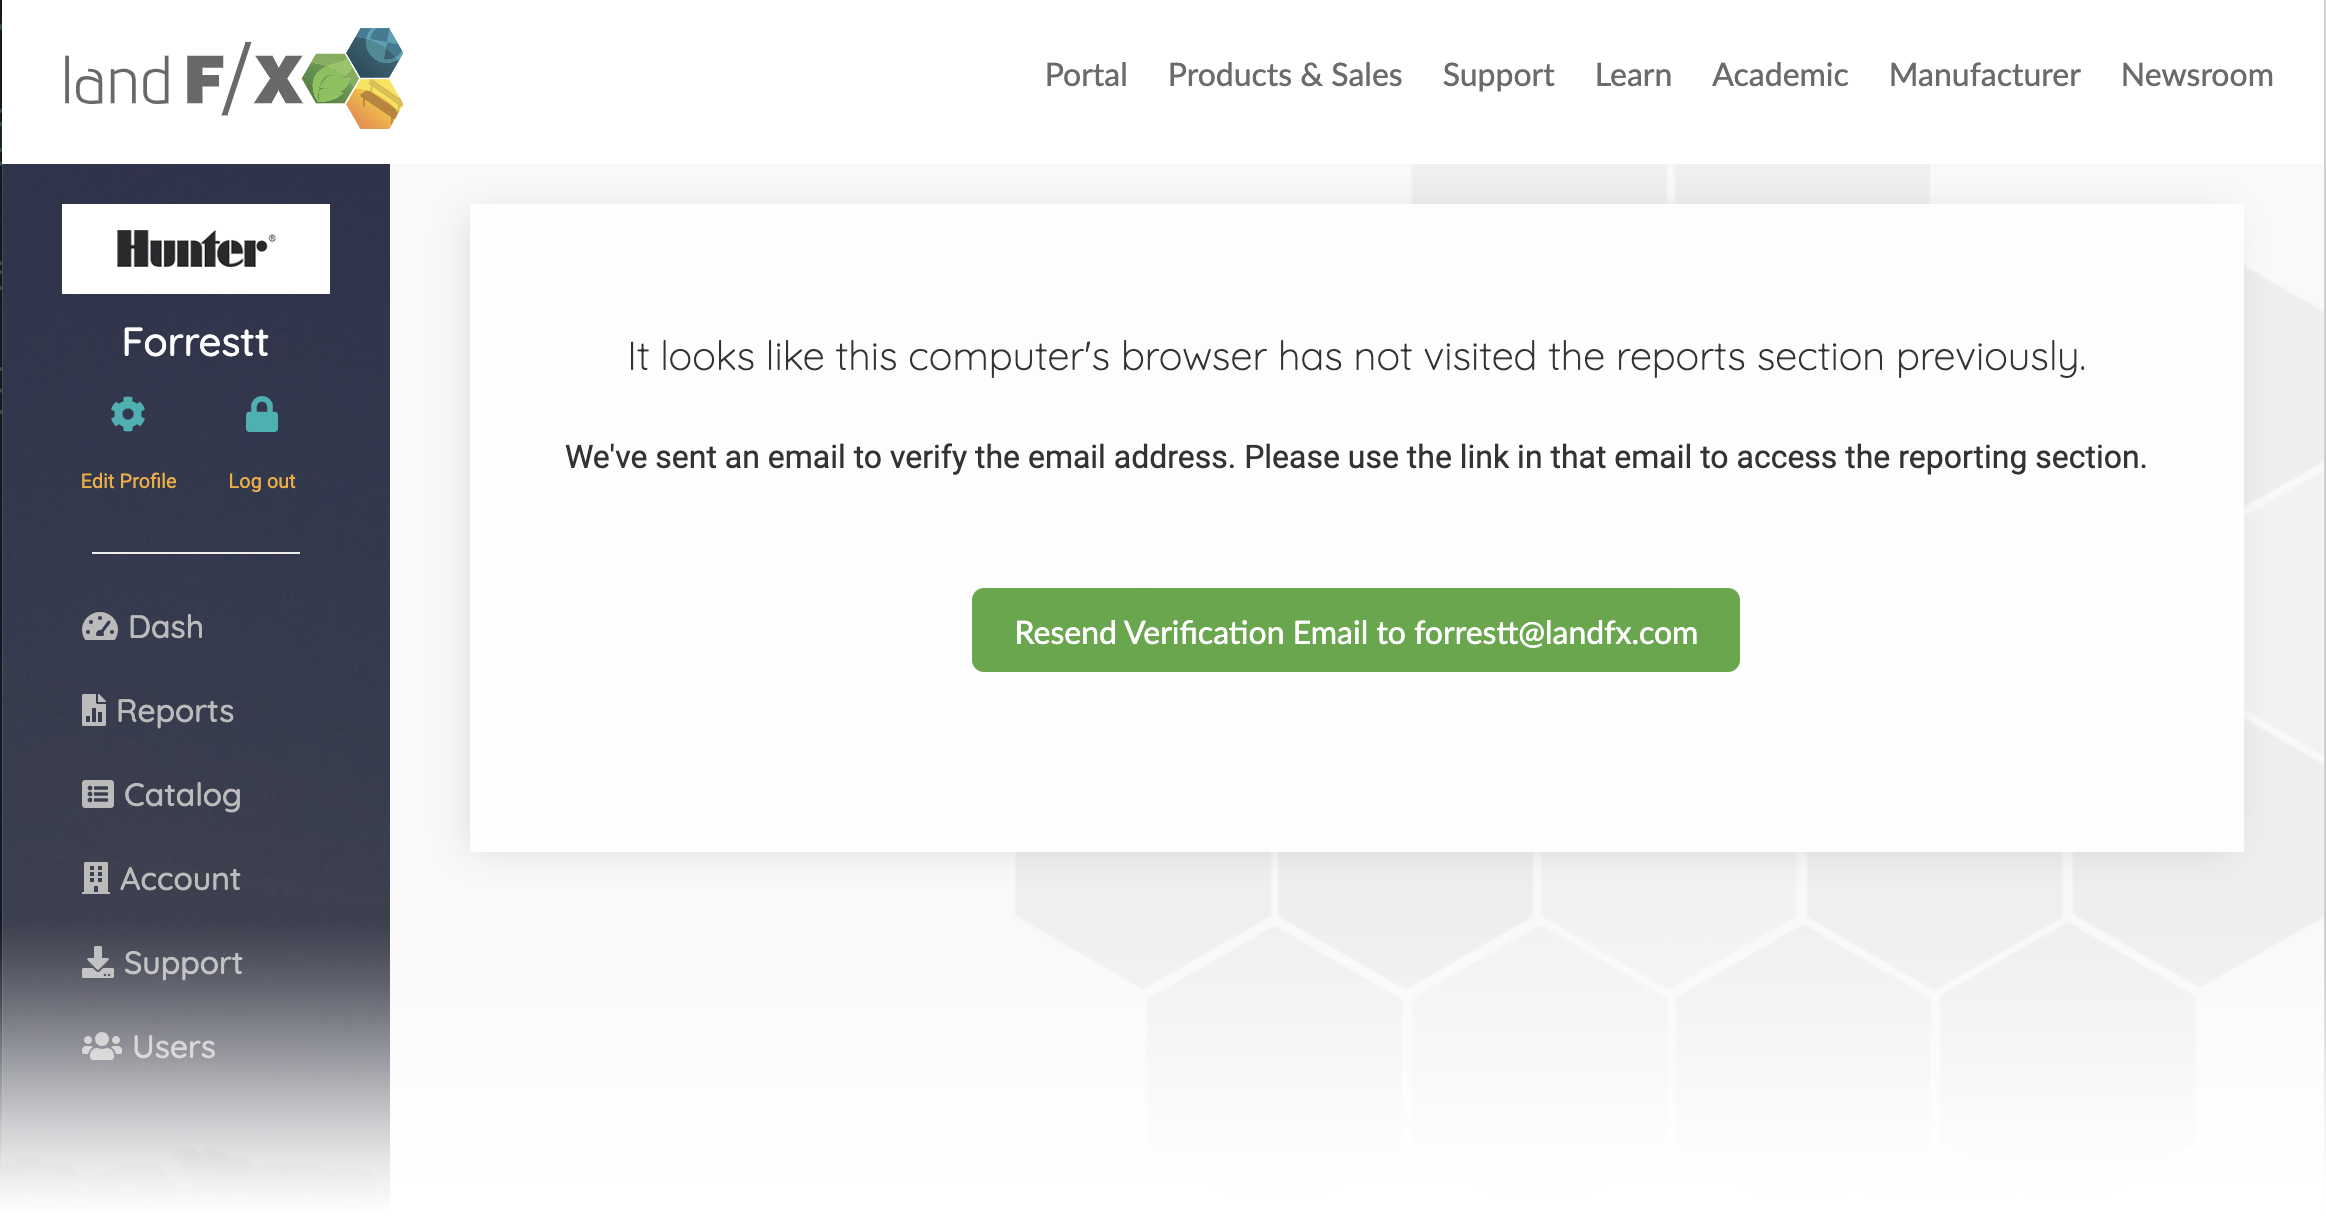
If this is your first time visiting the custom reports section, we will verify your email address again for extra security purposes.
Portal FAQs for Manufacturers
Q: How can I report an incorrect product listing?
A: When viewing your catalog in the Land F/X Portal, you'll find the following link for every product you see: Report this listing. Clicking this link will let you open a new ticket pre-populated with that product's information. Fill out the correct info, then click Submit.
Q: How can I add a new product?
A: On your Portal's dashboard, you'll find a link to the New Product Request Form. Fill out this form to add your product.
Q: How can I let another user access my custom reports?
A: Have your new user visit landfx/com/portal and register for a new account using your company's Land F/X Support ID.
Note: If the user is not using a company email address, you'll need to visit the Users section of the Portal and change his or her role from No access to User or Admin.
Related Webinars
- Deep Dive into the Land F/X Portal: The Land F/X Portal provides a powerful central location where you can access your Land F/X licenses, use our technical support system, manage your payments, and much more. Take a look around. (48 min)
- Portal Tour: Take a walk through the Land F/X Portal. You'll learn how to create new tickets, review old tickets, review your licenses, pay for renewals, manage your cloud data, and much more. (44 min)


