Plotting a Colorized Drawing
Quick video
- Important: Do Not Use the AutoCAD DWG-toPDF.pc3 Driver for Colorized Plans
- Step 1: Open the Page Setup Dialog Box
- Step 2: Select a Plotter or Printer
- Step 3: The Lines Overwrite Setting
- Step 4: Plot Transparency
- PC3 and CTB files
- PDF Viewer Software Freezing? Try This
- Related Webinars
- Troubleshooting
You have a few printing options that will bring the best results for your colorized plan. Two important options are the Lines Overwrite setting and Plot Transparency.
To learn how to colorize plant symbols and groundcover areas using the Color Render tool, see our Color Render documentation page.
Important: Do Not Use the AutoCAD DWG-to-PDF.pc3 Driver for Colorized Plans
The DWG-to-PDF driver that's built into AutoCAD is not a good option for plotting colorized drawings to PDF. Instead, we've compiled a list of recommendations for third-party PDF printers that are much better options for high-quality color PDFs.
Step 1: Open the Page Setup Dialog Box
You can configure a physical plotter or a PDF plotter for colorized plans from the Page Setup dialog box, available from the Page Setup Manager.
From any AutoCAD drawing, open the Page Setup Manager:

Output ribbon, Page Setup Manager button
or type PAGESETUP in the Command line
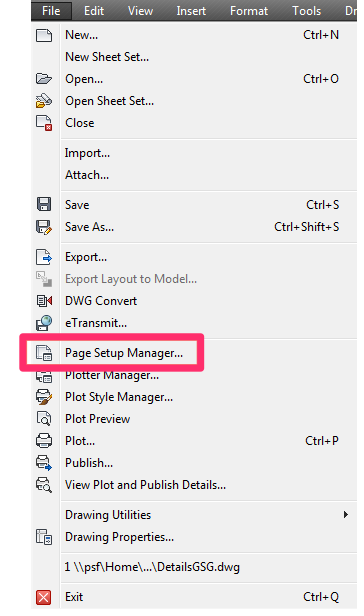
File pull-down menu, Page Setup Manager option
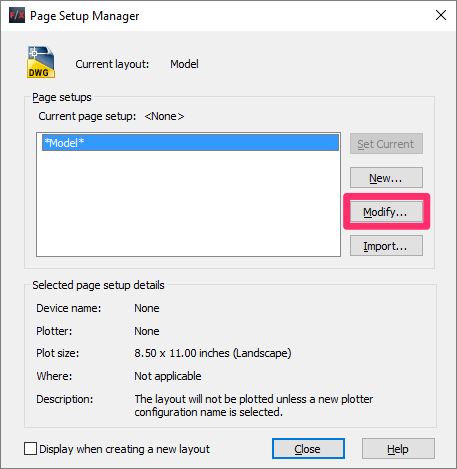
In the Page Setup Manager, click Modify to open the Page Setup dialog box.
Step 2: Select a Plotter or Printer
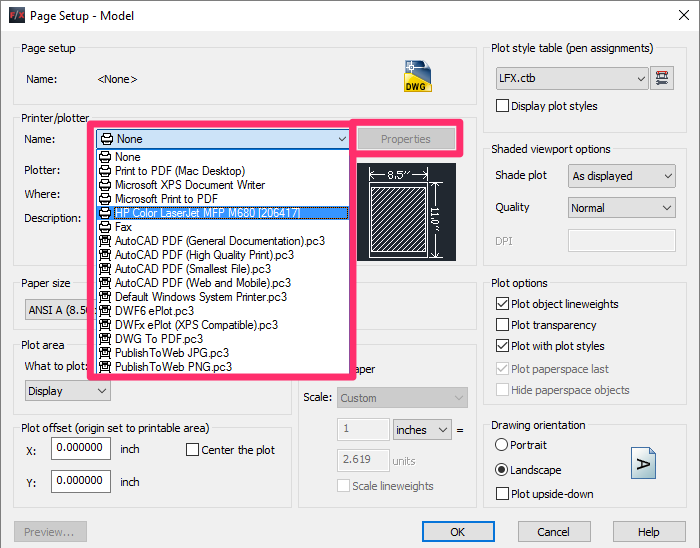
In the Name pull-down menu under Printer/plotter, highlight the name of the plotter you want to set up.
In this example, we'll set up the printer HP LaserJet MFP M680.
Click the Properties button next to the plotter name, as pictured to the left.
The Plotter Configuration Editor dialog box will open (see below).
Step 3: The Lines Overwrite Setting
Although Lines Overwrite is the AutoCAD default, we recommend setting the printer properties to Lines Merge when plotting our regular plant symbols in a toned or shadowed plan.
In the Plotter Configuration Editor dialog box, select the Device and Document Settings tab.
If you see a plus (+) sign next to the Graphics entry in the menu, click it to expand the Graphics options.
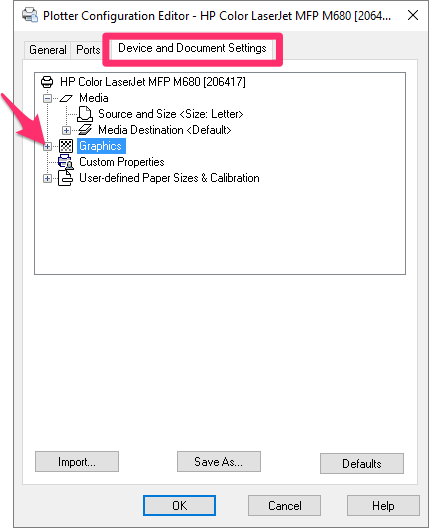
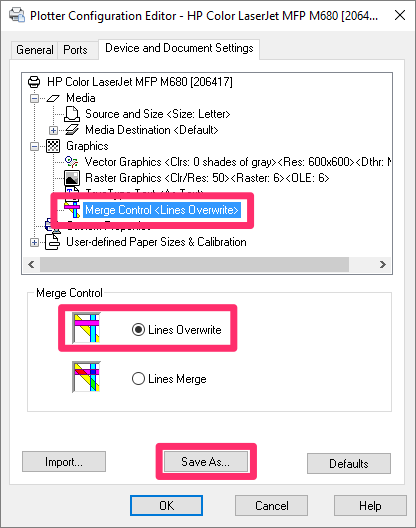
Select the option for Merge Control under Graphics.
A pane titled Merge Control will display in the bottom portion of the dialog box. Select the Lines Overwrite option.
Click Save As to save this setting as a PC3 file.
A PC3 file is a plotter configuration file that is automatically saved to where your AutoCAD sees plotter styles. When you save the PC3 file, give it a name that will help you remember the file is set to Lines Overwrite.
The file name will automatically end with pc3. For plots requiring this configuration, select this PC3 file when you plot.
Step 4: Plot Transparency
Set up the other items you normally indicate when plotting, such as determining a sheet size and the plot style table, or CTB file. While you are plotting in color, you can use your normal CTB plot style table. None of the color fills in the symbols are made of the 255 AutoCAD Index Colors, but the outline, branching, trunk, etc., will be, and these will print as lines with the related thickness to the AutoCAD Index Color.
It's especially important to set up Plot Transparency for color rendered drawings.
Follow the steps above to access the Page Setup dialog box.
Select the Plot Transparency option.
Click OK when finished.

PC3 and CTB Plotting Files
A Plotter Configuration Version 3 (PCB) file contains settings for a particular plotter on your network. For more information, visit our Create PC3 Files documentation section.
Color-based (CTB) plotting is the most prevalent plotting method in the landscape architecture world, as well as the foundation of our software. For more information, visit our About CTB Plot Styles documentation section.
PDF Viewer Software Freezing? Try This
Sometimes the plot to PDF from CAD will be successful, but your PDF viewer software (such as Adobe Reader or Acrobat Pro) can freeze or become stuck while plotting to a printer – especially in drawings with a large number of gradients, transparencies, or solid hatches.
In this case, when printing from Adobe Reader or Acrobat Pro, click Advanced and select the option to Print As Image.

This option will allow the plot to go through without freezing the PDF viewer software.
Keep in mind that the plot may still be slow because of the sheer number pixels in images created from 24"x36" or A0 sheets (or larger).
Related Webinars
- All About Plotting: Plotting from AutoCAD is an imperative step in achieving the all-important final product. We'll cover all aspects of plotting, including best practices in choosing and using physical plotters, managing page setups and plotter configurations, and producing the best possible PDF plots of your designs. (52 min)
- Plotting in Style: CTB & STB Files Explained: We'll show you how to use proper plot-style setup to achieve your desired look in a plotted plan. We'll examine how plot styles work, highlight the differences between STB and CTB plot styles, and explain why we recommend CTB styles to minimize the confusion and maximize your time spent designing. (48 min)
Troubleshooting
Issue: Problems With Tree Transparency – You Cannot See Through or Below the Trees
Solution: In your Page Setup, you need to select the Plot Transparency option. See the Plot Transparency section above.
Issue: Unable to see hatches or colorized plants in a 3D model (AutoCAD or Civil 3D)


