AutoCAD Crashes or Stops Working Correctly (.NET 4.7 Issue)
Issue
AutoCAD is crashing or stops functioning correctly. This issue can occur during several AutoCAD functions, including (but by no means limited to):
- Running an update
- Installing or starting AutoCAD
- Attempting to access the Quick Access Toolbars
- Attempting to use a tool that opens a dialog box, palette, or ribbon
The symptoms can range from an all-out crash to issues with specific AutoCAD functions.
For example, you may be:
- Unable to undock some of your palettes or expand lists within dialog boxes (such as the list of layers in the Layer Properties panel)
- Missing some of the icons on your ribbons, or missing some ribbons altogether
- Random crashes
- Inability to launch or install at all
- Seeing a Fatal exit error message
- Unable to launch AutoCAD help docs from F/X CAD 2017
Cause
The Windows update likely installed .NET 4.7, which doesn't play well with AutoCAD. This is a widespread and ongoing issue affecting all Autodesk products.
For more information, see the official Autodesk article on the issue.
Solution
Follow these steps if you're running Windows 10 on your computer.
Step 1: Run the Windows update.
Run the Windows update. The update should install the latest .NET framework, pushing past version 4.7.
Step 2: Verify your version of .NET
You can verify your version of .NET using the ASoft .NET Version Detector, available on the page linked here.

You'll now have a zip file named netver.zip in the location where you normally download files (often your Downloads folder or your desktop).
Double-click that file to unzip it.
You'll now have a file named .net.exe in that same location.
Double-click that file.


The Version Detector will open.
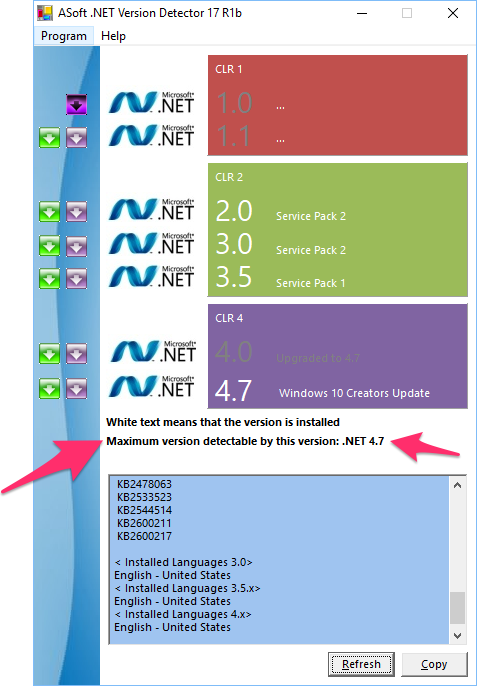
Your version of .NET will be listed to the right of Maximum version detectable by this version.
In this example, the computer has .NET 4.7.2 installed. As long as you have a version of .NET that is higher than 4.7 (such as 4.7.2), you should be able to use AutoCAD without it crashing or freezing.
Close
Follow these steps if you're running Windows 7, 8, or 8.1 on your computer.
Step 1: Verify your version of .NET
You can verify your version of .NET using the ASoft .NET Version Detector, available on the page linked here.
Already know your version of .NET? Scroll down to Step 2: Resolve the .NET issue.

You'll now have a zip file named netver.zip in the location where you normally download files (often your Downloads folder or your desktop).
Double-click that file to unzip it.
You'll now have a file named .net.exe in that same location.
Double-click that file.


The Version Detector will open.
Your version of .NET will be listed to the right of Maximum version detectable by this version.
In this example, the computer has .NET 4.7 installed.
If you don't have Version 4.7 installed, the steps below will not apply to you.
Step 2: Resolve the .NET issue
Once you know your version of .NET, you can proceed to resolving the issue.
Complete the following steps in the order listed. If a step doesn't resolve the issue or isn't an option, move on to the next step.
Windows 7 users:
Remove .Net 4.7:
1. Close any software applications you have running. If necessary, use the Windows Task Manager to shut down any programs that refuse to close.
2. Open your Control Panel, and select either Add or Remove Programs or Programs and Features.
3. Scroll down to and click the Microsoft .NET Framework 4.7 entry.
4. Click Uninstall.
5. Download and install .NET 4.6.2
Receiving any .NET errors or having problems reinstalling 4.6.2? If so, download, install, and run the .NET repair tool.
You can now move on to Step 3: Temporarily prevent Windows Updates from re-downloading and installing the update.
Windows 8 or 8.1 users:
Remove .Net 4.7:
1. Close any software applications you have running. If necessary, use the Windows Task Manager to shut down any programs that refuse to close.
2. Open your Control Panel, and select either Add or Remove Programs or Programs and Features.
3. Browse under the Installed Updates view, and look for update KB3186539 and remove that update.
4. Click Uninstall.
5. Download and install .NET 4.6.2
Receiving any .NET errors or having problems reinstalling 4.6.2? If so, download, install, and run the .NET repair tool.
You can now move on to Step 3: Temporarily prevent Windows Updates from re-downloading and installing the update.
Step 3: Temporarily prevent Windows Updates from re-downloading and installing the update
Finally, you'll need to configure the Windows Updates utility so it doesn't reinstall the .NET update.
1. Open the Start menu, and type REGEDIT in the search box. Select the RegEdit option from the menu.
2. Back up the HKEY_LOCAL_MACHINE in the Windows Registry.
3. Right-click the following subkey:
HKEY_LOCAL_MACHINE\Software\Microsoft\NET Framework Setup\NDP
4. Select New from the menu, then select Key.
5. Name the new key WU, which you just created. Then press Enter.
6. Right-click the new key WU. Select New, then select DWORD Value.
7. Type BlockNetFramework47, then press Enter.
8. Right-click BlockNetFramework47, and click Modify.
9. Type 1 in the Value data box, then click OK.
10. Open the File menu, and select Exit.
For more information, see the Windows article How to temporarily block installation of the .NET Framework 4.7.
Close


