Dimensioning in Architectural Inches in a Decimal Feet Plan or Detail
Issue
In a plan or detail that has its units set to Decimal Feet, you want to place dimensions that show measurements in Architectural Inches.
Are your dimensions incorrect measurements in your drawing but listed correctly in the Properties panel? Here's what to do.
Why would you need to draw in Decimal Feet but dimension in Architectural Inches?
Decimal Feet is essentially the standard for Imperial measurements. It’s just simply easier to type decimal numbers. In addition, the Decimal Feet system has a better correlation with site work. When you are constantly entering relevant distances, such as 20 feet, 80 feet, 10.5 feet, and so on, it just saves a good deal of time and effort. Thus, it's understandable that firm after firm has made it the standard to draw in Decimal Feet.
But what about when you need to place dimensions in your plan? Even though you've entered a distance as 6.5, for example. which is taken as 6.5 feet, your firm's preference may (entirely understandably) be that the Dimension should read 6’-6” (that is, 6 feet 6 inches).
Now let's say you're working on a Detail. You may want to draw in Decimal Feet but dimension in Architectural Inches to maintain a uniform standard across your drawings, for example.
Solution
You can set your dimensions to Architectural Inches in a Decimal Feet plan or detail by adjusting the Unit format and Scale Factor in the Modify Dimension Style dialog box.
The following method is really your only option for drawing in Decimal Feet but dimensioning in Architectural Inches. Note that Autodesk actually advises against using this method – we're just providing it in case the standards of your firm or client dictate that you absolutely need to dimension in this way.
1. Follow our steps to change the Dimension Style (DimStyle) settings for the DimStyle you want to use.
2. When modifying the DimStyle, ensure that the Unit format is set to Architectural.
3. In the Measurement scale section, Set the Scale factor to 12 (or 12.0, 12.00, 12.0000, etc. depending on your precision setting).
4. Click OK to save your changes.

Setting the Scale factor to 12 in this way will take the distance (which is in Decimal Feet), and multiply it by 12 before displaying it in the desired Unit format, which is now set to Architectural inches.

As a result, a dimension for 6.5 feet (in Decimal Feet) will appear in a dimension as 6'-6", and so on.
If your dimensions are still not appearing how you want them, you may need to take one of the following actions for them to appear correctly:
- Undo an existing DimStyle override.
- Rename the Land F/X DimStyle.
- Try placing a dimension in a completely blank drawing.
Alternative Method
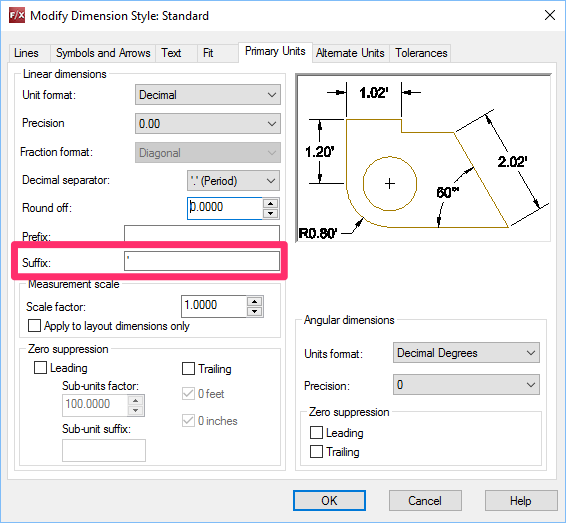
Some firms prefer the simplicity of decimals even in the dimension, but would like to include the foot mark to clarify which units the dimension is drawn in. A simple way to do so is to set the suffix – example: 6.5' (6.5 feet) rather than 6'-6" (6 feet 6 inches).
If you'd like your linear dimensions to end in an apostrophe, you'll need to create two diffewrent DimStyles – one for your linear dimensions and one for other dimensions.
First, create a DimStyle to serve as your "master" DimStyle (or the one Land F/X created).
You can enter an apostrophe in the Suffix field in the Modify Dimension Style dialog box, Primary Units tab.


As a result, your dimensions will end in an apostrophe, as pictured to the left.
Keep in mind, however, that this suffix will apply to all your dimensions – even angular – until you create a second DimStyle, as described below.
Create another DimStyle to apply to your angular dimensions. In this DimStyle, you'll leave the Suffix field blank. (This field will be grayed out, so you'll only be able to leave it blank anyway.)
Finally, use our Save Dimstyle feature to now save this additional DimStyle back into the system.


