Change Several Single-User Land F/X Installations to a Multi-User Installation (Local or Cloud Data, Office Server or Shared Online Folder)
Your office currently has several computers with single-user installations of Planting F/X, Irrigation F/X, and/or Design F/X. You want to create a multi-user installation and share data (such as symbols, preferences, and projects) between these installations by:
- Installing our software on your office server, and
- Turning the Single-User installations into workstations that access your Land F/X data from a central server or shared online folder
An Example
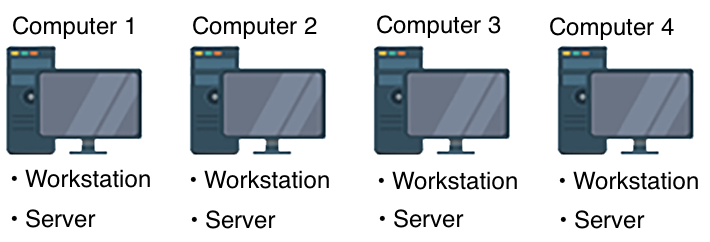
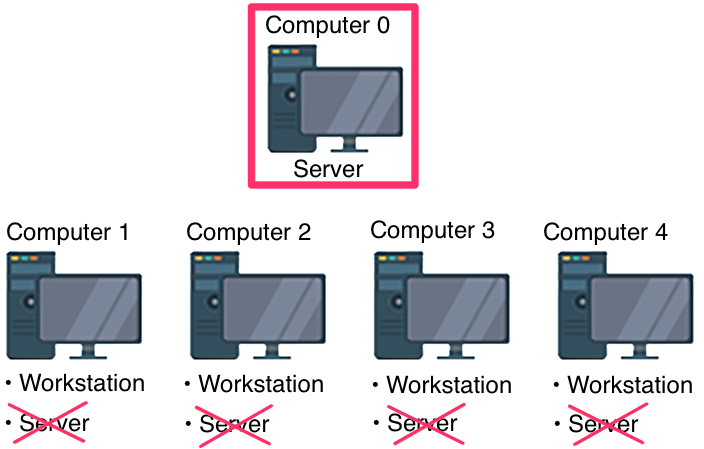
Let's say you currently have four computers in your office, all with single-user installations of our software. Because they are single-user installations, each of these computers currently functions as both a server and workstation in terms of our software. As a result, the computers cannot share Land F/X data directly with each other.

You want to host your installation from your office server or a shared online folder, turning computers 1, 2, 3, and 4 into workstations that access their Land F/X data from a central location. (In the example below, the shared location is on a central office server, which we've named Computer 0.)

Cloud Data users
Step 1 (if applicable): Back Up all Land F/X data on all workstations
In most cases, you'll be combining multiple Single-User installations that all share the same Land F/X Support ID. If so, you won't need to complete this step and can skip to Step 2: Copy a LandFX folder to your shared location & share it with users.
If you have Cloud Data, you'll only need to complete this step in the uncommon case that you're combining Land F/X installations with different Support IDs. Not sure of the Land F/X Support ID on one or more of your workstations? Find out here.
1A. From each Land F/X workstation in your office, follow our steps to back up your Land F/X data. Make sure to select the Backup All option.
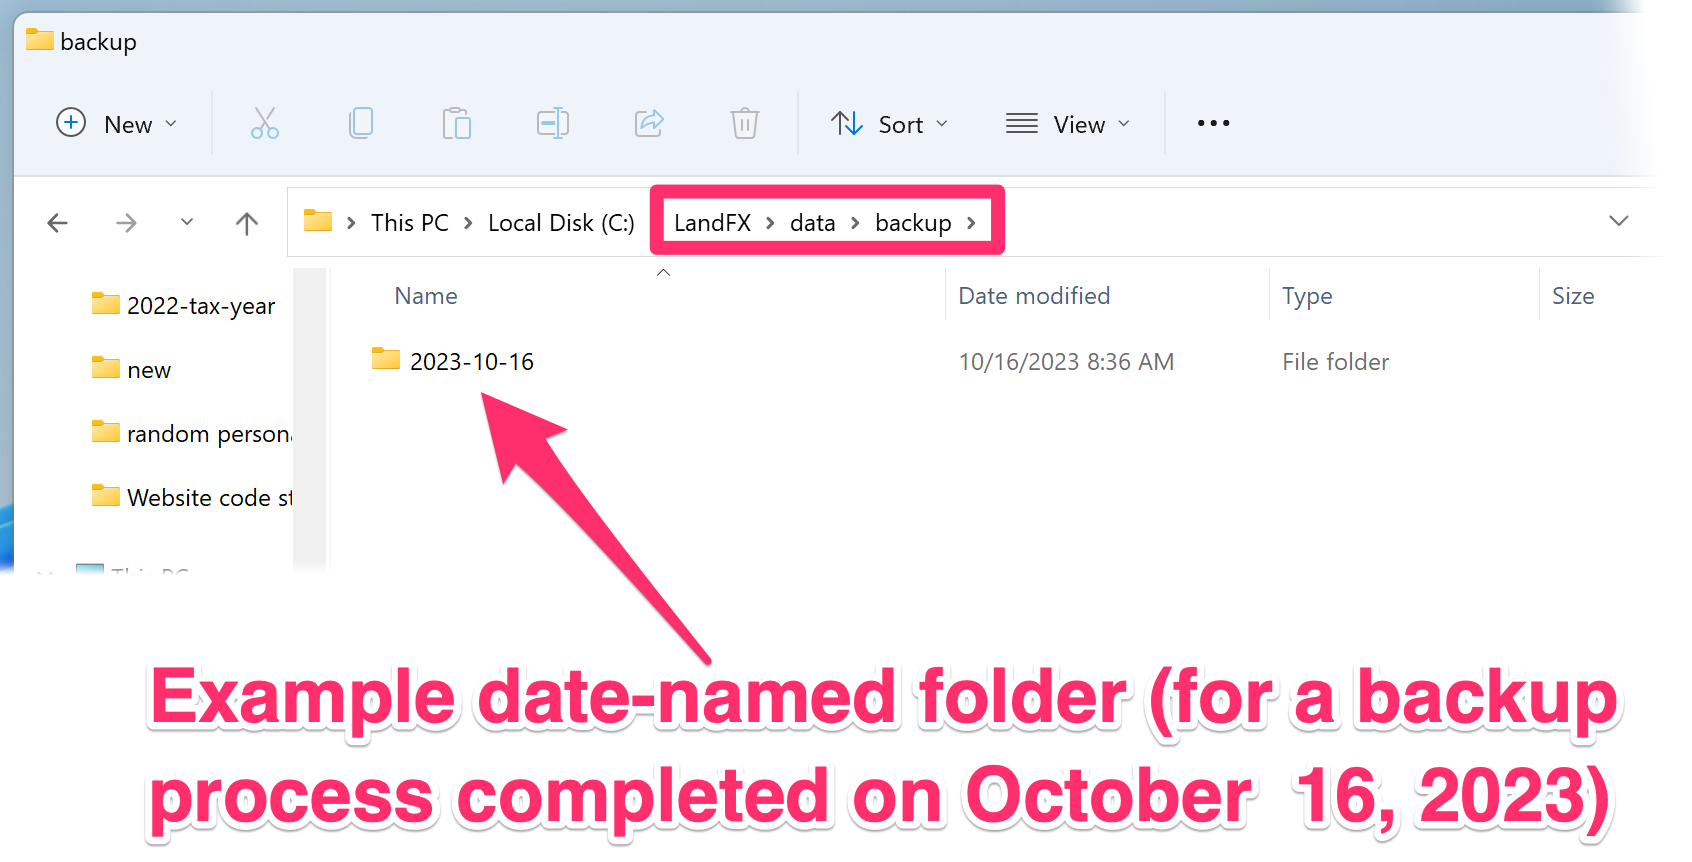
This step will create a date-named subfolder within the folder C:/Landfx/data/backup on each of your existing workstations. Once the backup is complete, a pop-up will confirm the location where the backup was created. (The folder will be named with the date when you performed this step, as pictured below.)

1B. Create a backup copy of the LandFX location to preserve any user-defined data. We recommend that you simply rename the C:\LandFX folder on each of these computers to C:\LandFX-old.
Step 2: Copy a LandFX folder to your shared location & share it with users
2A. Copy the LandFX folder from one of your Land F/X workstations – ideally, one where you've saved any custom content such as blocks or details – to your server or shared online folder.
Shared online services we do not recommend:
Microsoft OneDrive
Over time, we have observed continued incompatibility with the OneDrive platform for several reasons, including:
- Inconsistent sync times
- Color Render dialog boxes loading empty because the necessary files could not be created at runtime
- Duplicate folders
- Our detail system not working correctly
Because of the wide range of issues that seem to come and go with updates, such as those listed above, we do not recommend the use of OneDrive to host our software.
Carbonite:
We no longer recommend Carbonite as a shared online service to use with our software, as it does not allow the real-time sync required for proper operation.
Microsoft's Distributed File System (DFS) & similar services:
Our software will not work with Microsoft's Distributed File System (DFS) or any other cloud file service where files are not hosted locally as well.
2B. Share your LandFX folder with the Land F/X users in your office or network.
Step 3 (if applicable): Copy any additional custom content to your shared LandFX folder
If your office has created custom blocks, details, hatches, or other content that was not saved on the workstation whose LandFX folder you copied to your shared location, you'll want to ensure that this content is included in your shared LandFX folder. If you have some of your content saved on an additional workstation, navigate to the appropriate subfolders within the LandFX folder on that workstation, then copy these subfolders into the LandFX folder on your server or shared online location, replacing the existing subfolders of the same names.
For example, if you have custom details, copy the folder LandFX/details from the workstation into the LandFX folder in your shared location, replacing the details folder that's already there. Repeat this step with the appropriate folders for any other custom content. Blocks are stored in the folder LandFX/Blocks hatches in the folder LandFX/Hatches, etc.
Step 4: Rename your old LandFX folder(s)
Change the name of the LandFX folder on each of your workstations to something like LandFXold.
Take care to rename the old LandFX folder(s) on your system – not the new one you just configured in your shared location.
Step 5: Uninstall Land F/X on each workstation
5. Follow our steps to uninstall Land F/X on each of the existing Land F/X workstations in your office. (In the example shown above, you would complete these steps from computers 1, 2, 3, and 4). Make sure you uninstall the following programs:
- F/X Server
- F/X Workstation
- MySQL Server (If you find two or more MySQL files, uninstall all of them)
5B. Rename the C:\LandFX folder on each of these computers to C:\LandFX-old.
Step 6: Reinstall Land F/X on each workstation
Complete the following steps from each computer in your office that will function as a Land F/X workstation. In the example shown above, you would complete this step on computers 1, 2, 3, and 4 – as well as any additional computers you want to use as a Land F/X workstation. (You do not need to complete this step on the server or shared online folder.)
6A. Follow our steps to map a network drive to the LandFX folder on the server or shared online folder (if not accessible from an existing mapped drive).
6B. Make sure all Land F/X users have full read/write permissions to this folder.
6C. Follow our steps to install the Land F/X Workstation component, making sure to run the Workstation installer (uninstall_FXWorkstation) from within the LandFX folder on your server or shared online folder. (In our example, you would navigate to the LandFX folder on Computer 0 from each workstation, and run the Workstation installer from that location.)
If you run into problems at this point, see our Manual Workstation Installation Steps.
Step 7 (if applicable): Import the old project data to your shared Land F/X location
In most cases, you'll be combining multiple Single-User installations that all share the same Land F/X Support ID. If so, you won't need to complete this step.
If you have Cloud Data, you'll only need to complete this step in the uncommon case that you're combining Land F/X installations with different Support IDs. Not sure of the Land F/X Support ID on one or more of your workstations? Find out here.
If you're combining multiple Land F/X installations with different Support IDs, you'll now import your Land F/X projects and other data into the LandFX folder on your server or shared online folder. (You previously backed up this data in Step 1 above).
Remember: You'll likely have different versions of each project floating around – and maybe even different versions of each Preference Set. Take care to import the correct version of each project, Preference Set, and other data.
Follow our steps to restore your Land F/X data to your shared location.
You should now have a networked setup in your office for sharing Land F/X data.
Close
Local Data users
Step 1: Install and configure Land F/X on your server or shared online folder
Follow our steps to install Land F/X on your server or shared online folder.
Step 2 : Back Up all Land F/X data on all workstations
2A. From each Land F/X workstation in your office, follow our steps to back up your Land F/X data. Make sure to select the Backup All option.
This step will create a date-named subfolder within the folder C:/Landfx/data/backup on each of your existing workstations. Once the backup is complete, a pop-up will confirm the location where the backup was created. (The folder will be named with the date when you performed this step, as pictured below.)

2B. Create a backup copy of the LandFX location to preserve any user-defined data. We recommend that you simply rename the C:\LandFX folder on each of these computers to C:\LandFX-old.
Step 3: Copy a LandFX folder to your shared location & share it with users
3A. Copy the LandFX folder from one of your Land F/X workstations – ideally, one where you've saved any custom content such as blocks or details – to your server or shared location.
3B. Share your LandFX folder with the Land F/X users in your office or network.
Step 4 (if applicable): Copy any additional custom content to your shared LandFX folder
If your office has created custom blocks, details, hatches, or other content that was not saved on the workstation whose LandFX folder you copied to your shared location, you'll want to ensure that this content is included in your shared LandFX folder. If you have some of your content saved on an additional workstation, navigate to the appropriate subfolders within the LandFX folder on that workstation, then copy these subfolders into the LandFX folder on your server or shared online location, replacing the existing subfolders of the same names.
For example, if you have custom details, copy the folder LandFX/details from the workstation into the LandFX folder in your shared location, replacing the details folder that's already there. Repeat this step with the appropriate folders for any other custom content. Blocks are stored in the folder LandFX/Blocks hatches in the folder LandFX/Hatches, etc.
Step 5: Rename your old LandFX folder(s)
Change the name of the LandFX folder on each of your workstations to something like LandFXold.
Take care to rename the old LandFX folder(s) on your system – not the new one you just configured in your shared location.
Step 6: Uninstall Land F/X on each workstation
6A. Follow our steps to uninstall Land F/X on each of the existing Land F/X workstations in your office. (In the example shown above, you would complete these steps from computers 1, 2, 3, and 4). Make sure you uninstall the following programs:
- F/X Server
- F/X Workstation
- MySQL Server (If you find two or more MySQL files, uninstall all of them)
6B. Rename the C:\LandFX folder on each of these computers to C:\LandFX-old.
Step 7: Reinstall Land F/X on each workstation
Complete the following steps from each computer in your office that will function as a Land F/X workstation. In the example shown above, you would complete this step on computers 1, 2, 3, and 4 – as well as any additional computers you want to use as a Land F/X workstation. (You do not need to complete this step on the server or shared online folder.)
7A. Follow our steps to map a network drive to the LandFX folder on the server or shared online folder (if not accessible from an existing mapped drive).
7B. Make sure all Land F/X users have full read/write permissions to this folder.
7C. Follow our steps to install the Land F/X Workstation component, making sure to run the Workstation installer (uninstall_FXWorkstation) from within the LandFX folder on your server or shared online folder. (In our example, you would navigate to the LandFX folder on Computer 0 from each workstation, and run the Workstation installer from that location.)
If you run into problems at this point, see our Manual Workstation Installation Steps.
Step 8: Import the old project data to your shared Land F/X location
You'll now import your Land F/X projects and other data into the LandFX folder on your server or shared online folder. (You previously backed up this data in Step 2 above).
Remember: You'll likely have different versions of each project floating around – and maybe even different versions of each Preference Set. Take care to import the correct version of each project, Preference Set, and other data.
Follow our steps to restore your Land F/X data to your shared location.
You should now have a networked setup in your office for sharing Land F/X data.
Close


