Layer Names
- The Land F/X Layers
- Changing Layer Names
- Why You Don't Need to Worry So Much About the Layer Names Print Preferences
The naming of layers in AutoCAD is the subject of much discussion among our users. In the interest of making our software fully customizable, we've made it possible to change the default Land F/X layer names. You can do so from the General Preferences screen.
However, we'd also like you to keep in mind that we've given the layers their names for a reason. We've followed CAD layer naming standards carefully in naming each layer that goes into your drawing when you place a Land F/X object such as a plant, irrigation component, callout, or line of text.
When you place a Land F/X object (such as a plant or irrigation symbol, callout, site graphic, etc.) in a drawing, you are actually placing a block. Once placed in your drawing, each of these blocks exists on a certain layer with a name that identifies that block. In turn, if you were to explode a block, it would consist of a series of layers that also identify the items they contain.
For a detailed look at how our layers are named, download our PDF of the CAD Layer Naming Guidelines (linked below), which includes a full breakdown of the Land F/X layers.
We constantly add layers to our LK- block layers as needed for new block content. For the most current block layer list, use our Load Layers tool to load our default block layers into your drawing. Our content team uses this tool to make our blocks to the highest National CAD Standard (NCS) layer naming and organization standards.
In our layer naming system, each layer name consists of a series of standard groupings: the primary signifier, secondary signifier, and so on. Each of these groupings indicates which items would be placed on that layer.
Some of these layers are meant for entire Land F/X blocks. Examples include:
- L-ANNO-LABL: Layer where a callout would be placed
- LP-TREE: Planting layer where trees would be placed
Other Land F/X layers are meant for specific linework within blocks and other objects:
- L-ANNO-HILT: Landscape architecture annotation highlight layer
- L-ANNO-LEDR-025M: Callout arrow linework to plot at 0.25mm
- LK-TREE-035M: Linework within a tree block, to plot at 0.35mm
If you want, you can freely rename layers in any way you wish. However, keep in mind that there really is a logic to it. While the system will allow you to name multiple layers the same, you really should pause to understand why those different layers were set up in the first place.
Note: The system of having linework on Layer 0 within blocks has been considered an inappropriate standard for quite some time. Instead, the linework within blocks should be on different layers from the layer containing the block itself. Having all your block linework on separate layers allows you to change certain features of the block once you've placed it in a drawing. It also gives you more flexibility when you configure the viewport layer settings.
Remember: You can use the Lay Freeze command to turn off blocks such as trees, while allowing the blocks to use multiple layers.
What About Blocks With the "X-" Prefix?
Quick video
Our layer system used to include several layer names with the prefix "X-". Please note that we've done away with this layer prefix. Layers that previously began with X- now begin with LK-.
If you have a drawing that includes X- layers, you probably have the old versions of some of our blocks. Our updated blocks (and the layers they comprise) are downloadable on demand. To get the latest blocks, you can delete the folders within the LandFX/Blocks folder that contain the block files you need. The software will then automatically download the updated blocks on demand as you use them.
Important note: If you have custom blocks in any of these folders, take care to back up those blocks in a safe location before deleting the block folders. As you add and place blocks, the block folder structure will be automatically re-created. You can then move your custom blocks back into the subfolders where you want them.
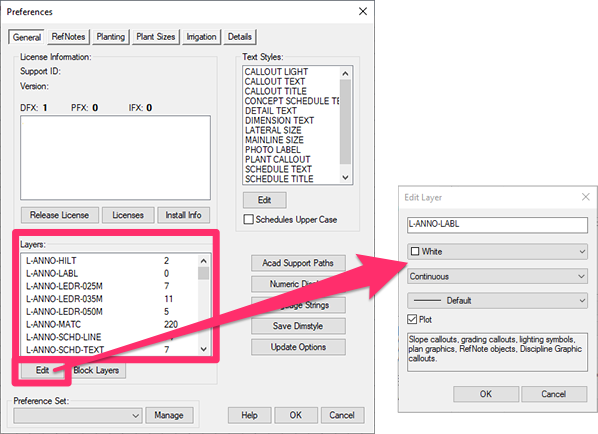
To change a layer name, select the layer in the Layers list in the General Preferences screen. Click Edit to open the Edit Layer dialog box. You can then type the name of your choice where indicated below. Click OK to save your changes.

The software will work the same whether or not you customize every layer. If you want, try it out a bit before you apply your changes from top to bottom. Change a few layer names, place blocks that use those layers, use our Highlight Plant tool, run some schedules, and see how you like it. Do all this before you charge in and rename every single layer in the system.
In the bigger picture, layers and layer names are becoming less and less relevant with intelligent CAD systems.
For example, you rarely need to worry about which layer is active when using our software. Across the vast majority of the software, you can just do your work and never worry about layers.
This movement away from layers is a parallel with BIM systems such as Revit, which completely lack layers.
Print Preferences
Did you know you can print out all the layer settings saved in your Preference Set for quick review and reference? Just use our Print Preferences feature.


