Plant Schedules: Getting Started
Quick video
- Plant Schedule Overview
- Schedule Destination & Schedule Integration
- Entire Palette
- Include Xrefs
- Schedule Options
- Plant Categories
- Plant Category Checkboxes
- Photo/Symbol/Code
- Container Size, Canopy, Spacing, and Density
- Quantity/Area
- Detail
- Plant Data
- Plant Code Styles
- Plant Schedules for a Colorized Plan
- Reverting a Schedule Back to 2D (Black-and-White) Symbols
- Placing a Plant Schedule Showing Color Plants from Xrefs
- Editing or Regenerating Existing Schedules
- Applying the Current Schedule Settings as the Default
- Work Areas
- Plant Outlines
- Flats and Six-Packs
- Make the Plant Schedule Narrower, or Change the Column Widths
- Schedule Text in Uppercase (or Upper and Lowercase)
- Create a Background Fill or Mask for Your Schedules
- Related Webinars
- Troubleshooting
Quick video
You can place a Plant Schedule in Model Space or Paper Space. If you place it in Model Space with the rest of the site drawing, it will be scaled automatically for the scale you are using for your planting design. If you place the schedule in Paper Space on a sheet layout, it will automatically be at 1:1 scale, or no scale.
To view several different styles of Plant Schedule, based on the options described in this article, see our Plant Schedules: Examples documentation.
PLANTSCHEDULE_LEGACY command has been phased out as of September 2024
The PLANTSCHEDULE_LEGACY command, introduced as a temporary measure to help users transition into our Plant Schedule overhaul carried out with update 20.00, has been discontinued as of September 2024. If you have questions about this command being phased out, we ask that you contact us via a technical support ticket to discuss your concerns so our team can help guide you in the transition or determine whether there's a formatting request we can implement. We are no longer able to support the legacy code, as we need to remove it to be able to implement more new capabilities.
You can create a Plant Schedule that is limited to plants in a specific area of your drawing such as:
- A specific portion or phase of the project
- Off-site and on-site improvement
- Scope-of-work requirements (for example, certain areas designated as containing tenant improvements, other areas under a general contract, etc.)
To limit your schedule in this way, you can simply create separate Work Areas in your drawing. For more information, see our Limiting the Plant Schedule Using Work Areas documentation.
Once you've configured the settings for your Plant Schedule, you can apply those settings as the default in the active Preference Set using the Planting Preferences. You can also create additional Preference Sets and apply new default settings to each one. Find out how >
Plant Schedule Overview
Open our Plant Schedule tool:

F/X Planting ribbon, Plant Schedule flyout
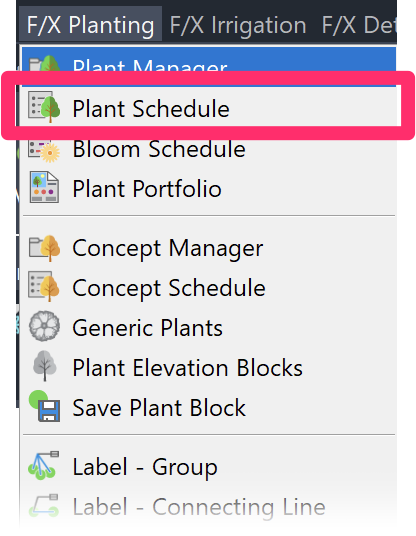
F/X Planting menu, Plant Schedule option
or type FX_PlantScheduleProduction in the Command line
The Plant Schedule dialog box will open, allowing you to configure the settings for your Plant Schedule.

1. Destination: Choose how and where to place or send your schedule.
We've replaced the Drawing and Table options with a single Table option and a Gridlines non-plot checkbox. More information
2. Options to:
- Include the Entire Palette in the schedule. More information
- Include plants from your external references (Xrefs) in the schedule. More information
- Include Concept Plants: List your Concept Plants in your Plant Schedule. You can choose to include your Concept Plants by group or by plant. More information
3. Schedule Options: A series of menus, checkboxes, and buttons that allow you to customize the appearance of your Plant Schedule. More information
4. Select or deselect the plant categories to include in the schedule. More information
5. Checkboxes to customize the contents of the plant categories in the schedule More information
Quick video
6. Options for including plant sizes and planting spacing and density in the schedule. More information
7. Options to include plant quantity and area in the schedule. More information
8. Option for the schedule to include details associated with plants in each category. More information
Schedule Destination & Schedule Integration
The Destination section of the Plant Schedule dialog box includes several options for how and where you want to place or send your schedule.
- Table: Place the schedule in your drawing as a table.
- Gridlines non-plot: Check this option if you want the lines separating the table cells to be non-plot. Uncheck this option if you want the table lines to plot.
We've replaced the Drawing and Table options with this single Table option and the Gridlines non-plot checkbox. If you select Gridlines non-plot, the schedule will place with gray gridlines that will not show up when you plot your drawing (essentially the same as the former Drawing option). Deselecting this option will result in a schedule placing as a table with gridlines set to plot (essentially the same as the original Table option). This updated system allows you to edit your schedules much more easily.
- Spreadsheet: Export the schedule to a spreadsheet program such as MS Excel.

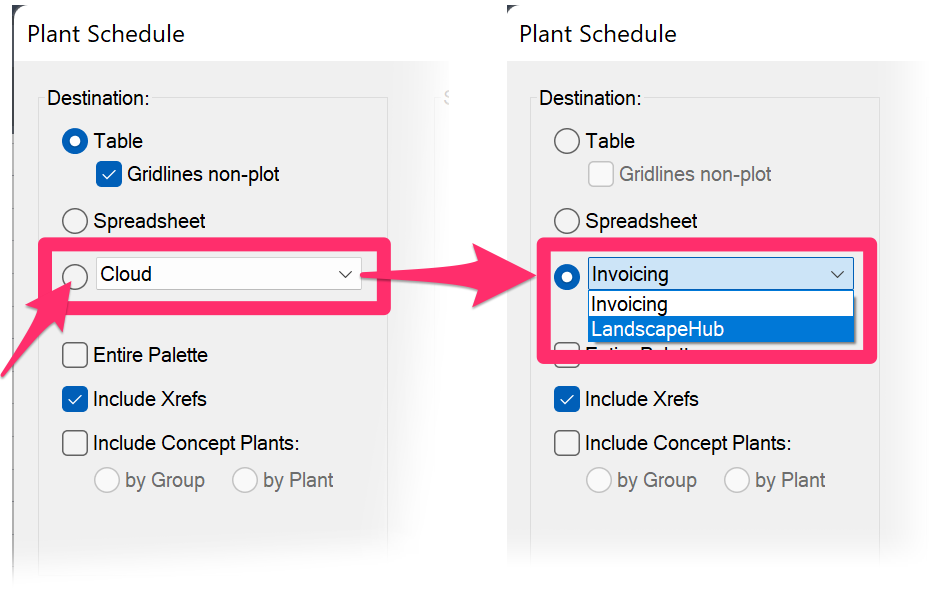
You also have the option to send the schedule directly into another service provider – for instance, your firm's estimating and invoicing system.
You'll first need to set up an Integration Partner using our Schedule Integration feature. You can then use the Cloud menu to select the provider of your choice.
For example, if you've set up integration with LandscapeHub, you can select the Landscapehub option from this menu. See our Land F/X and LandscapeHub webinar for more details.
When you select one of these options, the schedule(s) will go right into your system, where the partner department or provider can do everything from ordering materials to invoicing the client – therefore saving a great deal of time.
Sending a Schedule to a Spreadsheet
Exporting a schedule to a spreadsheet using a program such as MS Excel gives you an infinite number of options in formatting and enhancing that schedule. In a spreadsheet, you can easily make edits, add specific calculations, create new information columns, and make the schedule available to a client or contractor who doesn't have AutoCAD.
Quick video
Creating a Macro for a Schedule in MS Excel
A macro is a recorded set of actions that can be applied automatically to a spreadsheet with the click of a button. You can create your own macro in Excel to include custom columns, carry out automatic calculations on preset columns, and much more.
For example, you might need to calculate the percentage of the plant total occupied by each plant in a project. With a macro, you can carry out these calculations instantly. See our article on creating a macro in MS Excel for a schedule.
Entire Palette
Quick video
Select the Entire Palette option to list all the plants you've added to your Land F/X project in the Plant Schedule, whether or not you've placed the plants in your drawing.
Use this option to review the plant palette early in a project, which will help you determine what you need to add or delete.
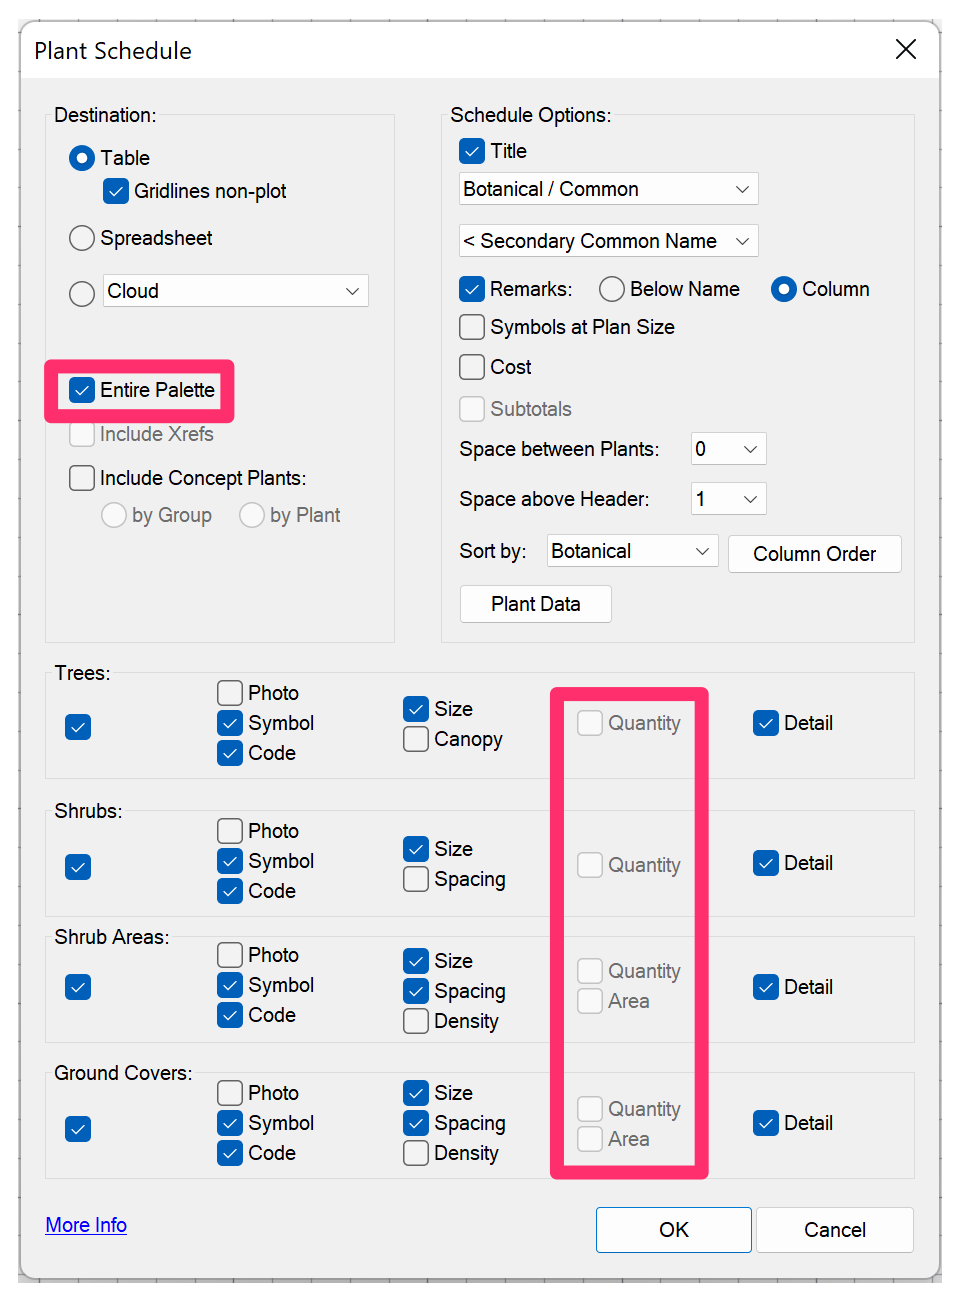
Note that an Entire Palette schedule will ignore quantities, and the Quantity and Area options for each plant category will be grayed out and not available for selection when Entire Palette is selected.
You can run an Entire Palette schedule without having placed any plants at all, or from a temporary blank drawing. You can place the schedule in your drawing or send it to a spreadsheet for review of the project data.
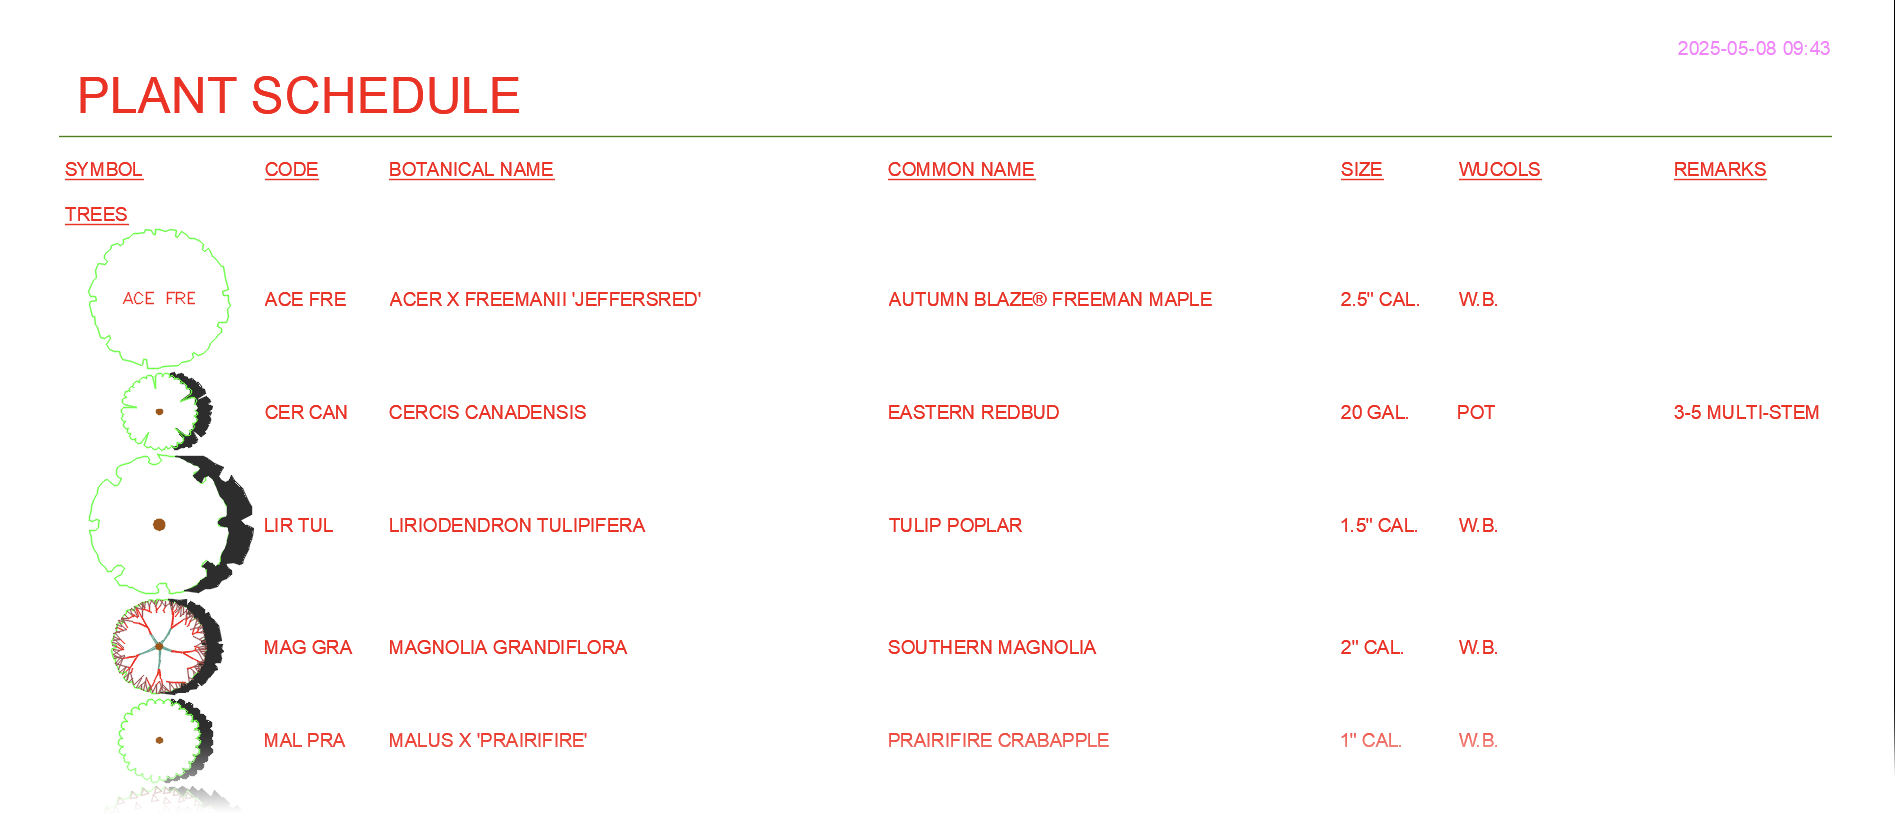
Here is an example of a Plant schedule created with the Entire Palette option selected.
Include Xrefs
If your drawing includes an external reference (Xref) where you've placed plants, select the Include Xrefs option to include those plants in the schedule.
Make sure the units and scale in your main drawing match the units and scale of the Xrefs. If not, your groundcover quantities will be incorrect in the Plant Schedule.
Keep in mind that the Include Xrefs feature will only recognize plants placed in drawing files that have been directly Xrefed into the main drawing. It won't recognize objects that are in an Xref within an Xref (known as a "nested Xref").
If you notice that your schedule is not counting some of the objects within your Xrefs, the problematic objects are likely within a nested Xref. If so, here's what to do.

Schedule Options

1. Title: Select this option to include a title in the Plant Schedule.
2. Use this menu to control how plants will be ordered in the schedule. More information.
3. Secondary Common Name: To use a language other than English, select a language for your common plant names.
4. Remarks: Select this option to include remarks, or notes, in the schedule. More information
Quick video
5. Symbols at Plan Size: If you want your schedule to show the symbols for trees or shrubs, the default is to include them at a relatively small size for ease of appearance. If you select this option, the symbols for either trees or shrubs will appear in the schedule at the same size as on the plan.
Are your plant symbols overlapping in the schedule, and you don't want them to overlap? To find out why, and see your options, see our Plant Symbols Overlapping in Plant Schedule article.
6. Cost: Select this option to include the costs assigned to the plant.
7. Subtotals: Select this option to include subtotals in the schedule.
For the Plant Schedule tool to function correctly within CAD, the ability to change the column order in a schedule that includes subtotals has a few specific limitations. More information
8. Space between Plants: Select this option to insert empty spaces between plant rows in the plant schedule.
9. Sort By: Use this menu to select whether to sort the schedule by Botanical name, Common name, or Plant Code.
10. Plant Data: Opens a dialog box where you can select several plant data categories to appear in the schedule.
11. Column Order: Open a dialog box where you can reorder your Plant Schedule columns to your liking.
Name Order Options
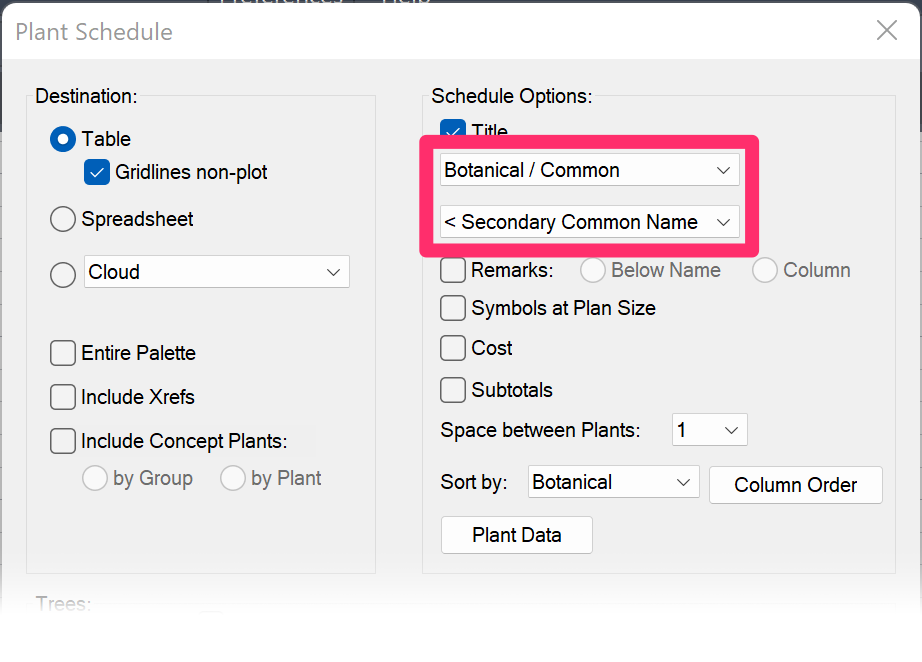
This menu controls the order of the plant naming in the schedule, based on each plant's common and botanical name.
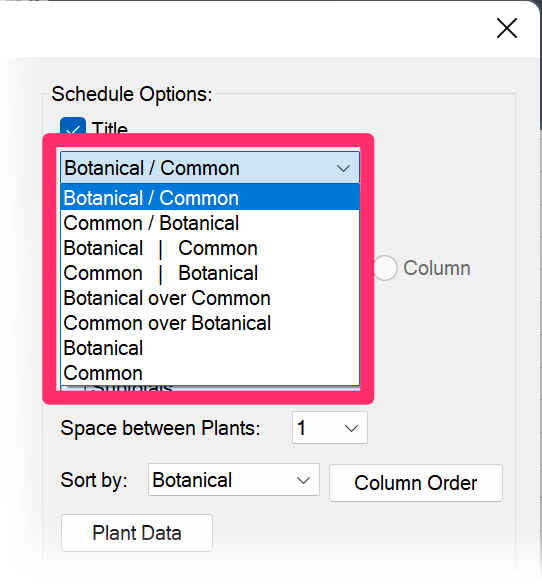
Display Options:
- Botanical / Common: Botanical name followed by common name
- Common / Botanical: Common name followed by botanical name
- Botanical | Common: Botanical name followed by common name, in separate columns
- Common | Botanical: Common name followed by botanical name, in separate columns
- Botanical over Common: Botanical name directly above common name
- Common over Botanical: Common name directly above botanical name
- Botanical: Only include botanical name
- Common: Only include common name
For examples of the schedule that will result from selecting each of these options, see our Plant Schedule Examples: Name Order Options documentation.
Remarks

Select the Remarks options to include a column listing remarks you've added to each plant's data.
If you include remarks, you have two options:
- Below Name: If you select this option, any remarks will appear below the plant name. This option will result in a narrower schedule.
- Column: If you select this option, any remarks will appear in a separate column of the schedule. This option will result in a wider schedule.
The Remarks column width will match the width of the scenarios listed below of whatever the Plant Name column is set to when running a schedule. Ideally, the Below Name option should be selected. This setting is our recommended method when using remarks, but if you decide to put remarks in its own column, see the scenarios below.
Scenario 1: Botanical/Common or Common/Botanical
The width of the Remarks column will match the width of the widest plant name combination in the list.

Scenario 2: Botanical | Common or Common | Botanical
The width of the Remarks column will match the width of the widest name in the first name column (Botanical or Common).

Scenario 3: Botanical over Common or Common over Botanical
The width of the Remarks column will match the width of the widest botanical or common name in the Name column.

Scenario 4: Botanical or Common
The width of the Remarks column will match width of the first name column (Botanical or Common.

Including Concept Plants in Your Plant Schedule

To list Concept Plants in your Plant Schedule, select the Include Concept Plants option when placing a schedule.
If you include Concept plants by Group in your Plant Schedule:
- If any member plants have a cost assigned, the group cost will be zeroed out.
- The code of each member plant will be included in the schedule.
To list your Concept Plants by Design Group, select the By Group option.

Here's an example of the resulting schedule:
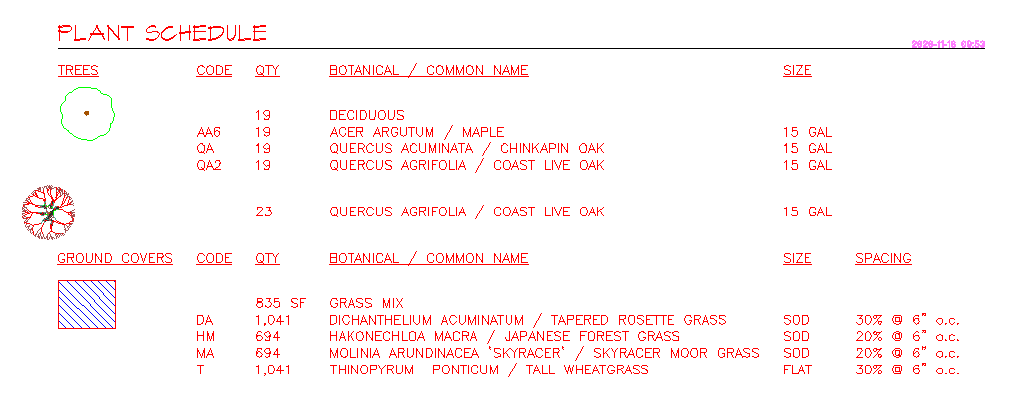

When you include Concept Plants by Design Group in your Plant Schedule, each individual groundcover or Shrub Area's percentage fill in its Design Group will appear in the Spacing column.
To list your Concept Plants by individual plant, select the By Plant option.

Here's an example of the resulting schedule:

Column Order
Click the Column Order button to reorder the columns in your Plant Schedule.
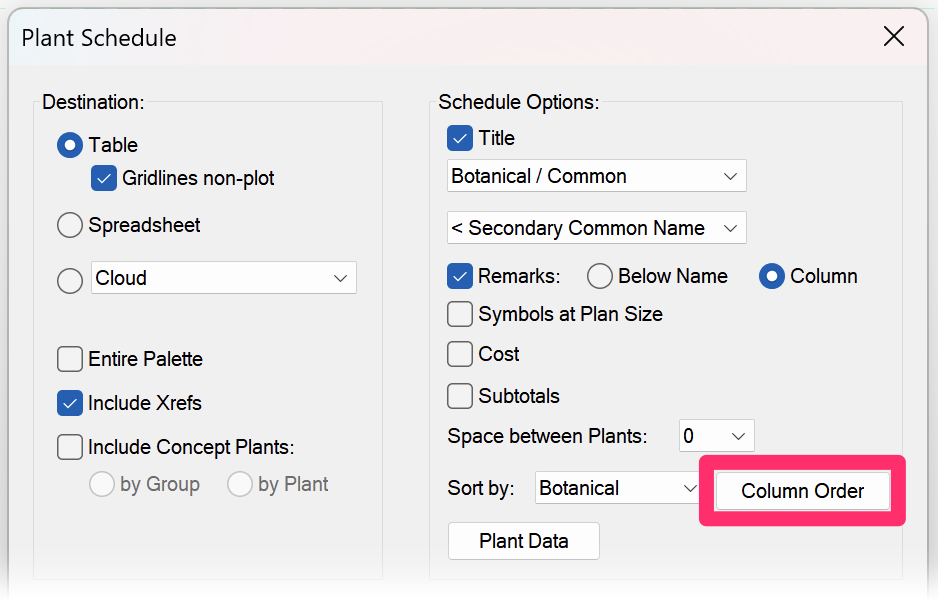

In the Column Order dialog box, select a column title, or group of column titles, you'd like to move in the order, and use the arrow buttons to move it up or down. The up arrow will move the selected column or column group to the left in the resulting schedule, and the down arrow will move it to the right.
In this example, we'll select the Quantity/Cost/Total column group, which corresponds with the Quantity, Cost, and Total columns. We'll then use the up arrow to move this column group up in the order, which will move those columns to the left in the schedule.
Note that the Sample section at the bottom of the dialog box shows the current order of the columns as they will appear in a resulting schedule. In our example, the three Quantity entries appear to the right of the Names, Size, and Spacing column entries.
The selected column title will move up or down in the Column order list after you reorder it, and the corresponding entry will move to the left or right in the Sample section.
In our example, the Quantity/Cost/Total column has moved up in the list, and the Quantity, Cost, and Total entries have moved to the left of the Names, Size, and Spacing column entries in the sample order section.

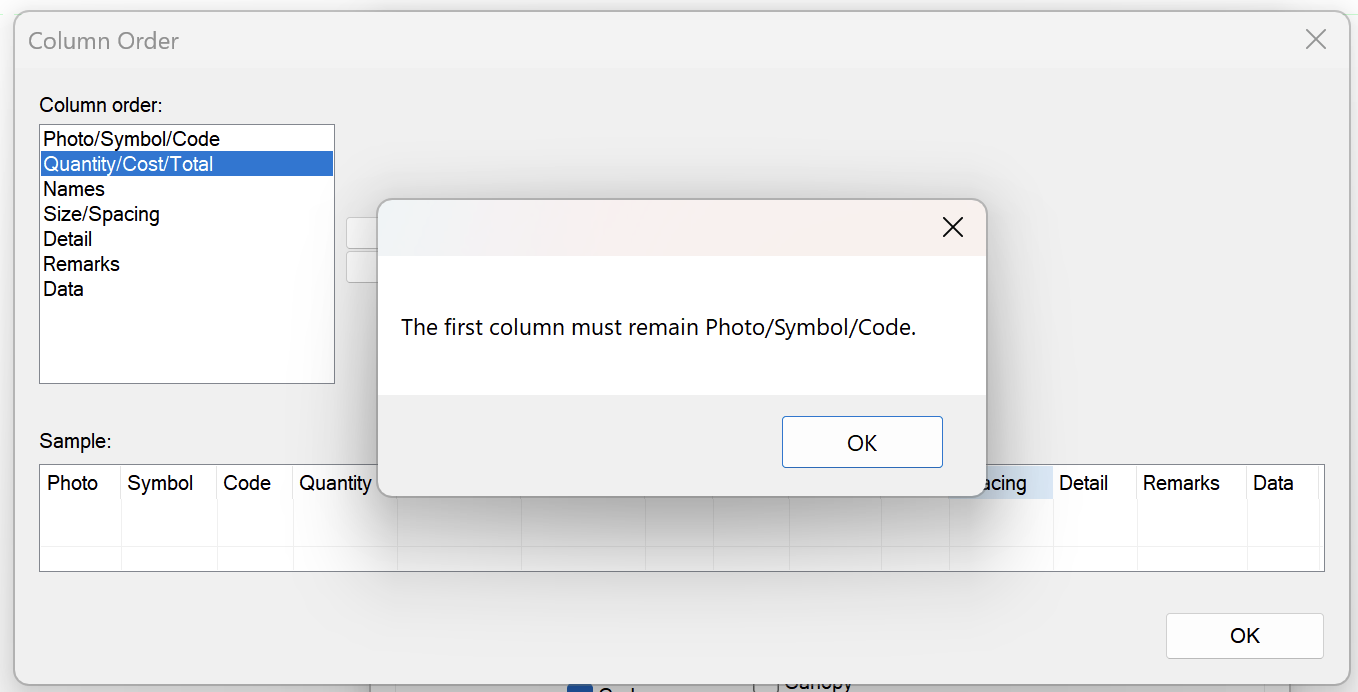
We've engineered this feature to require the identifying Photo, Symbol, and Code columns to remain the leftmost columns in the schedule.
If you attempt to move these columns down in the list, or move any other column above them, you'll see a message that The first column must remain Photo/Symbol/Code.
Here is an example of a placed Plant Schedule before and after reordering the columns.

Changing the Column Order with Subtotals: Limitations
Some users have asked whether their Plant Schedule can include a Subtotal headed before the Quantity column when Quantity is moved before the Name column.
At this point, no, this order is not possible. Here's why: For our schedule tools to function within AutoCAD, we need to code them using a logic-based structure that's as simple as possible to allow the reordering of columns while also minimizing the chance for error.
The first Name column was the best location. Every schedule always has a name column, while it's possible to exclude photos, symbols, and codes. Allowing the Quantity column to be placed before the Name column could result in a lack of columns where the word Subtotal could go, causing the schedule to error out. Because of this issue, we've opted to require subtotals to always appear under the first name column.
If want to use subtotals in your schedule, we recommend keeping the Quantity column somewhere after the botanical/common names for clarity.
As a workaround, you can edit the Subtotal column header using our language strings feature (available in the General Preferences scree), replacing it with a term that makes more sense coming after the subtotal number – for example, 37 (Subtotal) instead of 37 Subtotal:
Plant Categories
In this area, you can customize information about each of our plant categories (Trees, Shrubs, Shrub Areas, and Ground Covers) that will appear in the schedule.
Plant Category Checkboxes
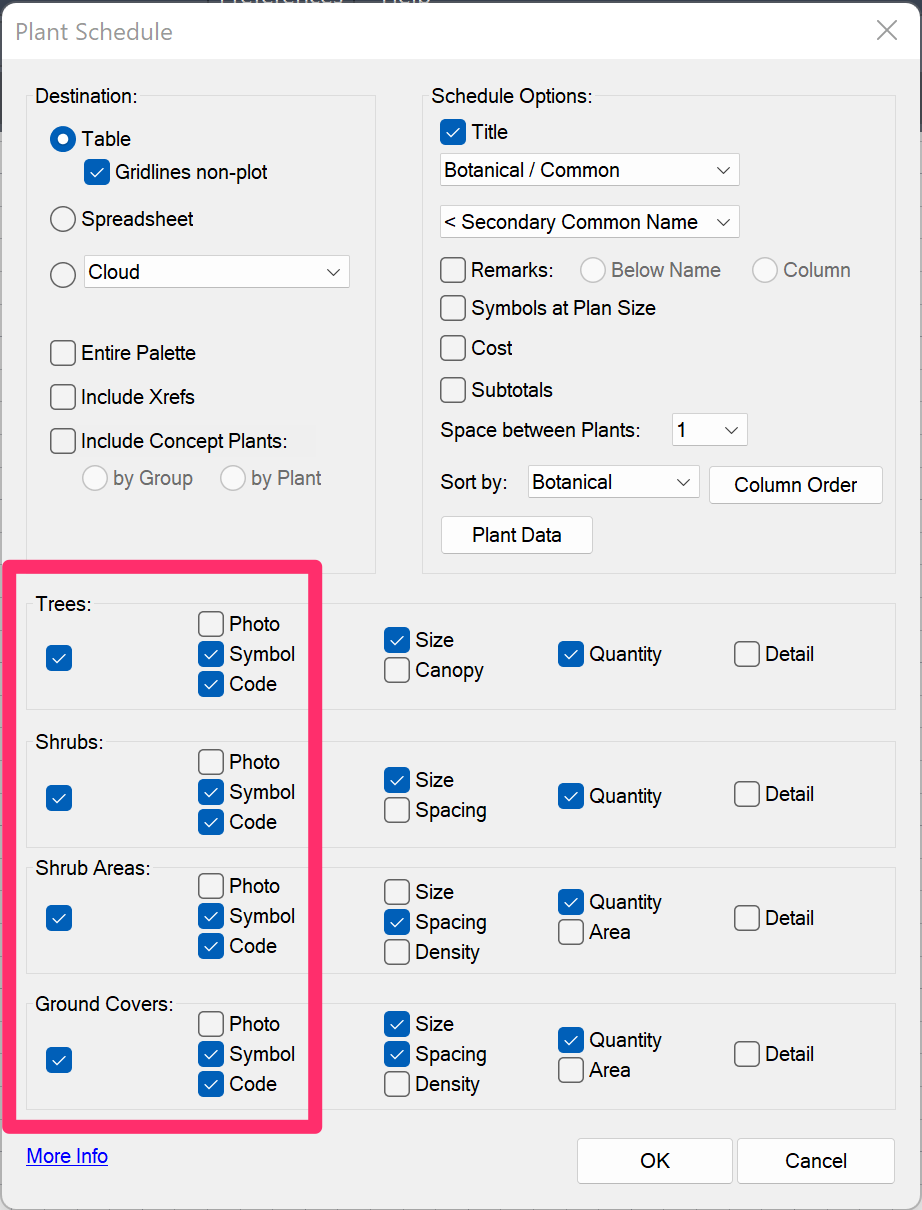
Each plant category has its own checkbox. If you check the box for a category, that category will appear in the schedule.
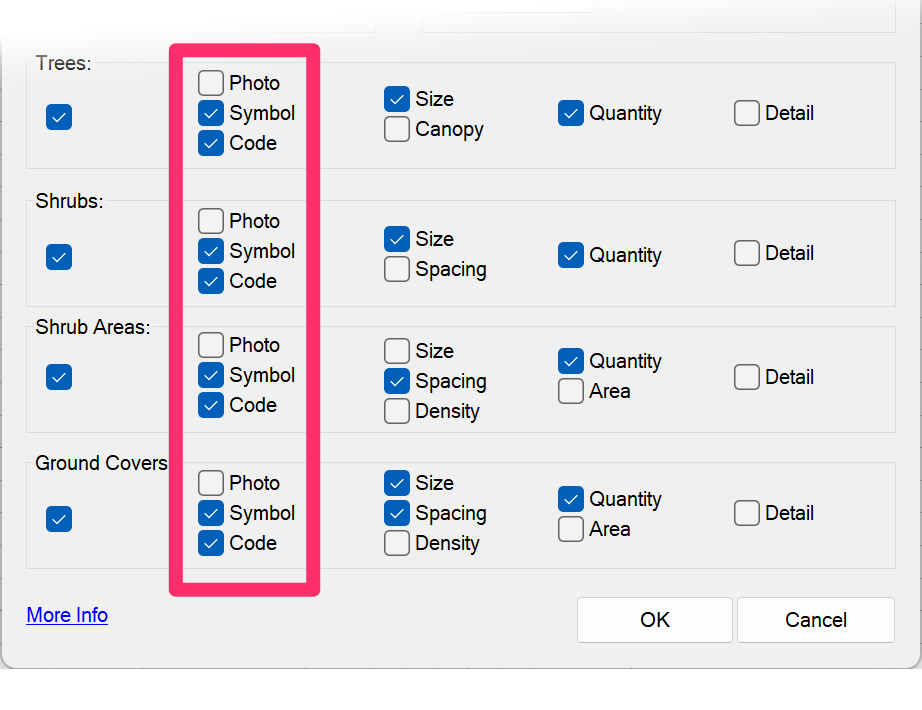
Photo/Symbol/Code
These checkboxes control how plants in each category will be referenced to the drawing from the schedule – by a combination of a photo you've assigned to each plant with our Photo Callout tool, plant symbol, and/or plant code (or none of the above)
Container Size, Canopy, Spacing, and Density
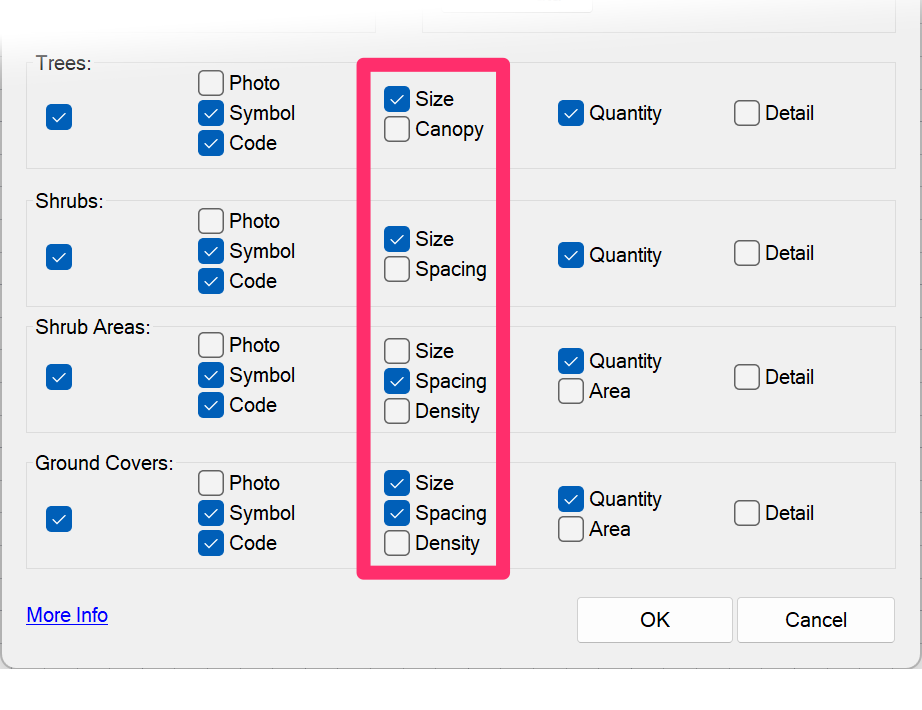
Check these boxes to include some, all, or none of the following items in the schedule:
- Size (all four categories)
- Canopy (Trees only)
- Spacing (Shrubs, Shrub Areas, and Groundcovers)
- Density (Shrub Areas and Groundcovers)
Quantity/Area
Check these boxes to display plant count Quantity (all four categories) and/or Area (Shrub Areas and groundcovers) in the schedule.
Want a schedule that shows both the quantity and area for groundcovers and/or Shrub Areas? Here's what to do.

Quantity will express a quantity based on the spacing, and Area will express the square feet or square meters of what was drawn. You can choose either of these options for Shrub Areas and Groundcovers according to your preference.
Some designers argue that Quantity is not entirely accurate because trees and shrubs can be mixed into a flatted groundcover area, and thus no plants are placed at those locations, resulting in too high a quantity.
Another argument against Quantity holds that sloped conditions on the site may require more plants for a given 2D area, resulting in too low a quantity.
Yet another argument is to show the area that was drawn with the groundcover, and let the contractor review the plans and other conditions and ultimately responsibility for a quantity bid based on the document information.
Detail

Select this option for each plant category if you want the detail associated with each plant in that category to appear in the schedule.
Plant Code Styles
Each plant you add to a Land F/X project will have its own unique plant code that will identify that plant by abbreviations of its genus and species in both your labels and Plant Schedules. You can choose to give this code three possible styles:
- GEN SPE (three capital letters for the genus and three capital letters for the species)
- Gen Spe (three letters for the genus and species, with initial caps and internal lowercase letters)
- GS (one capital letter for the genus and one for the species)
For instructions on how to customize this code style, see the Plant Code section of our Planting Preferences documentation.
Plant Data
Plant Data Tags & Columns
Click Plant Data to open a dialog box where you can control which plant data from our plant data tagging system will be included with the plants in your schedule.
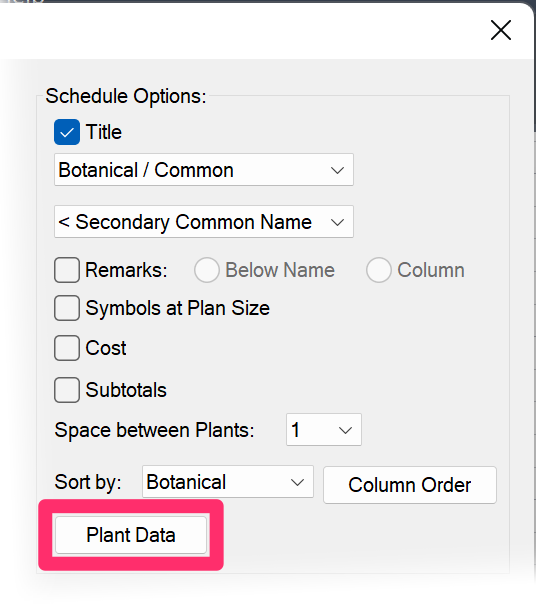

You'll now see checkbox options for displaying plant data characteristics you've assigned to your plants.
Check the box for each of these fields you want to include for each plant in the schedule. Uncheck the boxes for fields you don't want to include.
You're also able to add your own custom fields, which will display and be selectable in this dialog box when you're configuring your Plant Schedule. More information
Plant data fields cannot be saved with your Plant Schedule default settings.
Column Display Options for Plant Data
You have two options for displaying your plant data in your schedule:
- Display tags in one column per group: Include one column per tag group (Water Use and Plant Landscape Use, for example). Each column will include all tags applied within a tag group. In this format, the schedule will be much shorter because it will have far fewer columns, making it easy to include all plant data. This option also minimizes the time needed to generate the schedule and prevents schedules that are too long to fit in your drawing.
- Display tags in separate columns: This option is the historic style, where each data point (tag) is listed as a column header in its own column, with an x denoting whether the tag is applied or not. Each tag group will have its own headers, in addition to the headers for each tag. As you increase the number of tags included, the time required to generate the schedule increases by quite a bit. For this reason, we recommend including only a select amount of data in a schedule in this format. To mitigate this issue, we've included options for limiting which data shows up in the schedule in this format.

Quick video
Select your display option, then select the tag groups you want to display and click OK.
Plant Schedules for a Colorized Plan
If you've used our Color Render tool to colorize your plan, you can choose to show your color plant symbols in the Plant Schedule.

To show your color plant symbols in the schedule, run a new Plant Schedule while Color Render is turned on. That schedule will include color versions of your plant symbols.
When running the schedule, select the Symbol option for the plant types whose symbols you want to display – Trees, Shrubs, Shrub Areas, and Groundcovers.
If you have an existing schedule that already shows 2D (black-and-white) plant symbols, you can simply regenerate that schedule. The symbols will be replaced with the color versions.
Reverting a Schedule Back to 2D (Black-and-White) Symbols
To revert a schedule back to 2D symbols, turn Color Render off and then either regenerate an existing schedule or run a new schedule again.
Placing a Plant Schedule Showing Color Plants from Xrefs
If your color planting plan is in one of the files you've Xrefed into your sheet drawing, use the following workaround if you want to show those color plants in a Plant Schedule within that main sheet drawing.
1. Place a single dummy plant in the sheet drawing.
3. Delete the dummy plant.
4. Run a Plant Schedule, taking care to describe either the Symbol or Both option for each plant type you Want shown in color. The resulting schedule will include the color plant symbols from your Xref.
Editing or Regenerating Existing Schedules
If you open the Plant Schedule tool in a drawing that already includes one or more existing Plant Schedules, you'll see the Schedule dialog box, which includes the following buttons:
- Regen: Regenerate an existing schedule after making changes in your drawing.
- Edit: Edit the settings of an existing schedule. Clicking this button opens the Plant Schedule dialog box, allowing you to reconfigure a selected schedule. Any changes you make to the schedule settings at this point will apply to the selected schedule in your drawing when you click OK.
- New: Create a new Plant Schedule.
- Regen All: Regenerate all existing Plant Schedules in your drawing after making changes.

Applying the Current Schedule Settings as the Default
Once you've configured your Plant Schedule the way you want it, you can apply those settings as the defaults under the active Preference Set in the Planting Preferences. You can also create different defaults for different Preference Sets.
For specific instructions, see the Schedule Defaults section of our Planting Preferences documentation.
If you open the Preferences and notice that the buttons and options are grayed out and you can't make changes, the current Preference Set may be restricted. More information
Work Areas
If your drawing includes Work Areas, the Plant Schedule can reflect only the contents of one Work Area, or it can define the contents of multiple, or all, Work Areas.
For more information, see our documentation on:
Plant Outlines
Plant Schedules will reflect the current status of our Plant Outlines tool. If you place a Plant Schedule with outlines turned on, the plant symbols in the schedule will include outlines. Similarly, if you place a schedule with outlines turned off, the plant symbols in the schedule will not have outlines.
If you have an existing schedule when you turn Plant Outlines on, the symbols will fade but will not automatically get outlines. Regenerate the schedule to apply outlines.
Flats and Six-Packs
When planting in flats or six-packs, you may want to count each flat or six-pack instead of counting each plant individually. For more information see our Flats, Six-Packs, Sods, and Seeds documentation.
When placing flats containing any number of plants (6, 8, 12, etc.), you might want to think of those plants in terms of area – that is, square feet or meters – rather than individual units.
Make the Plant Schedule Narrower, or Change the Column Widths
Need to fit your schedule into a narrower space in a layout, or simply change the widths of the columns? Follow the instructions in our Plant Schedule Does Not Fit on Layout Space / How to Make a Plant Schedule Narrower article.
Schedule Text in Uppercase (or Upper and Lowercase)
You can control whether the text in any of your schedules appears in all uppercase, or in upper and lowercase, from the General Preferences. For instructions, see our Schedule Text in Uppercase Knowledge Base article.
This setting will apply to all schedules you place in your drawings, including:
- Plant Schedule
- Irrigation Schedule
- Details Schedule
-
Site schedules such as:
- Reference Notes (RefNotes) Schedule
- Lighting Schedule
- Concept Schedule
- Zoning Schedule
- Site Development Schedule
- Grading Schedule
Create a Background Fill or Mask for your Schedules
Some designers want to give their schedules a background fill to allow it to pop from the rest of the drawing. You can create a background fill for your schedule using the Table Style Manager. Find out how.
Related Webinars
- Ask Us Anything! Spotlight on Plant Schedules Join us for the first "Ask Us Anything," which focused on Plant Schedules, including the massive 2023 update that overhauled the Plant Schedule dialog box and opened new possibilities for your Plant Schedules. (1 hr 7 min)
- Plant Schedules: Land F/X provides a wide range of options for configuring a Plant Schedule for your landscape design. We’ll show you how to organize your columns and include or omit elements such as plant symbols, codes, cost estimates, spacing, and plants from your Xrefs. Join us to explore these choices and pick up valuable insights for crafting your ideal schedule. (1 hr 5 min)
- Using Work Areas: Whether you need to separate out phases in your schedules or show an area at a different scale and viewing angle, you need to know how to manipulate a Work Area. (1 hr 2 min)
- Excel With The Right Tools: No matter how much you can accomplish in AutoCAD, sometimes MS Excel can do the job better. We’ll give you some examples of how Excel can improve your design process by adding everything from shade analysis reports to MAWA calculations and in-depth watering schedules. (1 hr 5 min)
- LandscapeHub and Land F/X: Follow along as we showcase our first integrated plant schedule export software, LandscapeHub. We'll go over some of its cost estimating and species availability features, which are tied directly to local nurseries, and show you how to use these tools to inform your plant species choices and design decisions. (48 min)
- Excel With The Right Tools Part 2: Now that we've gone over the basics of what MS Excel can do for you, join us for a more detailed look into the capabilities of this powerful application, including named ranges, templates and reusable macros, and more. (1 hr 5 min)
- Getting Started with Planting F/X: We'll give you a full tour of our F/X Planting ribbon, covering everything from adding, placing, and labeling plants to error checking, scheduling, and turning on our quick render tools. (1 hr)
Troubleshooting
Issue: Plant Schedule errors – general troubleshooting
Issue: My Plant Schedule is too long. How can I break it up?
Issue: Text in the Plant Schedule columns is overlapping
Question: Can I put mulch in the Plant Schedule?
Question: How can I prevent plant quantities from appearing before the plant names in my Plant Schedule?
Issue: Error: Not all plants in the drawing match the project data
Issue: The Plant Schedule shows an incorrect symbol for a plant in my drawing
Issue: Error: Non-Planar Entity
Issue: Plant symbols are overlapping in the Plant Schedule (and you don't want them to overlap)
Issue: You are unable to send your Plant Schedule to an Excel spreadsheet
Issue: The Plant Schedule is not recognizing or calculating objects in an Xref
Issue: Work Areas are not recognizing or calculating a Shrub Area or groundcover hatch
Issue: You need to change the width the columns, or the height of the rows, in your Plant Schedule
Issue: "Combined title length is too long" error message when placing a Plant Schedule
Issue: Alphanumeric plant symbols are showing up blank in the Plant Schedule
Issue: The screen flashes several times when you place a Plant Schedule in Paper Space
Issue: Text boxes are displaying in your drawing where your Plant Schedule text should be
Issue: Your Plant Schedule is listing plants that are not in your drawing
Issue: You received an "Unable to read plant list" message when trying to run a schedule
Issue: CAD freezes or lags after you place a Plant Schedule
Issue: Strange or unexpected characters are appearing within plant names in the Plant Schedule
Issue: Your customized tree or shrub symbols are appearing in the Plant Schedule at an incorrect rotation
Issue: Your schedule symbols are showing up with transparency when placed in your drawing
Issue: Hatches are missing or coming in at the wrong scale/size in the Plant Schedule
Issue: Your schedule header is showing up in the Arial font (and you don't want it to)
Issue: Your user field values are cut off in your Plant Schedule
Issue: In a metric drawing, some hatches in your Plant Schedule are displaying overly densely


