Project Templates
- Why Use Templates?
- Working With Templates
- Creating a Template
- Importing Land F/X Objects From a Template
- Importing Drawing Sheets into Your Projects
- Backing Up and Restoring a Template
- Creating a Project Based on a Template (Usually Not Recommended)
- Editing a Template
- Template Coming In Blank? Make Sure the Project Isn't Set to Read-Only
- Related Webinars
- Troubleshooting
Project templates can be a confusing subject. But once you've figured out how to use them, you'll understand how much time and work they can actually save.
Think of a template as a central inventory of plants, Reference Notes (RefNotes), and all other Land F/X objects you commonly use in your projects. Whether you create one or several, you can import the items directly from your templates to each new project you create. You've already done the work once to attach any necessary data to those objects, so it's just a matter of grabbing the ones you need and beginning your design.
You may feel tempted to open an existing project and rename it, rather than working from a project template. DO NOT DO THIS. Renaming existing projects with the intention of retaining their properties for a new project can cause a number of file issues. If you want to create a new project with similar properties to an existing project, save the existing project as a template. Then open a new project based on that template. To learn how to complete this process, follow the instructions below.
Need multiple plant palettes for different projects, phases, clients, etc.? Make a new template for each one. You can then start each new project with the necessary plant palette already filled.
Why Use Templates?
If you're using our software properly, you're creating a new project each time you start a new site design in a CAD drawing. It's a best practice that prevents several file issues down the road. (Trust us – we've seen them all.) However, we also understand how tedious this practice can be – especially when you find yourself adding the same objects over and over.
Take, for example, a tree. Adding a tree to a project is much more than selecting a species. You're searching our vast plant database (24,000 plants and counting) and selecting a genus, species, and variety of that tree. You're then selecting a 2D symbol (potentially in addition to Color Render and SketchUp symbols), then maybe writing a note about the tree and assigning a cost, rootball size, symbol width ... the list goes on and on.

If you found yourself using many of the same, 20, 50, or 100 plants in your site designs, you'd need to add all those plants and all associated data individually to each new project. (And that's not to mention all the details, Reference Notes, site blocks, and all the other Land F/X objects you commonly use in your designs.) That's where templates come in. When you create a template, you only have to complete all this specification and configuration once. When you start a new project, you can then tap into the template and import each plant, RefNote, detail, and even irrigation component you need. Importing each of these items also brings in all attached data – and thus saves you immeasurable amounts of time.
As always, anything you bring in from a template is fully editable. So, for example, if you decide that plant you've imported from your template needs a new symbol, cost, etc., you can easily make these changes in your new project.
Working With Templates
Quick video
If you constantly use the same plant palette for all your projects, you can create one central template that will always supply your palette for each project. Or, if you commonly use different palettes for different clients or types of project, you can create a new template for each situation. Then, when you create a new project, you can draw your inventory from your template that contains a few items you commonly use, rather than searching our comprehensive database.
You can create different templates for any number of uses, including:
- Different clients or municipalities
- Types of property (commercial, residential, etc.)
- Project sizes
- Design groups (ornamental, native, restoration, planting, tropical, etc.)
- Sun-, shade-, drought, or salt-tolerant plants
When creating your planting templates, think about the kinds of projects your firm works with, and how the best way to organize the plants into palettes might be.
Templates work in two main ways. When you start a new project, you can either:
- Select plants, RefNotes, and other items to import individually from a template (our recommended method), or
- Base a new project entirely on a template, bringing in ALL plants, RefNotes, details, etc. from the template
Although it's possible to base a project entirely on a template, we generally suggest creating a new project and then importing objects from a template – mainly because it allows you to refine your palette for each project. Plus, it really doesn't take much longer – just a few minutes. The ability to import items from templates is a more recent addition in our development, and an option we think is superior than the older method of creating projects based on templates. We just retained this option for users who prefer it.
Creating a Template
To create a template, first open a blank drawing, and then create a new project. You can import the following items into your template:
- Irrigation equipment
- Plants and Concept Plants
- Details
- Sheets
- Reference Notes (RefNotes)
- Site objects such as lighting, grading, and graphics
You can include all of these items in one template. You can also choose to create separate templates for each of these items – for example, one template containing your RefNotes. Or create a new template for a specific type or category of plants you typically use. It's really up to you.
Once you've added everything you want to add to your new project, open our Projects tool:

F/X Admin ribbon, Project List button
or type FX_ProjectFiles in the Command line
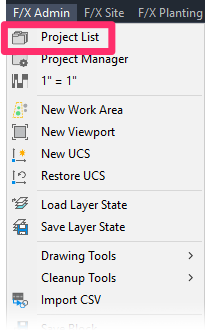
F/X Admin pull-down menu
The Land F/X Projects dialog box will open.
Select your project. Then click Save as Template.
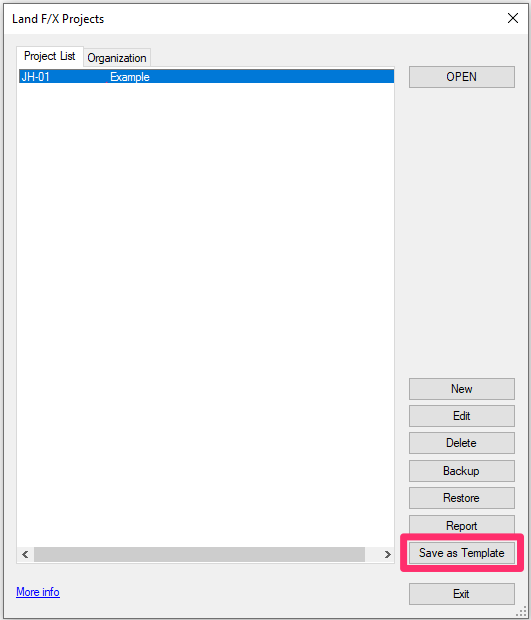

Type a name for your template in the dialog box that opens (pictured to the left.)
Click OK when finished.
The project will now be saved as a template, under a sublist in your projects titled Templates.
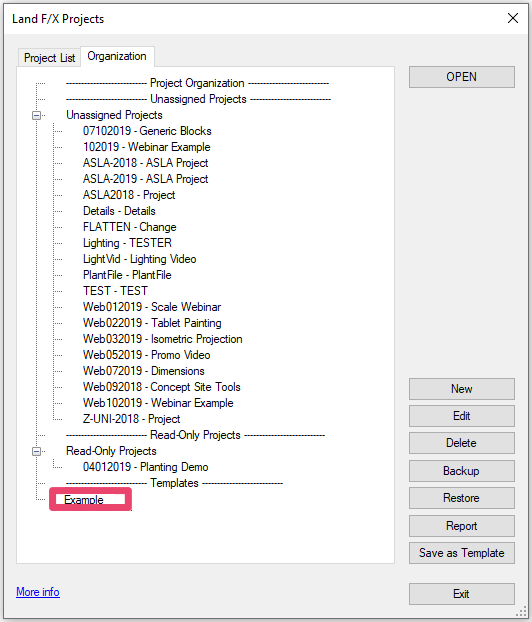
The template will now be a read-only file. To use this template, you will need to create a new project based on it, rather than open the template directly.
Importing Land F/X Objects From a Template
Quick video
Our recommended method for using templates is to treat them as limited palettes from which you can import the plants, RefNotes, and other Land F/X objects you need in each new project.
Instead of adding these items one at a time, you can quickly pull them into your template using the Import button we've included in the Manager dialog boxes for several "smart" objects used by our software, including:
- Plants
- Concept Plants
- Irrigation Equipment
- Reference Notes
- Details
- Site Amenities
- Lighting
- Concept Graphics
- Zoning Categories
- Site Development
- Grading Graphics
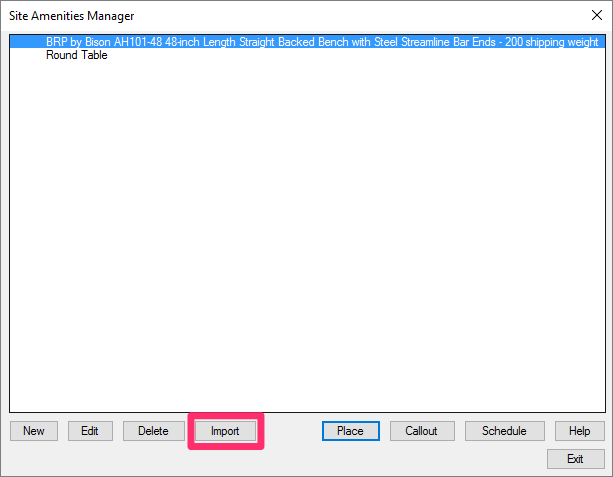
Importing Irrigation Equipment
We've engineered the ability to import irrigation equipment in order to save you the hassle of adding the same equipment to multiple projects you might be working on at once. However, keep in mind that manufacturers are constantly updating their catalogs. For example, model numbers change, and certain items are discontinued. Thus, although we are happy to be able to provide the capacity for importing equipment, we caution you to pay close attention to the equipment you choose to import. Make sure you are specifying equipment that has the correct model number and is still being offered by the manufacturer.
Importing will also move symbols and other data associated with the items you import. Take the time to add all your commonly used items to one or more templates. You can then skip all that configuration and data entry by simply importing these items to new projects rather than adding them from scratch.
Remember: You can always make changes to plants and other Land F/X objects in any of your projects. So if you add a certain variety of tree to a template and import it into a project, for example, you are fully able to change the symbol, size, cost, or any other data associated with that tree as it pertains to that project.
Start a new project without using a template. Making sure the new project is active, open any of the Managers. In our example, we'll import some plants from a template using the Plant Manager.
Click Import to import plants from another project.
As mentioned above, you'll see this Import button in other Managers, such as Irrigation, RefNotes, Site Development, etc.


Select the project that includes the plants and other items you want to import.
Then click OK.
You'll now see a list of the plants from the project you selected.
Select each plant you want to add to your template. You can select multiple plants at a time by pressing SHIFT when selecting plants.
Click Add to Project when finished adding plants.

The plants you selected will be included in your project, along with their symbols and other associated information.
Don't worry about organizing plants in a template into subcategories if you're planning on importing. An imported plant will not retain its subcategory.
Importing Drawing Sheets into Your Projects
To import drawing sheets into a project, create a template with your standard sheet names already filled in but not associated with any actual files.
You can then base new projects on this template, making sure to select the Sheets option in the New Project dialog box. The sheets will import immediately.
For instructions, see our documentation on importing standard sheets into a project.

Creating a Project Based on a Template (Usually Not Recommended)
In the interest of users who prefer this option, we've retained the ability to create a project based on an existing template. However, we generally recommend treating a template more as a source of supplying each new project through the importing method, rather than as an entire basis for a project. See Importing Items From a Template into a Project for instructions on our preferred method of working with templates.
If you need to add a new user to the permissions list of a template, our recommended practice is to create a new project based on the template, adjust the By User permissions list accordingly, then either save that project as a new template or overwrite the existing template by naming it identically.
To create a project based on a template, first create a new project. Type a project Number and Name as usual.
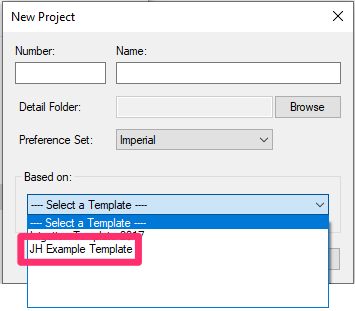
Use the Based on pull-down menu to select the template you want to use as the basis of the new project.
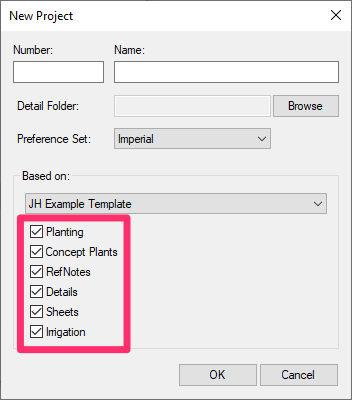
Note the checkboxes beneath the pull-down menu (Planting, Concept Plants, etc.).
Checking a box will bring in ALL data from that category. If the category is not available to select, the template contains no data for that specific category.
Click OK to create the new project based on the template you've selected.
Editing a Template
Templates are read-only files, so you cannot open a template and add items (such as plants and irrigation equipment). This is by design so users don't accidently modify templates and create problems.
To edit a template, open a new or existing project based on the template you want to edit.
Make any edits to plant and irrigation equipment data, as well as any other information you would like to reflect in the edited template.
When finished modifying data, open our Projects tool.
In the Land F/X Project screen, highlight the project name and click Save as Template.


Type a name for the template, and click OK.
Because you've chosen to save the new template under the name of an existing template, you'll see the following warning:
This template exists. Overwrite it?
Click Yes to overwrite the existing template.

Your new template will now be saved in the place of the old one. So essentially, rather than editing the existing template, you've created a new one and saved over it.
Once you've based a template on one of your projects, we recommend either keeping it in your projects list or setting it to Read-Only so it still exists but doesn't show in the list. That way, if you need to make updates to the template, the project is just as you left it when you created the template and you can pick up where you left off.
Backing Up and Restoring a Template
Our software saves templates just as it saves projects – as LFX files. Therefore, the process of backing up and restoring a template is essentially the same as backing up and restoring a project. Learn more about backing up and restoring projects and templates.
Template Coming In Blank? Make Sure the Project Isn't Set to Read-Only
If you create a template and it's not pulling the data from the project you based it on, that project may be set to Read-Only. A project needs to be set as active (Read-Write) before you can base a template on it successfully. Note that changing a project's permissions requires Admin status on that project.
Once you have Read-Write status on a project, you can base a Template on that project successfully.
Consult your office's CAD manager before attempting to change the permissions of a project. It might be set to Read-Only for a reason.
Related Webinars
- All About Templates: The word "template" can refer to several components in the AutoCAD and Land F/X systems. We break down the different types of templates available to you, including drawing templates (DWTs) and Land F/X project templates, and provide some helpful tips on using them to your advantage. (1 hr 4 min)
- Setting up Templates and Preferences for Repeat Clients: To save time and increase your accuracy, learn how to deliver a consistent drawing package for your repeat clients by setting up project templates and Preference Sets. (50 min)
- Streamlined Life Cycle of a Site & Hardscape Project: You have the tools at your fingertips – including Project Templates – to take your site and hardscape design from concept to construction documentation, complete with quantities, data, callouts, and cost estimates. Learn a complete process spanning the life cycle of each project that will start cutting days off your overall drafting time. (1 hr 3 min)
- Using Plant Templates: Project templates are focused and reusable palettes of your most frequently specified plants. This intermediate-level webinar will cover the best workflow for customizing templates. (1 hr 1 min)
- Land F/X Admin & Setup: This webinar will show you what you need to know about Land F/X admin processes and project setup. (1 hr 1 min)
Troubleshooting
Issue: When you open one of your templates, it comes in with a project already selected and a Dim1 scale. You may have attempted to save a new fixed template without a project selected, but it won't save.
Solution: If you are working in Imperial units, we recommend setting up at least two templates, already set to a sheet size and a scale. One of the templates should have the units set to inches, and the other to decimal feet. This way you can also set the -DWGUNITS. This setting will help prevent any abnormal scaling issues.
Need to disassociate a project from a drawing? Here's how.


