Return to the Classic CAD Interface
- Removing the Ribbons
- Retrieving the Menubar
- Toolbars (Discontinued)
- Returning to the Classic Light Theme
- Opening the Classic Layer Properties Manager
- Naming and Saving Your Customized Workspace
Don't like the post-2015 AutoCAD interface? Not a problem. You can convert yourself back to "Classic Mode" with a few quick steps.
Removing the Ribbons
Possibly the most prominent visual feature of the newer AutoCAD interface is the inclusion of "ribbons" comprising many of your favorite CAD and Land F/X tools. To remove the ribbons from your workspace, type RIBBONCLOSE in the Command line and press Enter.

The ribbons will be removed from your view. You can always open them again by typing RIBBON in the Command line and pressing Enter.
Retrieving the Menubar
Another hallmark of the classic interface is the menubar at the top of your screen. Don't see it? You can simply type MENUBAR in the Command line and press Enter. When prompted for a value, type 1.

Your menubar will appear at the top of your screen. To hide the menubar, type MENUBAR in the Command line again and press Enter. Then type 0 when prompted to enter a value.
Toolbars (Discontinued)
The toolbars are no longer supported as of January 2024. If you're accustomed to using the toolbars, we recommend getting to know the AutoCAD and Land F/X ribbons.
Returning to the Classic Light Theme
Post-2015 F/X CAD installations come with the Dark color theme as the default setting. To get back to the true CAD classic look, you can also choose to change the theme back to the classic light theme.
To do so, type COLORTHEME and press Enter. Then type 1 when prompted to enter a value.

Your CAD workspace will now have the classic light theme. To return to the Dark theme, type COLORTHEME and type 0 when prompted to enter a value.
Opening the Classic Layer Properties Manager
Another mainstay of the Classic interface is the Properties window. In this step, we'll replace the layer properties with the classic Properties window.
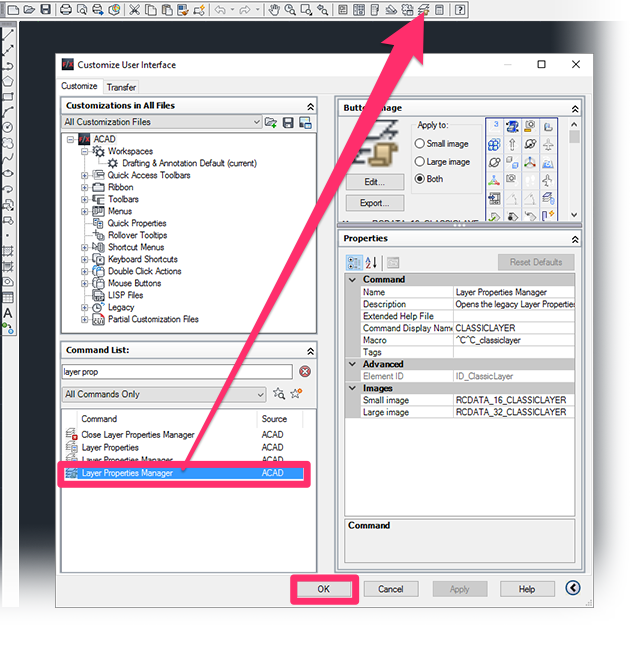
Type CUI and press Enter to open the Customize User Interface screen.
Type Layer Prop in the Command List field.


You'll see two Layer Properties Manager items in the list of commands in the bottom left corner of the dialog box.
Select each one, checking the Properties panel to the right to determine the one whose Command Display Name is CLASSICLAYER.
Once you've located the correct Layer Properties Manager icon, drag it to a toolbar.
Then click OK at the bottom of the CUI window.

Retrieving Your Layer Properties Manager and Xref Manager
The classic Layer Properties Manager and Xref Manager palettes can sometimes become lost off to the side of your interface. Getting them back is easy.
To retrieve your Layer Properties Manager (pictured below), type ClassicLayer and press Enter.

To retrieve the Xref Properties Manager (pictured to the right), type ClassicXref and press Enter.

Naming and Saving Your Customized Workspace
Finally, after you’ve customized your workspace, you'll need to save your settings.
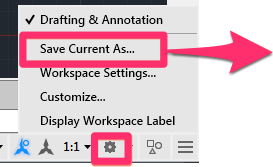
To do so, click the gear icon in the bottom right corner of your CAD interface and select Save current as… from the menu. Name this workspace something memorable, such as Classic. Then click Save.


Your classic settings will now be saved under the name you selected.
Don't see the gear icon? You can also type WSSAVE and press Enter to open the Save Workspace dialog box. You can then save your changes as shown above.


