
Tree Rootballs: Planting F/X for Revit® Plugin
Quick video

- Rootball Overview
- Placing Rootballs
- Moving Rootballs
- Assigning a Rootball to a Tree in Your Project
- Deleting Rootballs
- Rootball Clash Detection
- Troubleshooting
The Planting F/X for Revit Plugin includes a Rootball tool that allows you to define the shape and size of the underground portion of a tree's planting area in your landscape plan. Rootballs offer the following advantages:
- Ensure proper space allocation for roots
- Provide stability
- Prevent conflicts with underground utilities
- Simplify the installation process for landscaping contractors
Rootballs Overview
To open the General Preferences screen, open the Plant Sizes flyout from the Planting F/X ribbon in Revit.
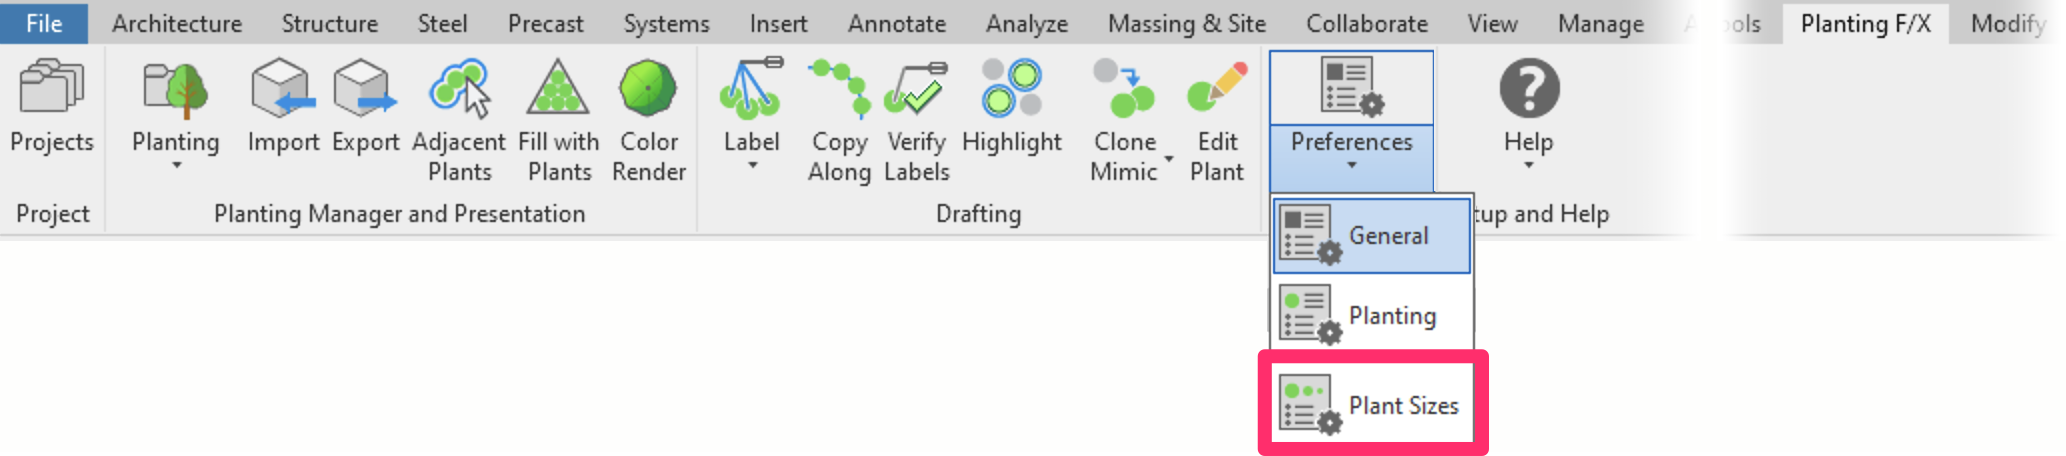
Planting F/X ribbon, Plant Sizes flyout
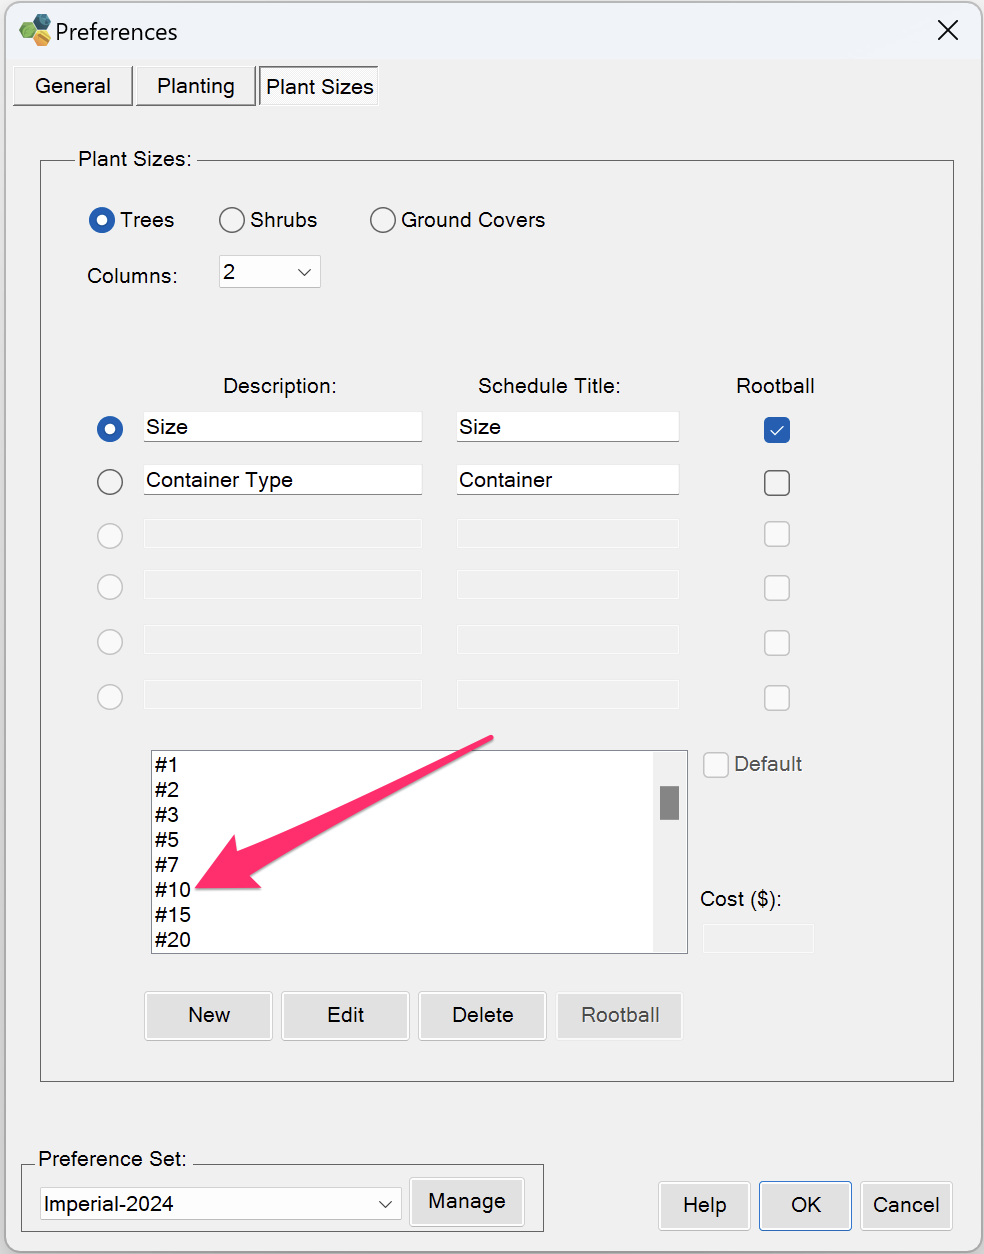
The Preferences screen will open. Ensure that the Plant Sizes tab is selected.
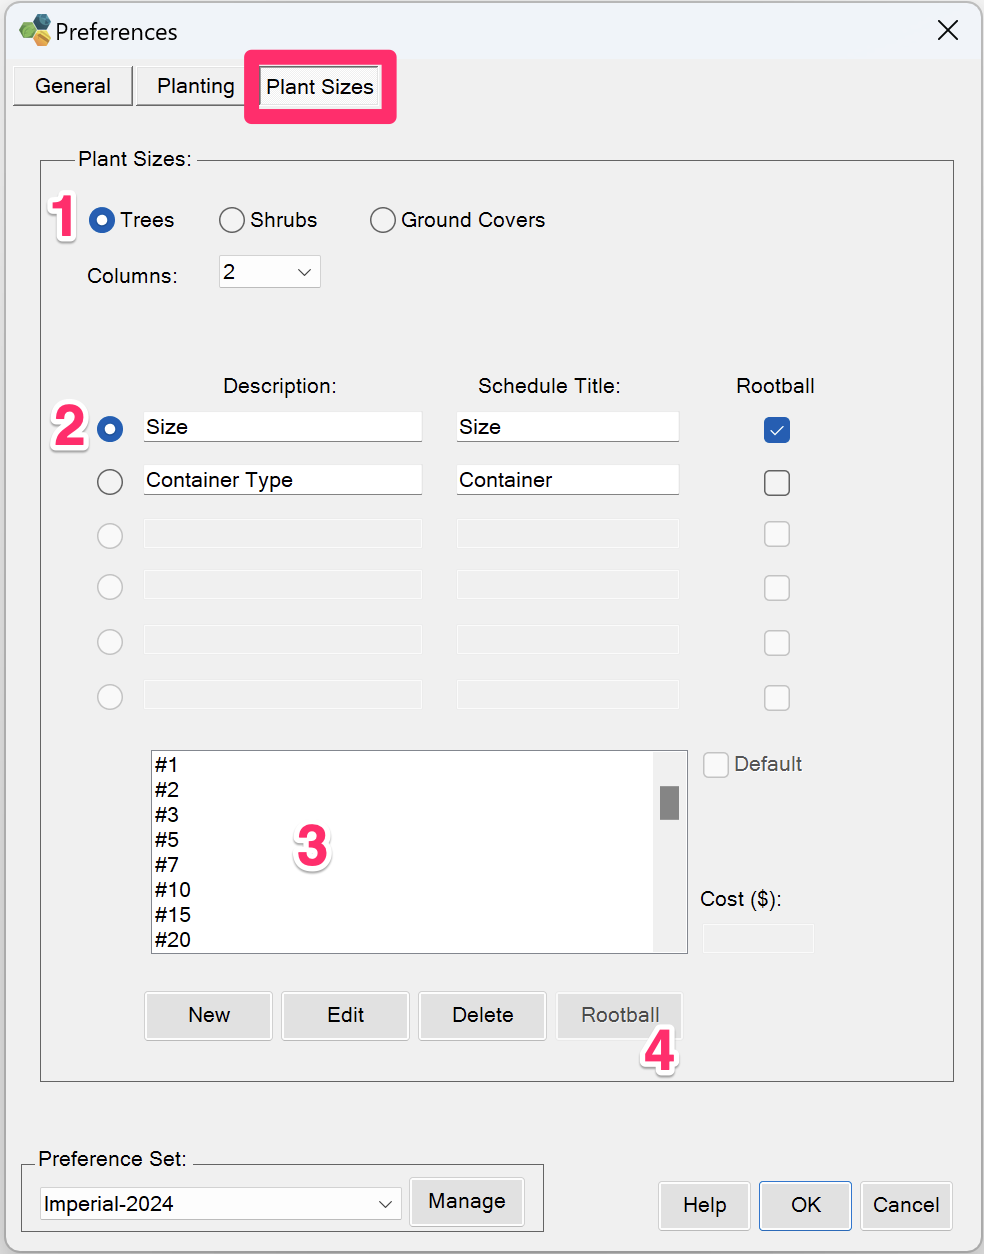
1. Select the Trees option.
Shrub rootballs are not significant enough to conflict with anything in your project, so our Planting F/X Plugin for Revit doesn't include an option to assign rootballs to shrubs.
2. Each plant size column field includes several field values. Select a field (such as Size) to see the available values for that field. Select the Rootball option to the right of a field to ensure that trees that are assigned values from that field will also be assigned with rootballs.
3. This area lists the values currently available for the selected field. Each value will have a preset rootball type by default, but you can choose to configure each rootball type to your liking. For example, if you want to configure a rootball for tree size #10, select the #10 option.
4. Click Rootball to edit the appearance (size and shape) of the rootball assigned to the selected field value. More information
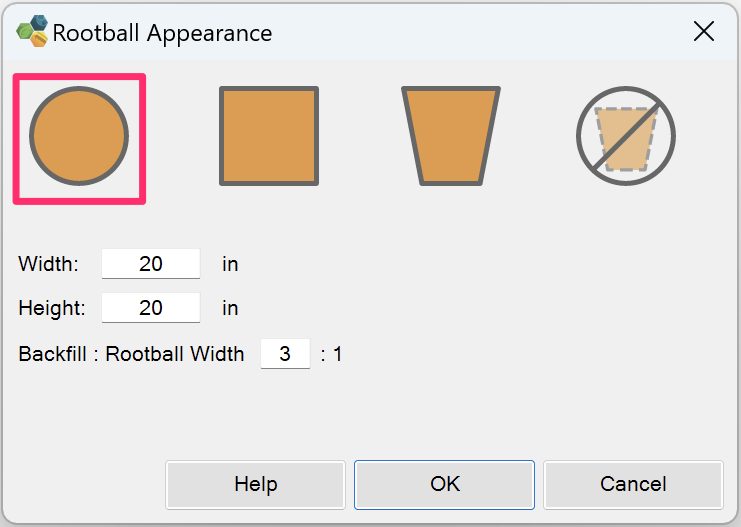
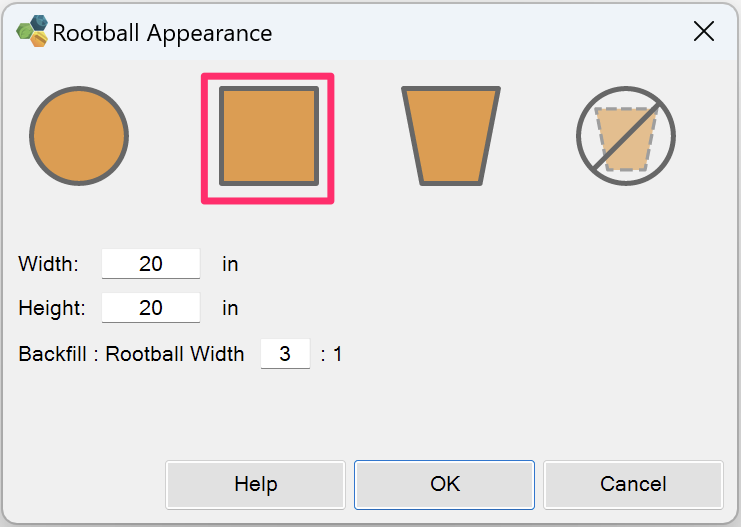
Configuring Rootball Appearance
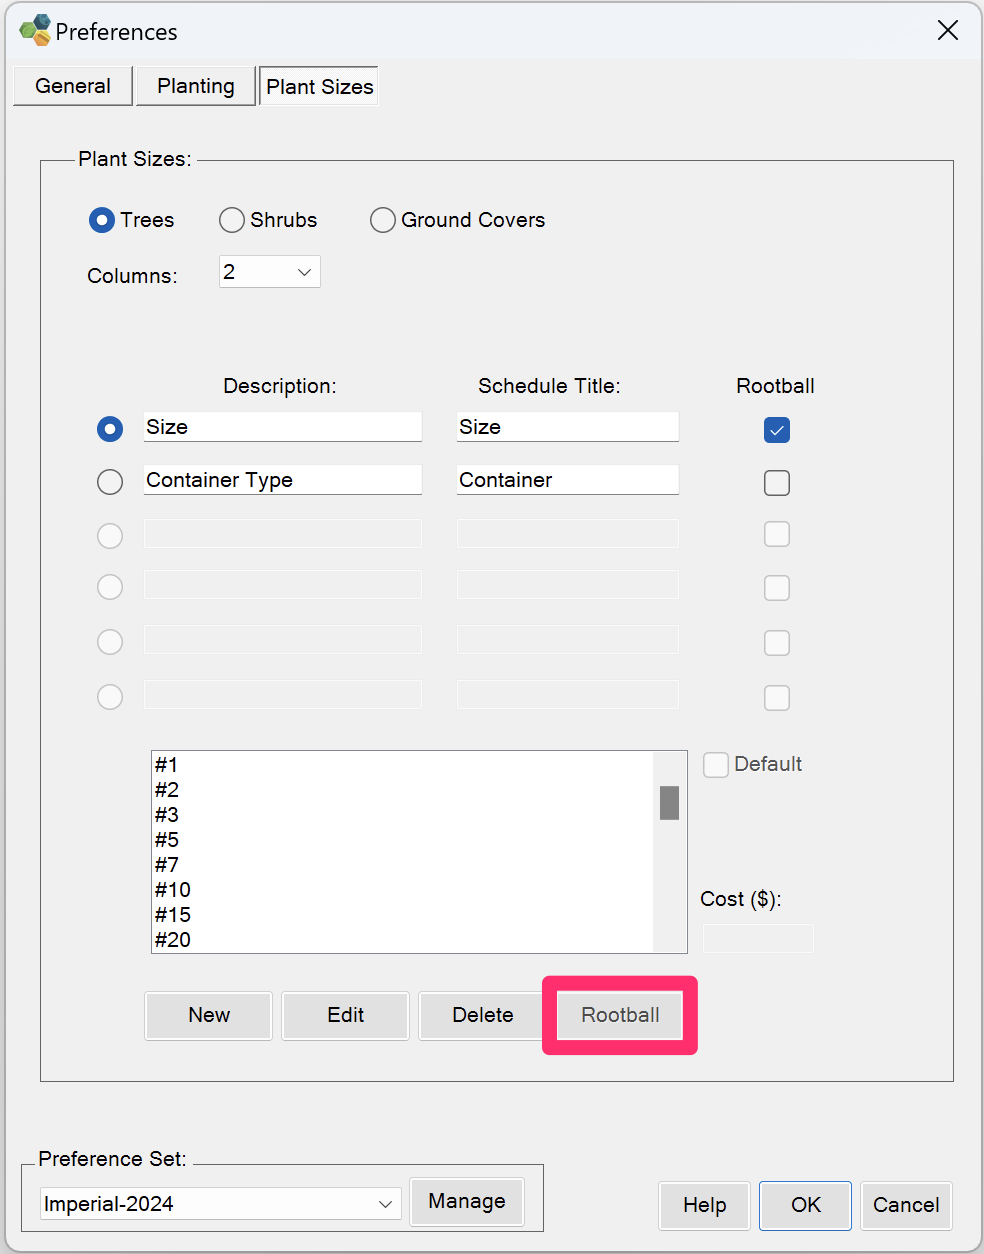
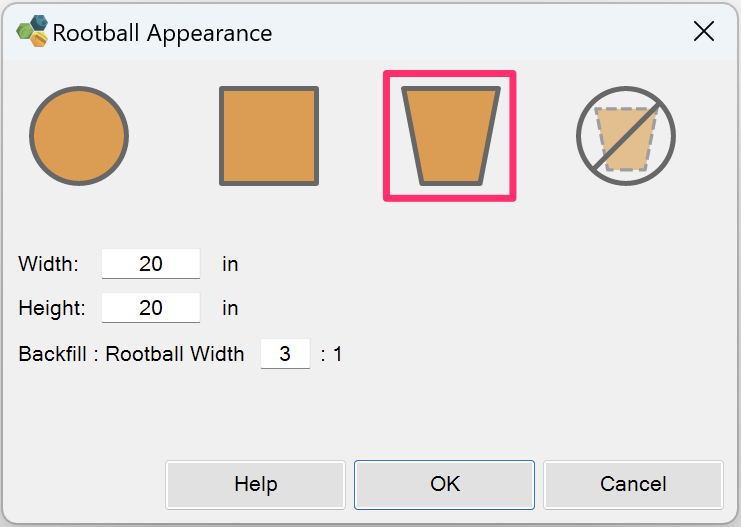
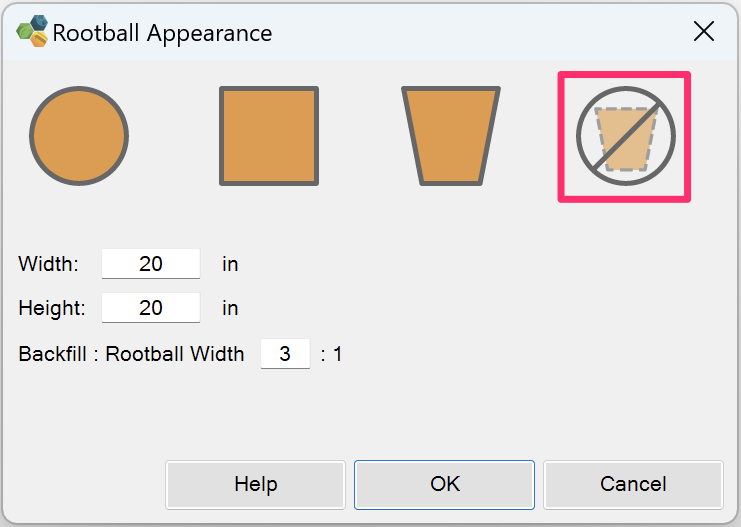
Click the Rootball button in the Plant Sizes Preferences screen to configure the appearance of the rootball assigned to the selected field value such as tree size.
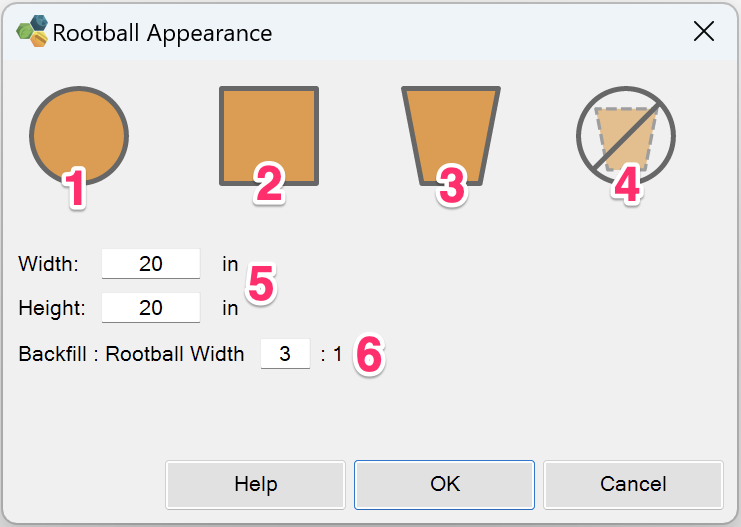
Select a shape for the rootball:
- 1. Circle (Sphere/Ball)
- 2. Box (Cube)
- 3. Pot
- 4. No rootball
5. Enter a Width and Height for the rootball.
6. Enter a backfill width for the rootball.
Available Rootball Shapes
Circle Rootball
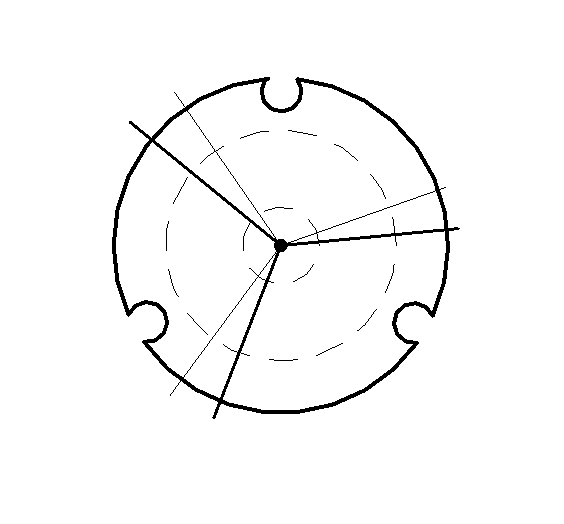
2D symbol of a circle rootball
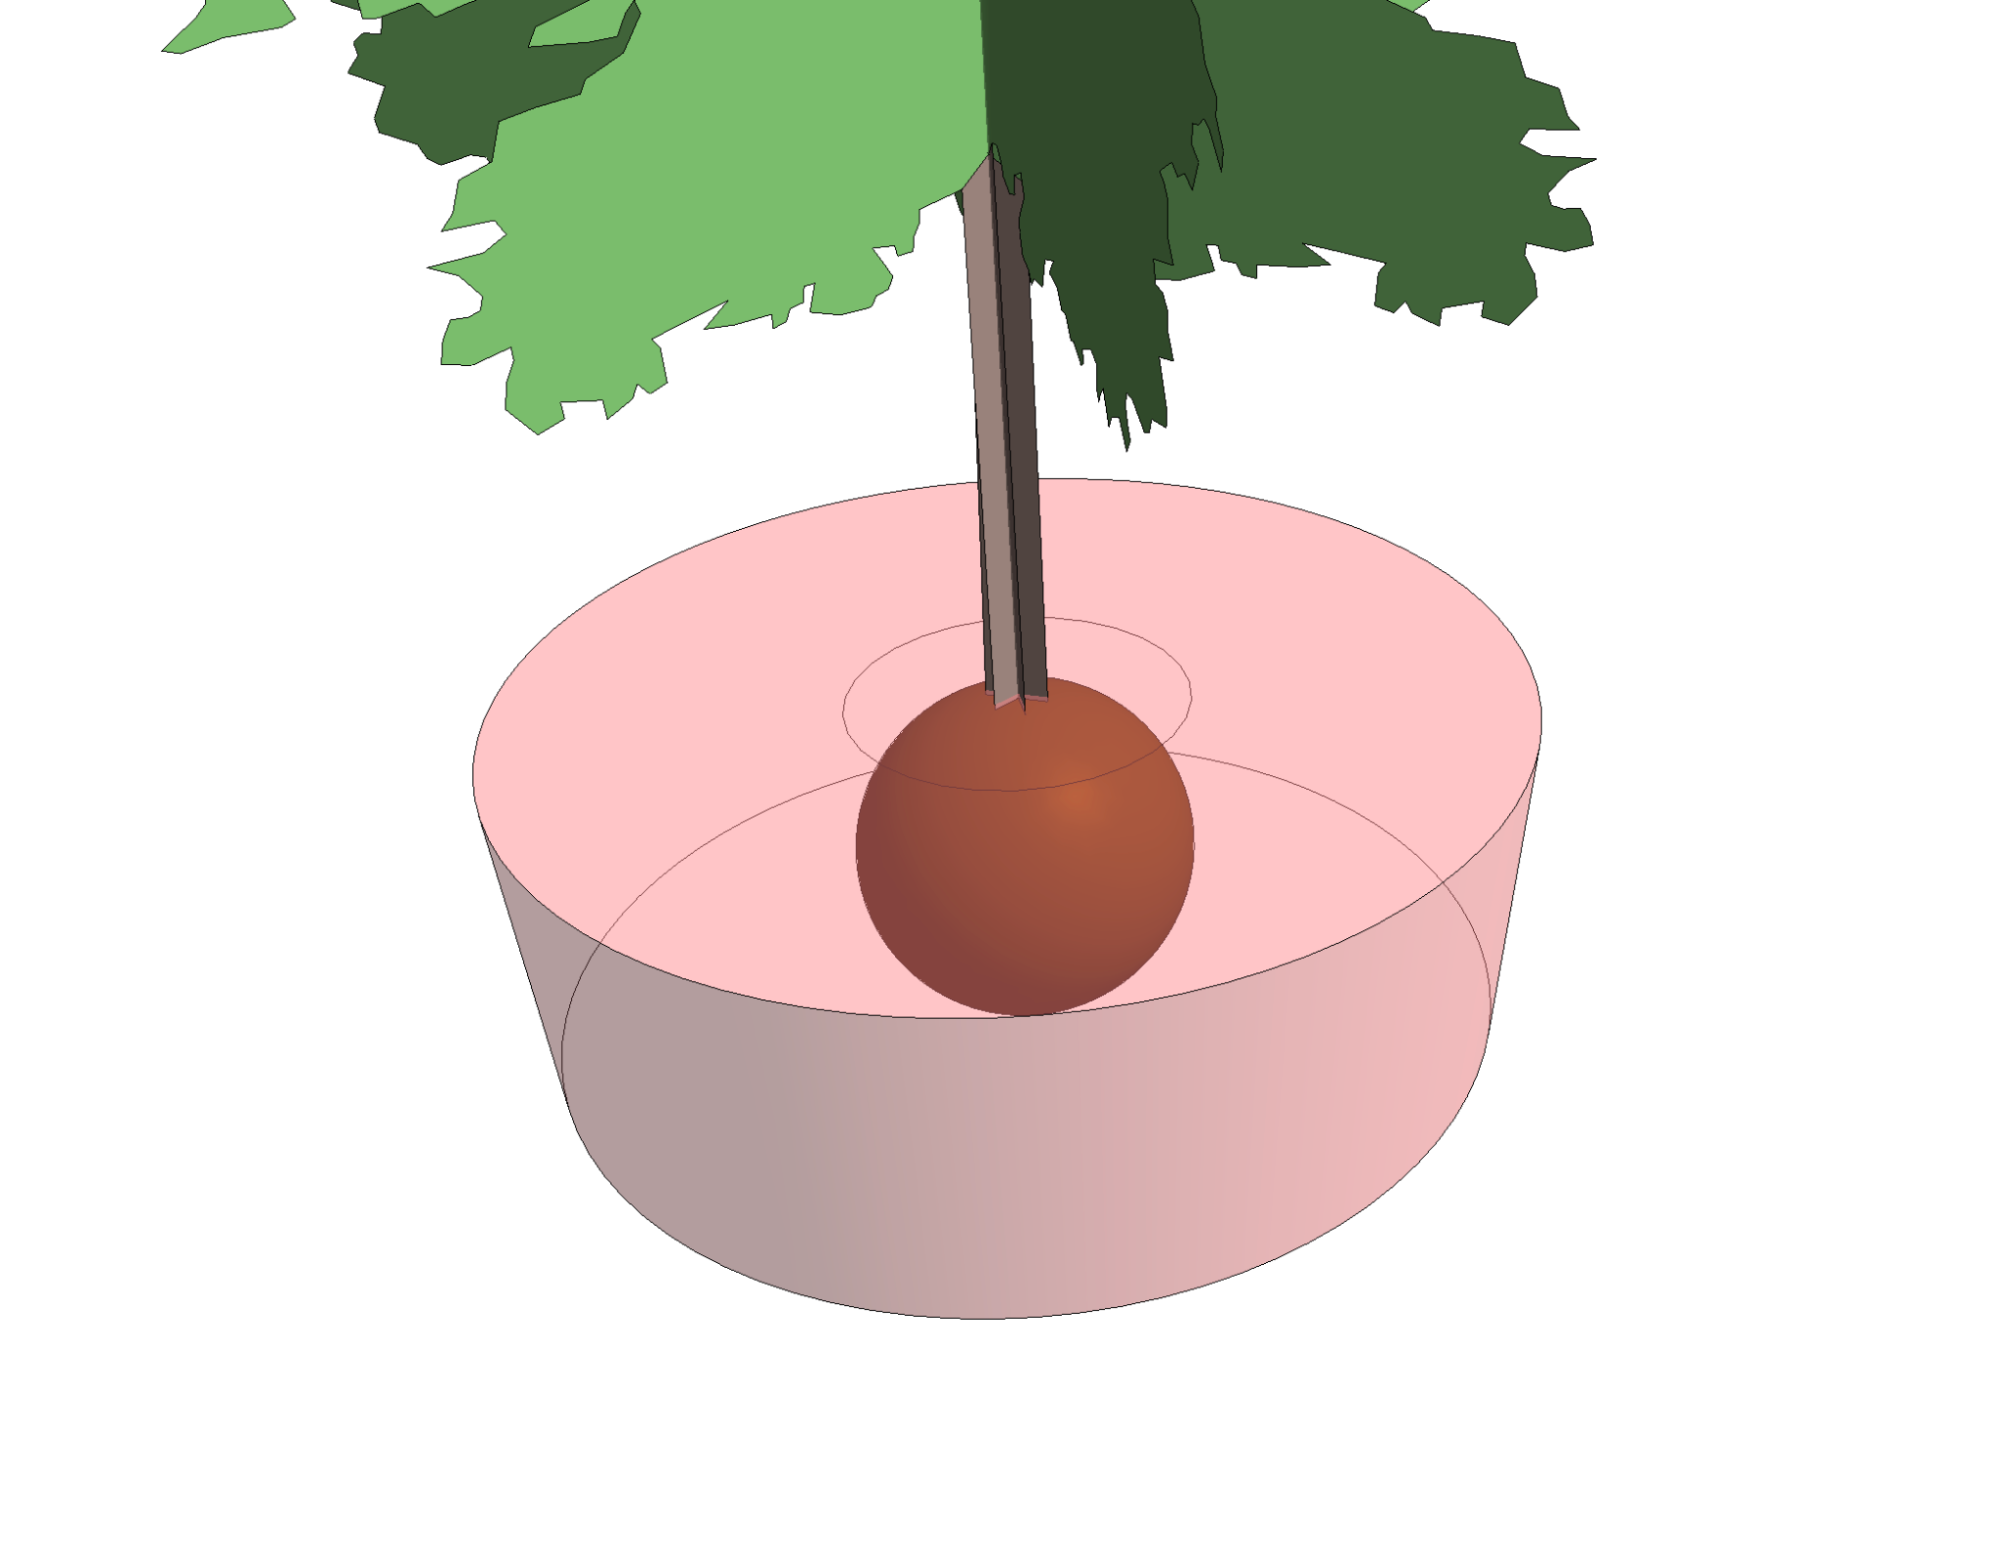
3D symbol of a circle rootball
Box Rootball
2D symbol of a box rootball
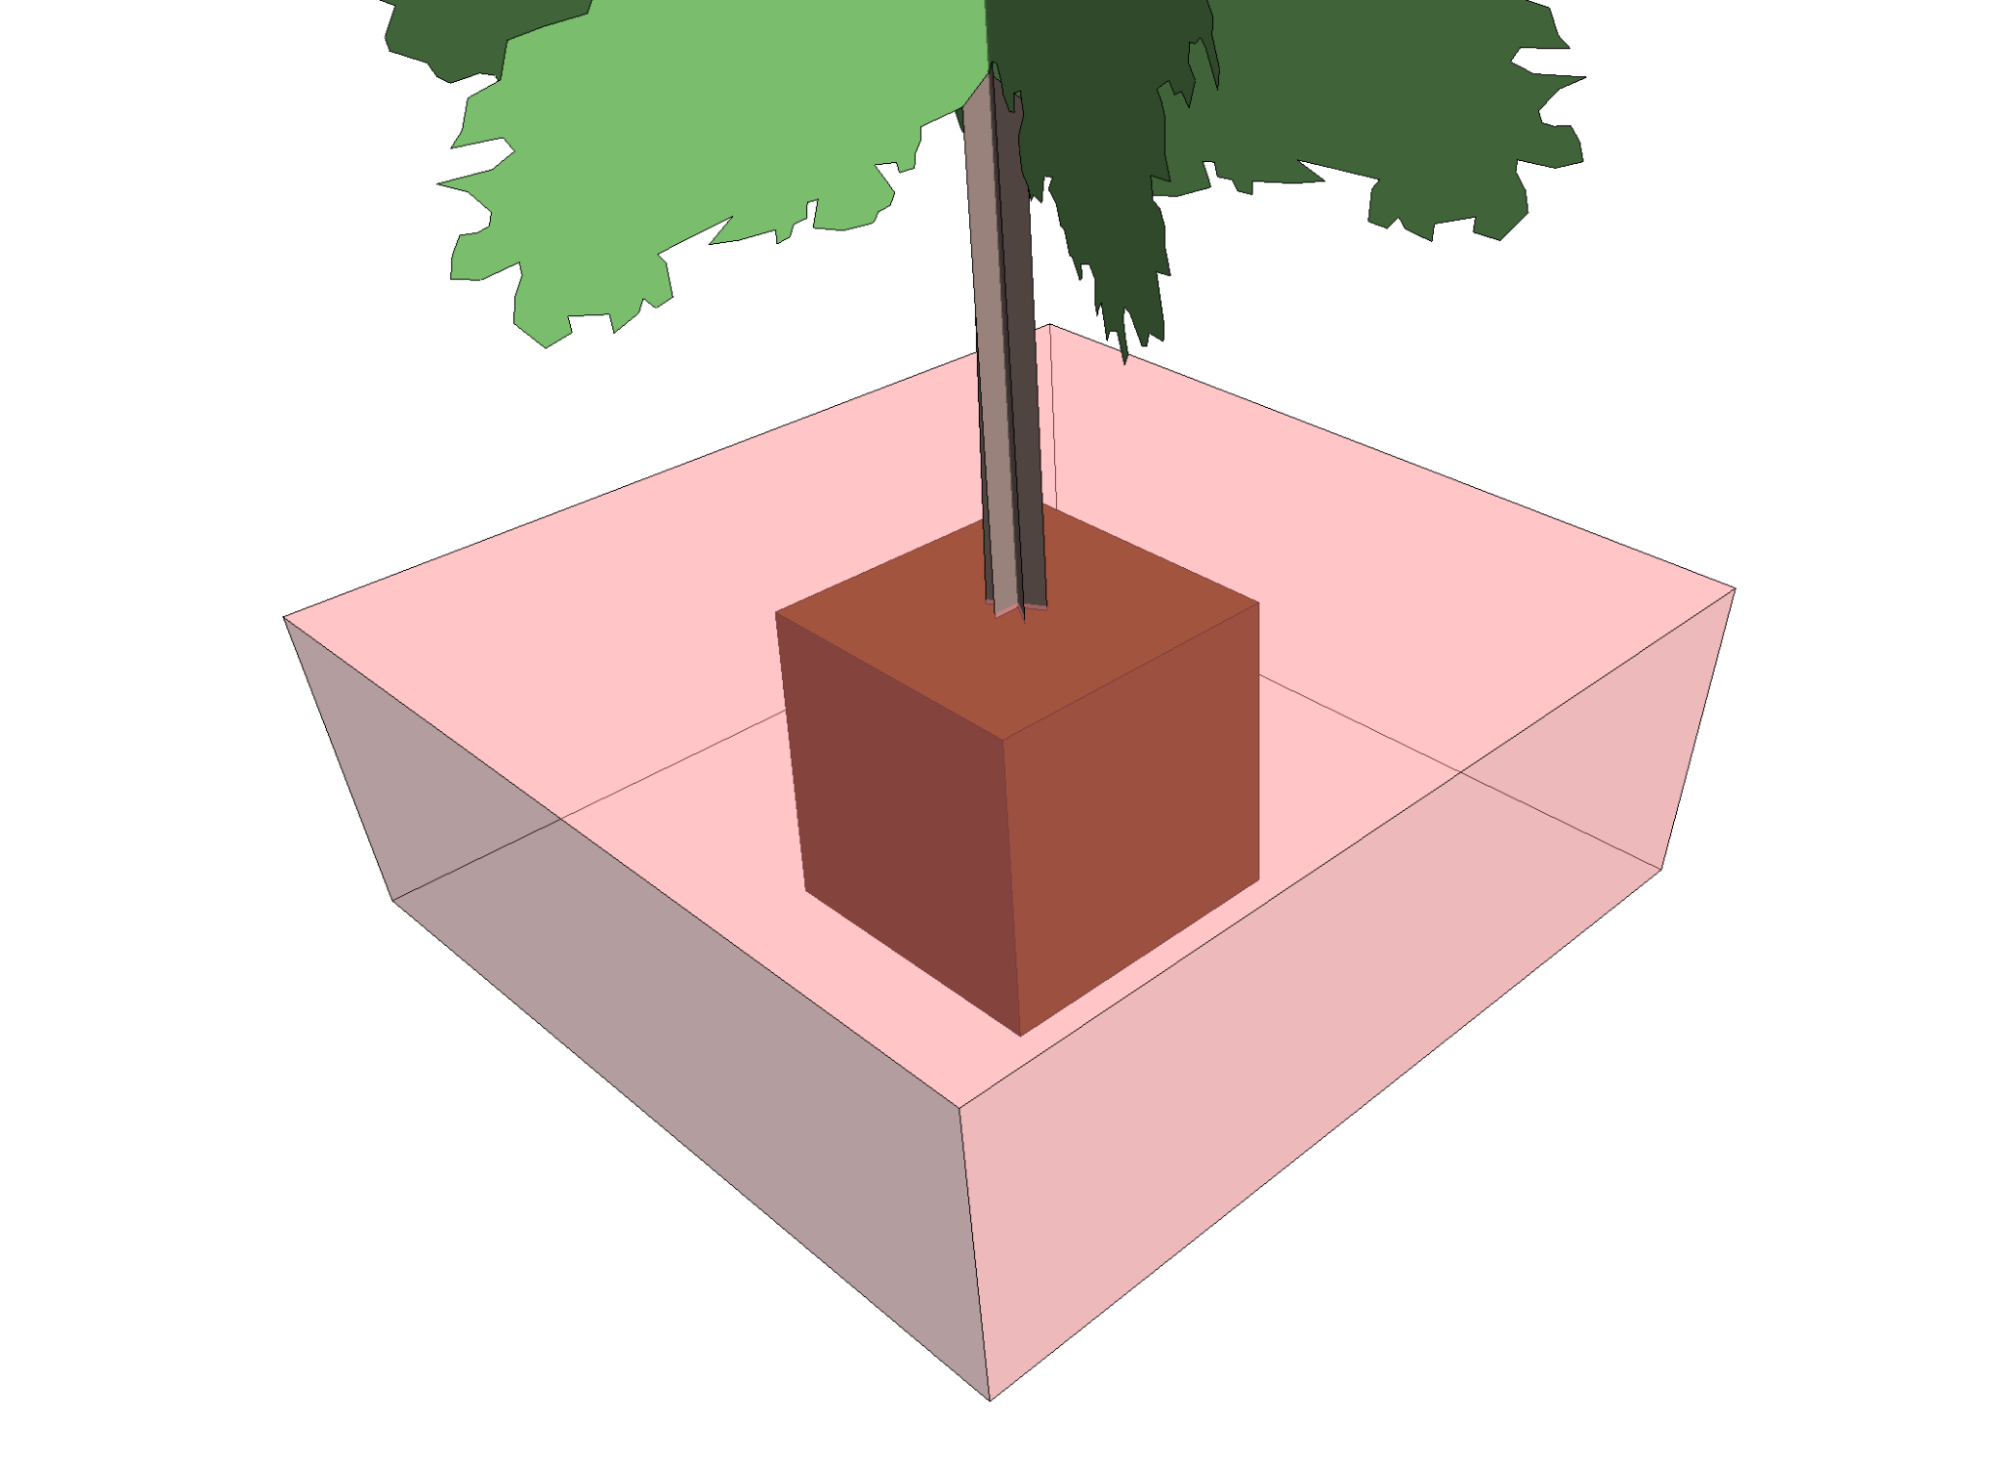
3D symbol of a box rootball
Pot Rootball

2D symbol of a pot rootball

3D symbol of a pot rootball
No Rootball
Placing Rootballs
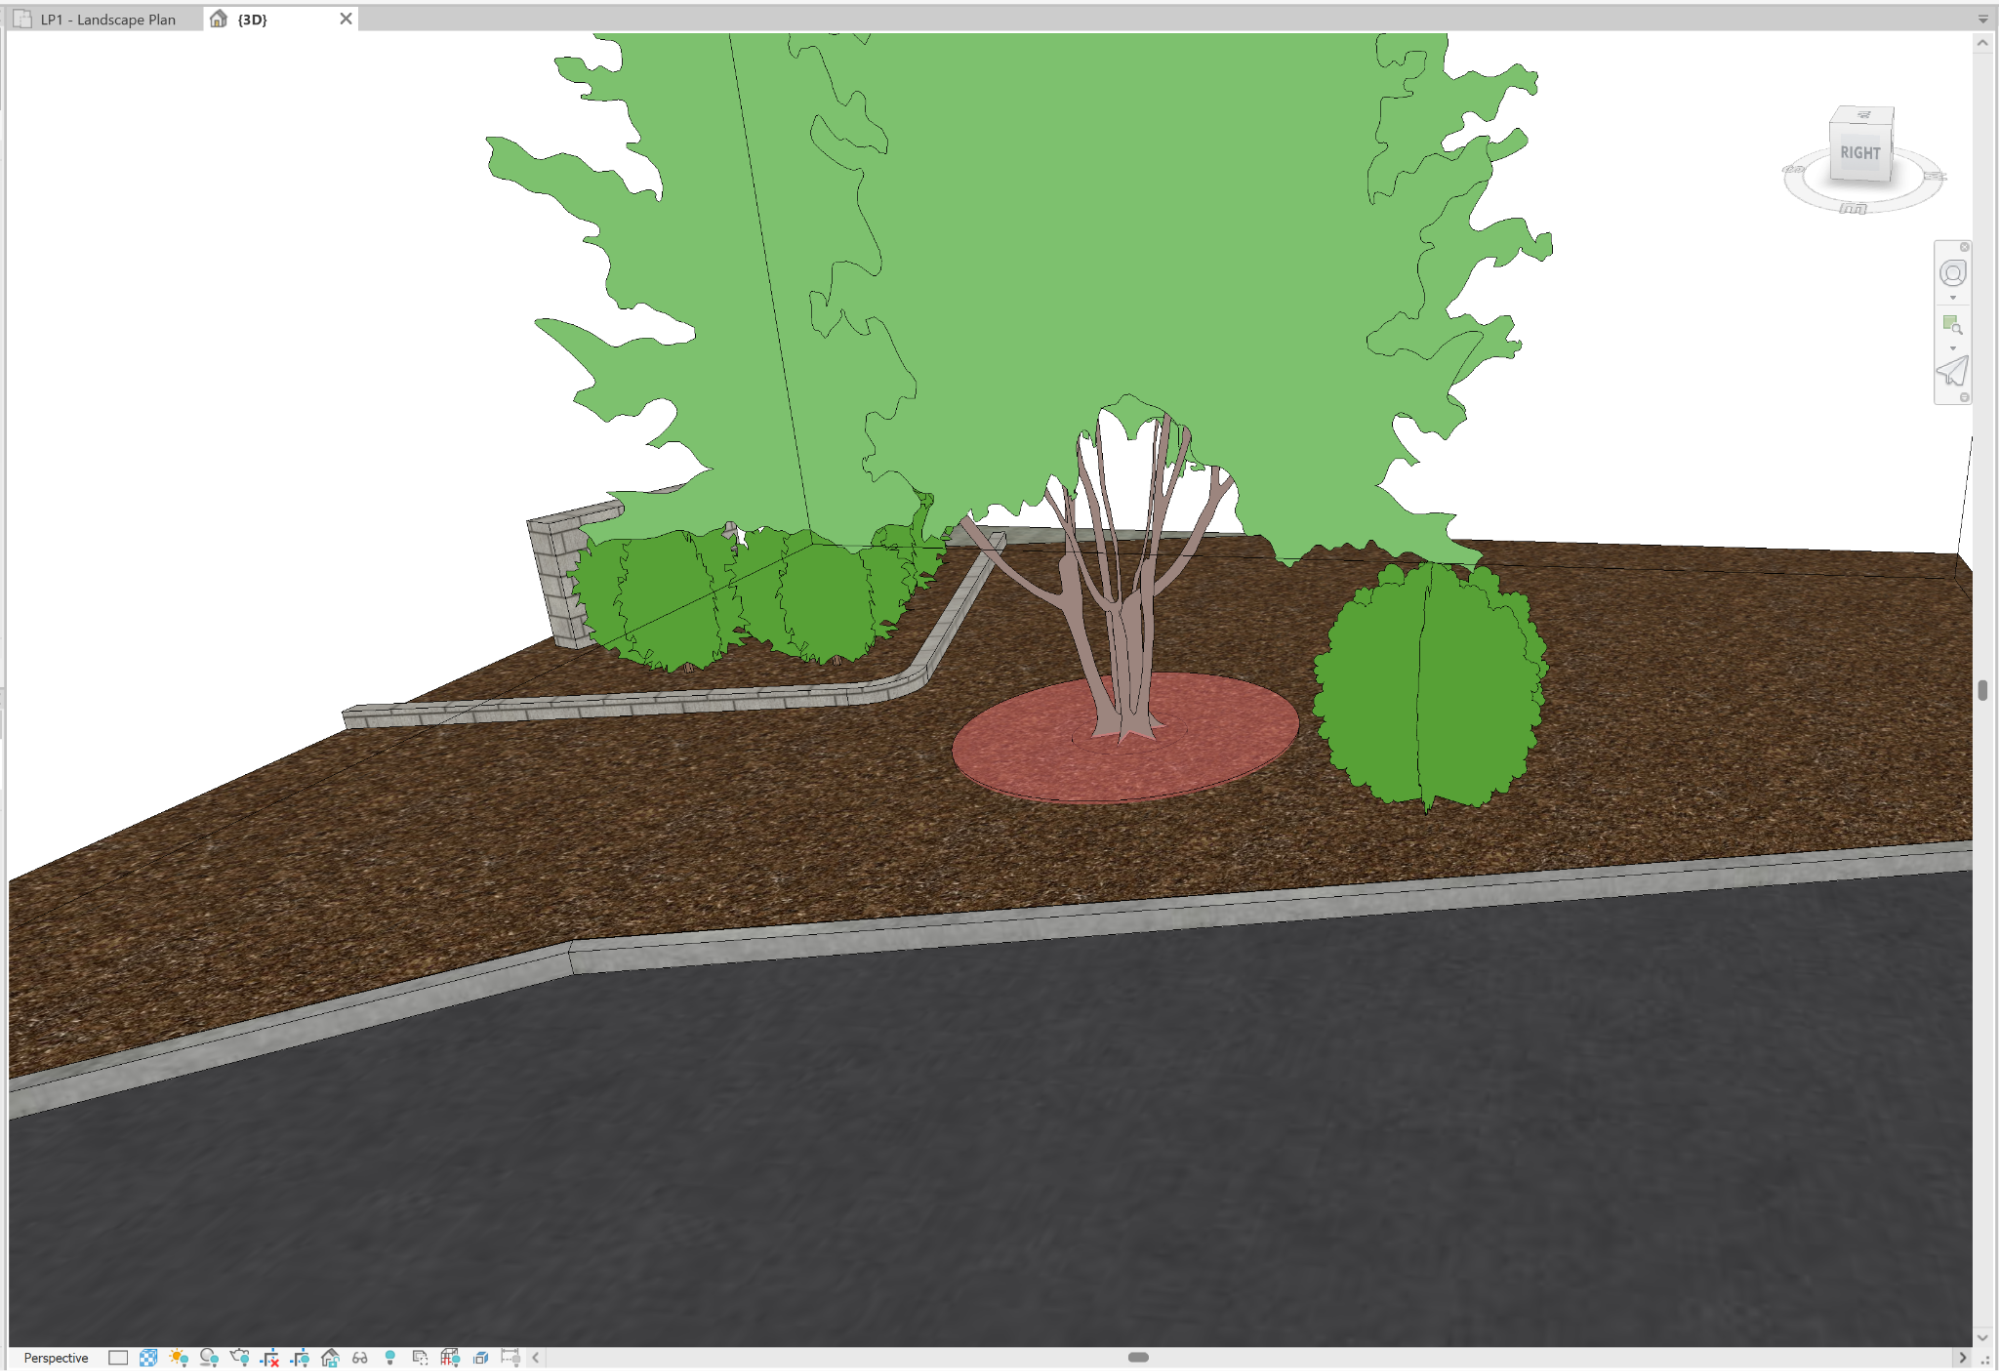
The process for placing rootballs is the same as placing trees. When you place a tree, the rootball assigned to that tree will place with the tree.
The rootball will be pinned to the placed tree.
The rootball family's shape and size will be set based on the tree size you chose.
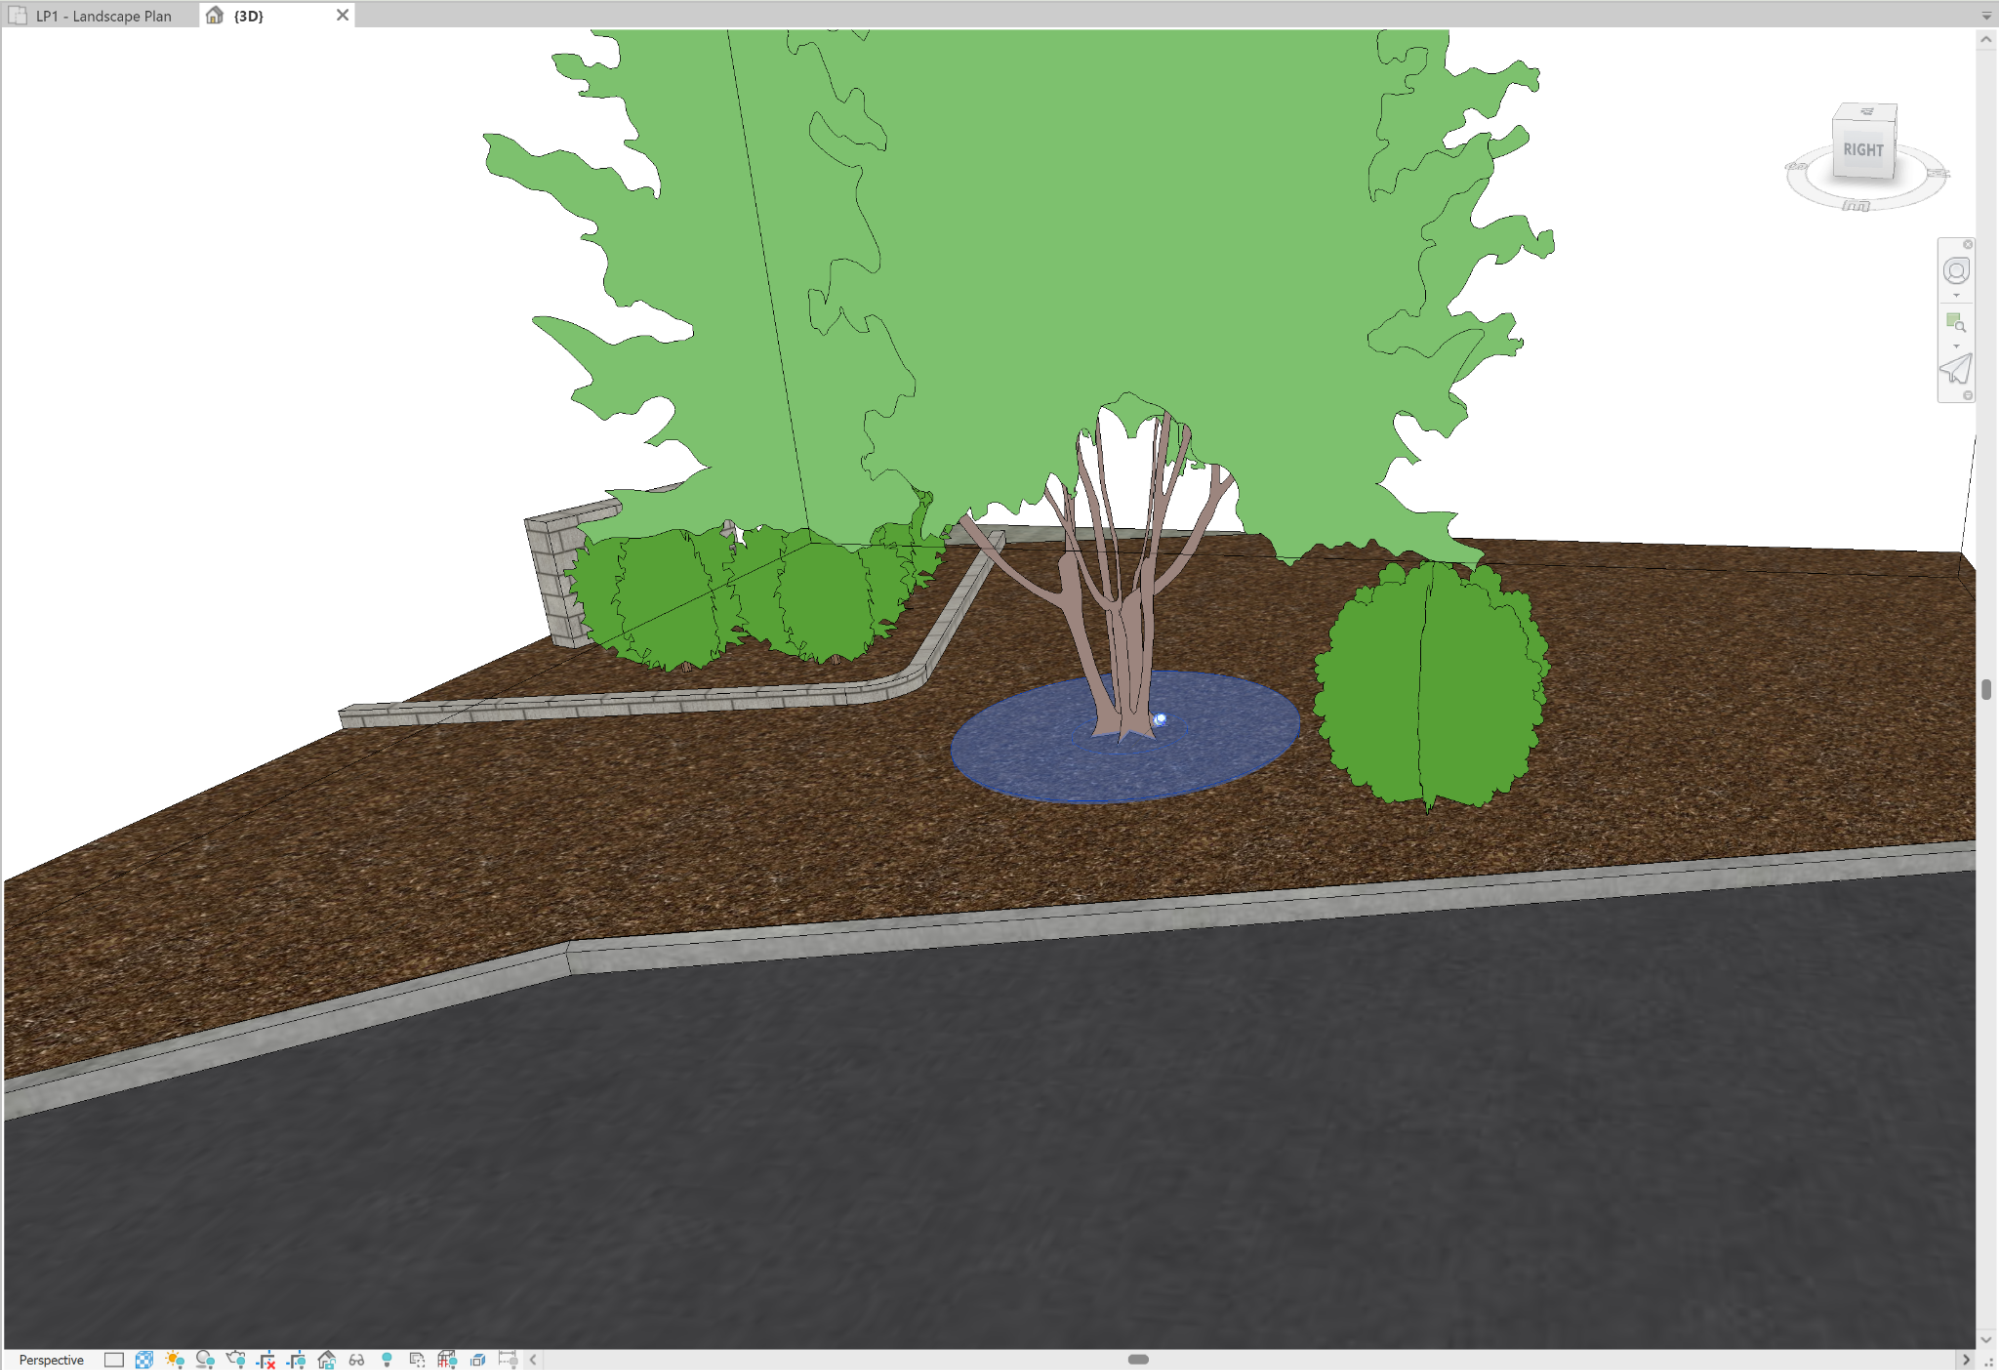
Moving Rootballs
When you place a tree that's assigned a rootball, the rootball will be pinned to that tree and will move to any location where you move the tree.
Assigning a Rootball to a Tree in Your Project
To assign a rootball to a tree that's already been placed in your Revit plan, open our Edit Plant tool from the Planting F/X ribbon, then click the tree in your plan to select it.

To assign a rootball to a tree that hasn't been placed yet, open the Plant Manager from the Planting F/X ribbon:

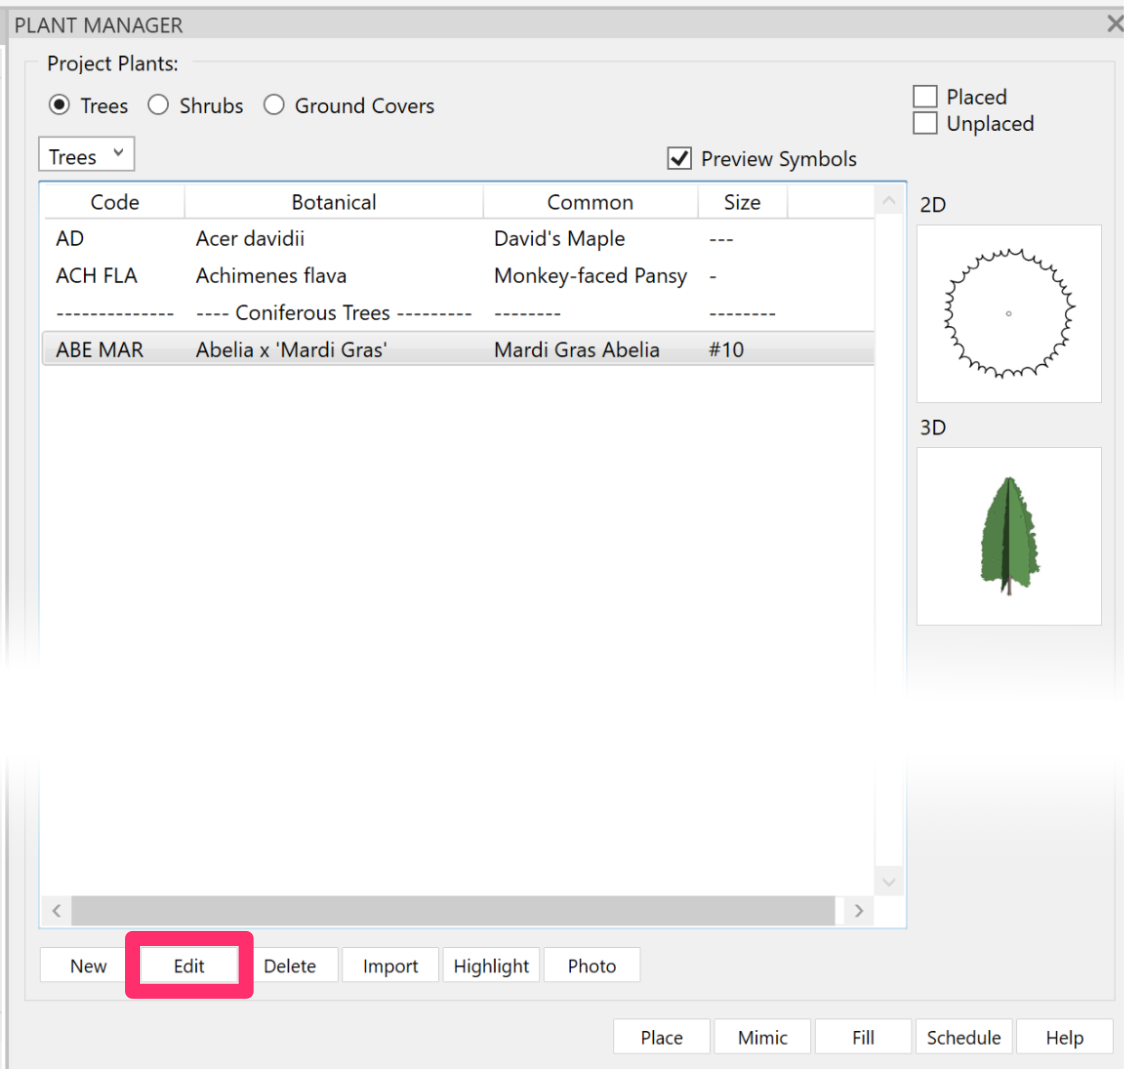
Highlight the tree in the Plant Manager, then click Edit.
Either of these methods will bring up the Plant Info dialog box (pictured below to the left.)
Set the top field (in this example, Size) to a value that matches the value for the same field in the Plant Sizes Preferences (pictured below to the right) that's currently assigned the rotball you want.
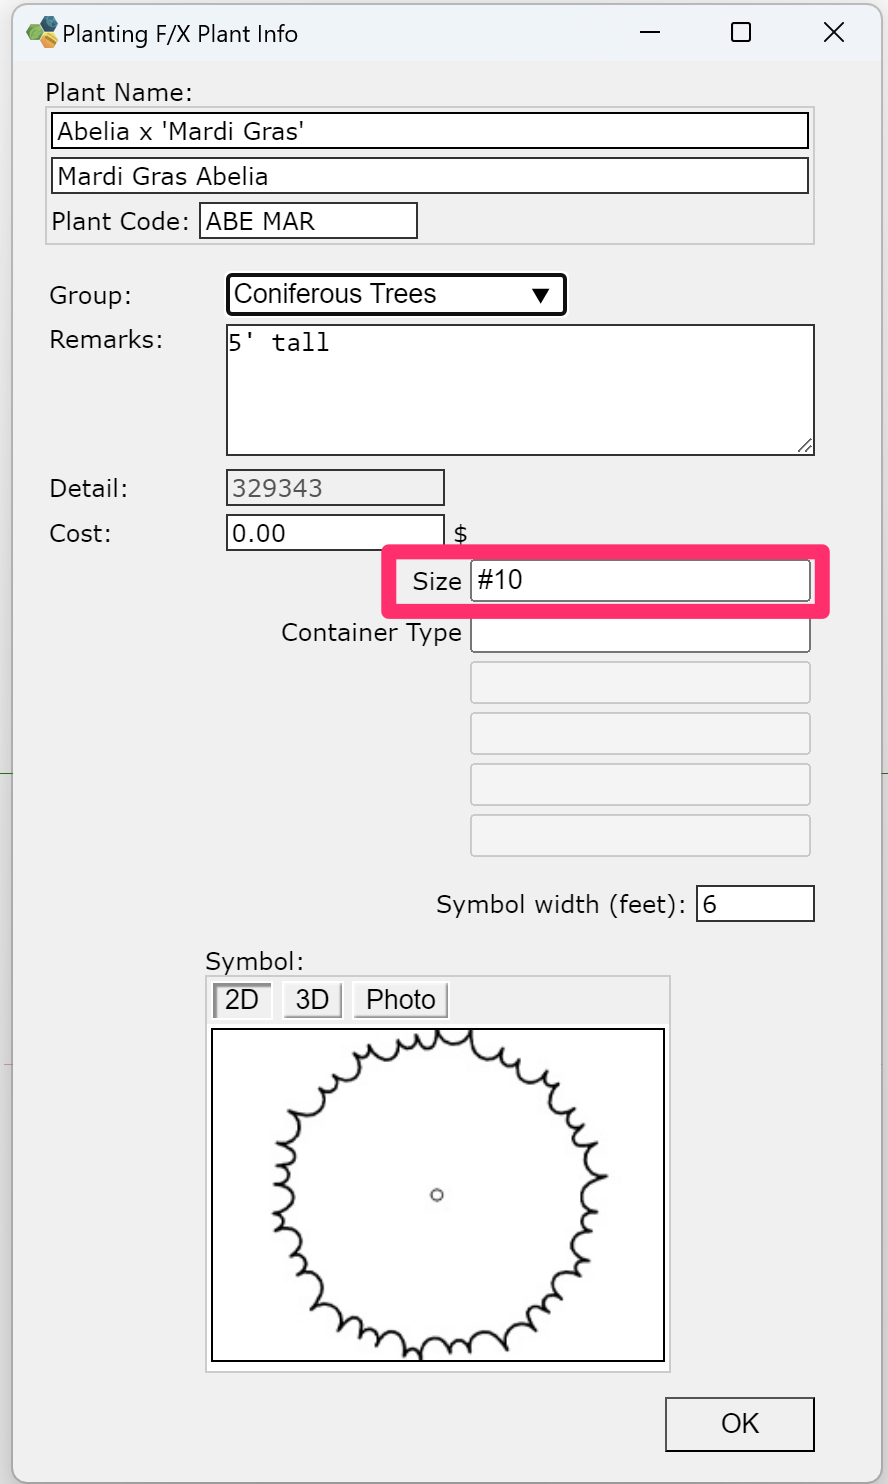
In this example, the selected tree is currently assigned Size #10. As a result, a rootball with the same size and shape currently set to the #10 plant size in the Plant Sizes Preferences will be assigned to this tree. When the tree is placed, the rootball will place with it.
Deleting Rootballs
To delete a rootball from your plan, simply delete the tree it's assigned to from your plan.
To delete the tree, right-click it and select Delete from the menu that opens.
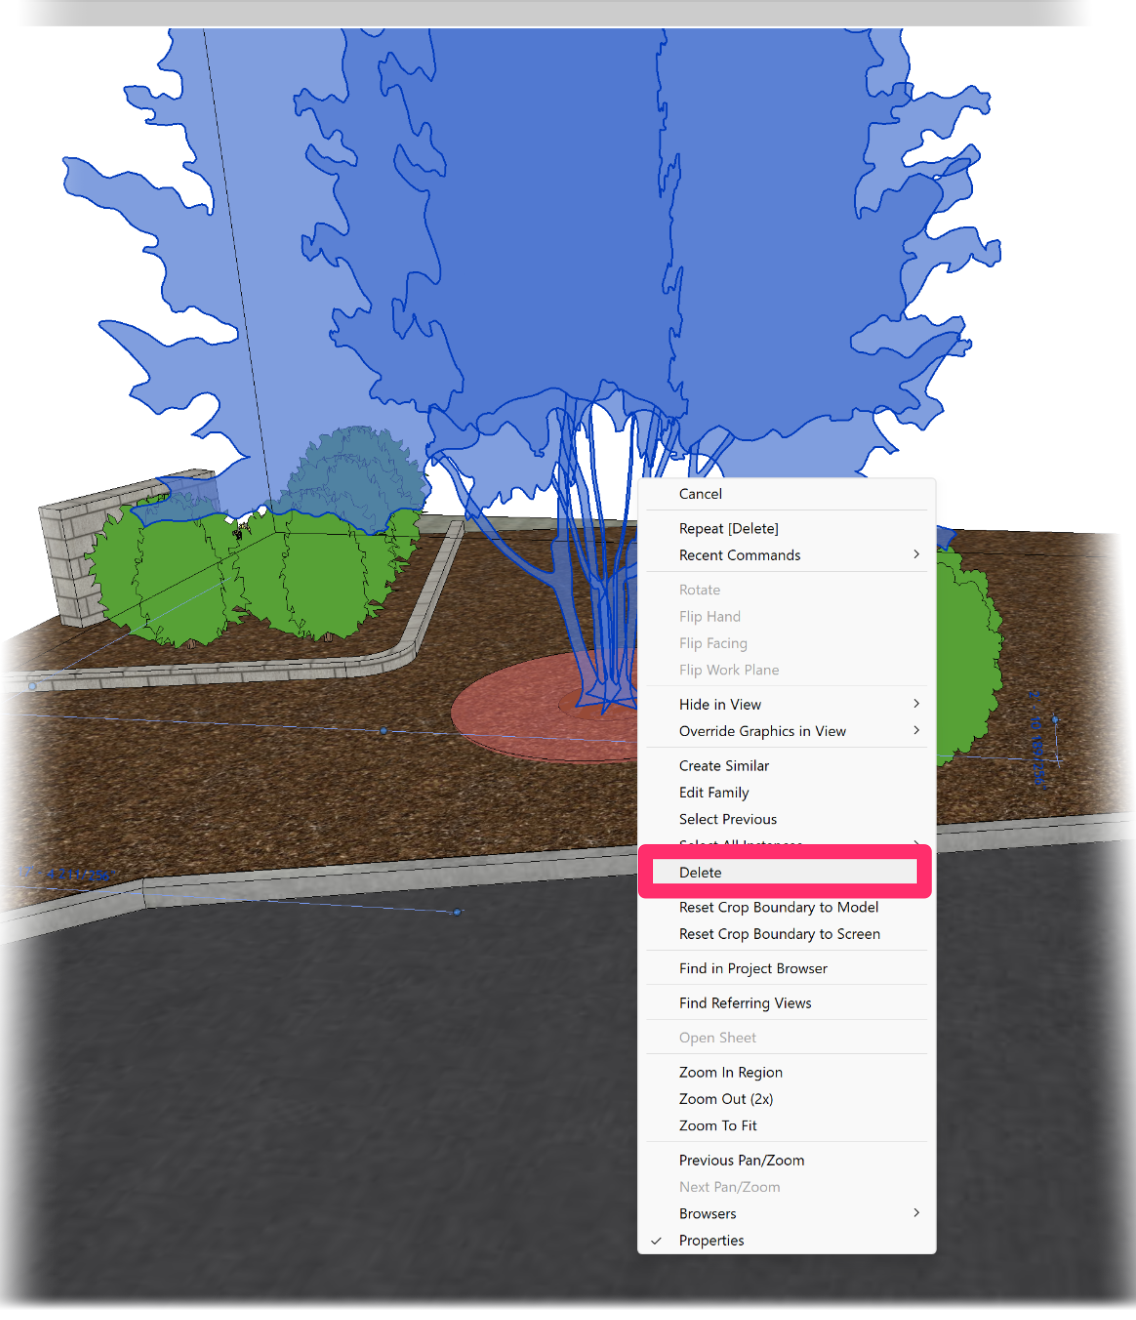

The rootball will be deleted along with the tree, resulting in accurate rootball counts.
Rootball Clash Detection
To run Clash Detection on the rootballs in your plan, select the Run Interference Check flyout option from the Collaborate ribbon.

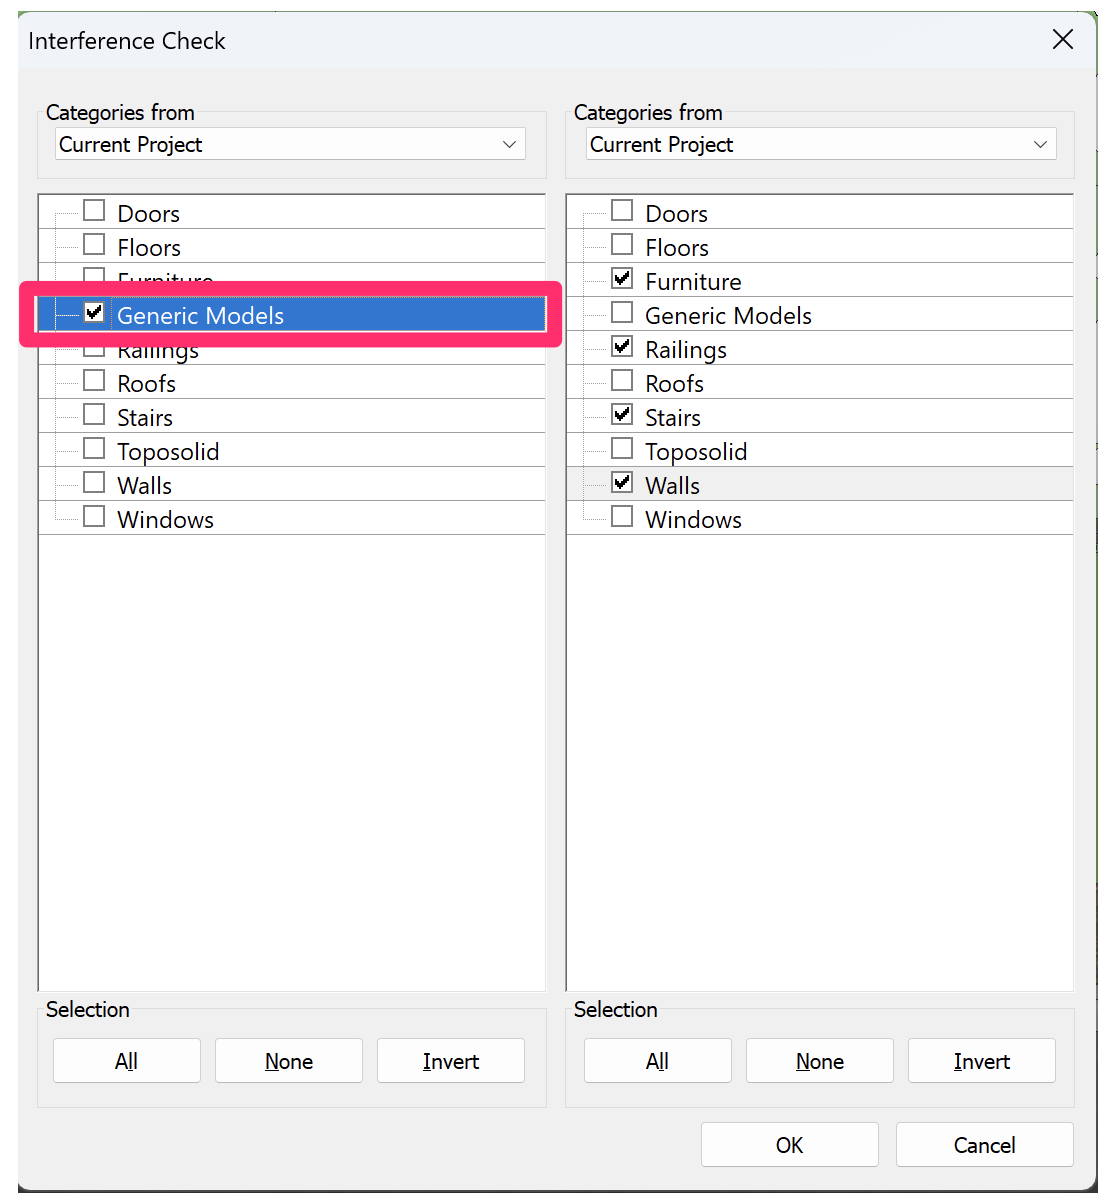
The Interference Check dialog box will open.
Select the Generic Models option, then select any categories that may interfere with the rootball.
When finished selecting categories, click OK to run an Interference Check on your project.
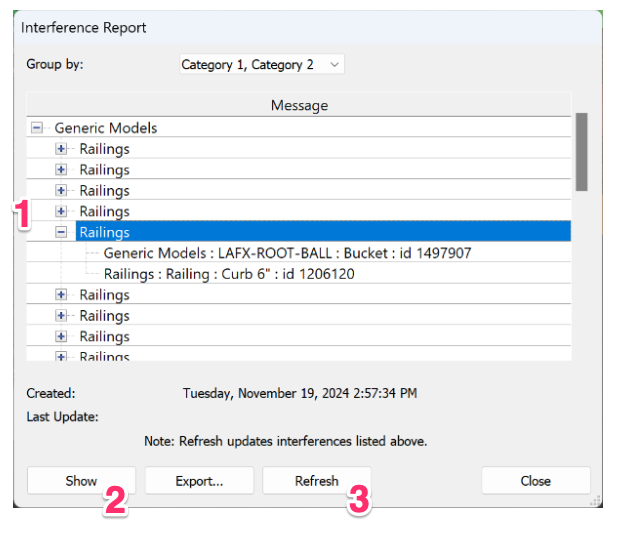
The Interference Report dialog box will open.
1. All instances where your rootball and other categories are clashing will populate here
2. Click Show to see the instance where your rootball is clashing, allowing you to address the issue.
3. Click Refresh to run the check again. Any clashes you've been able to address successfully will be removed from the refreshed report.
Troubleshooting
Revit® is a restricted trademark of Autodesk®.
Contact
- Land F/X


Our software tailors AutoCAD®, Revit®, and SketchUp® to the needs of landscape architects, irrigation designers, and other professionals. We automate your most tedious tasks and ensure accuracy, giving you more time to design.