Concept Areas (Site Development/Estimator)
- Concept Areas Overview
- Creating a New Concept/Site Development Category
- Placing a Concept Area
- Editing a Concept Category
- Adding a Custom Color
- Placing a Concept/Site Development Schedule
- Import Concept Categories from a Template or Project
- Related Webinars
- Troubleshooting
With our Concept Areas feature (formerly known as Site Development and Estimator), you can create an early-stage site cost study or a site master plan. Concept Areas allow you to set up a graphic preview of the various usage areas that will be installed throughout your site. Examples include regions marked for buildings, pavement, planting, and water features.
You can also use this feature to apply cost data to each of the site usage categories. Armed with this information, you can conduct an informed early review of your master plan's budget based on the assigned area for each use.
Concept Areas Overview
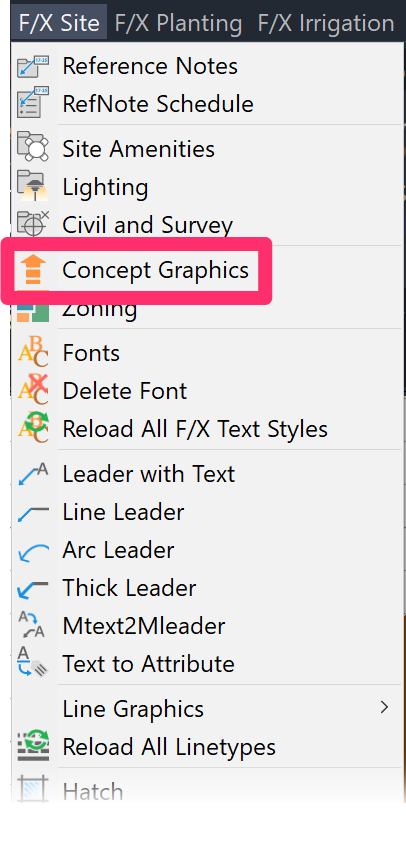
Our tool formerly known as Site Development and Estimator is now built into our Concept Graphics tool. Open the Concept Graphics Manager:

F/X Site ribbon, Concept flyout

F/X Graphics pull-down menu
or type FX_ConceptGraphics in the Command line
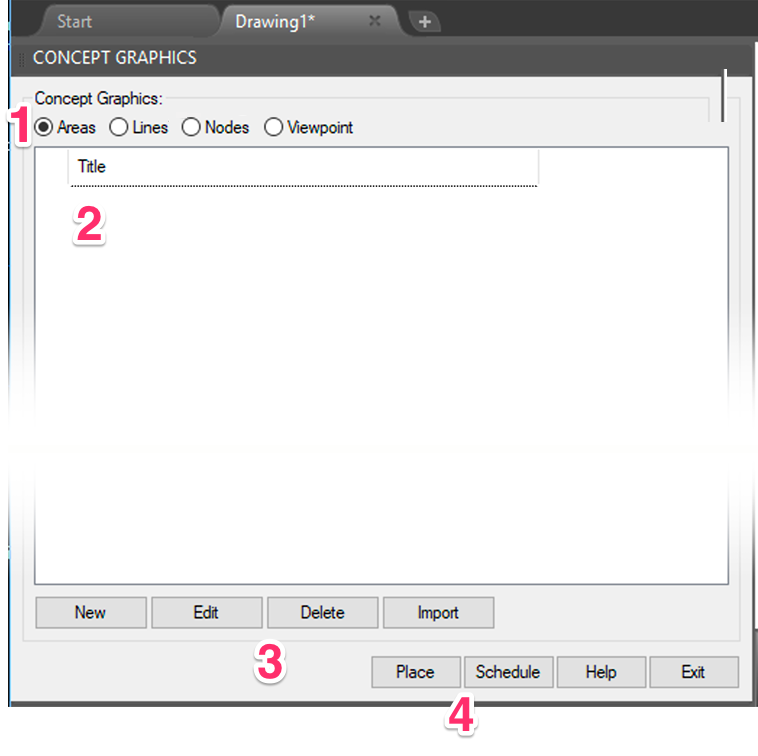
The Concept Graphics Manager will open.

1. Select the Areas category to add or otherwise work with Concept Areas.
2. Concept Areas you create will be listed here.
3. Buttons to add a New Area to the selected category, Edit or Delete a selected Area, and Import Areas from another project.
4. Buttons to Place a selected Area into a drawing and generate a Concept Graphics/Site Development Schedule
Creating a Concept Area Category
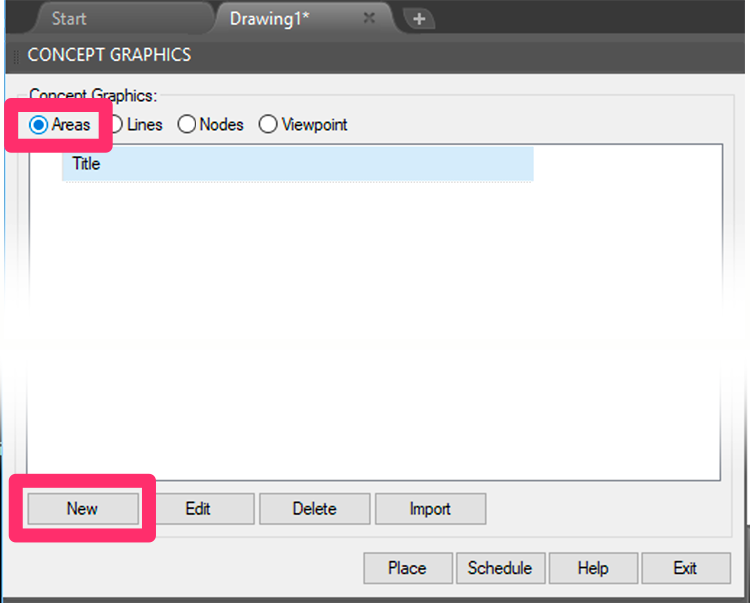
To add an Area, select the Areas option in the Concept Graphics Manager.
Then click New.

Selecting a Hatch or Color

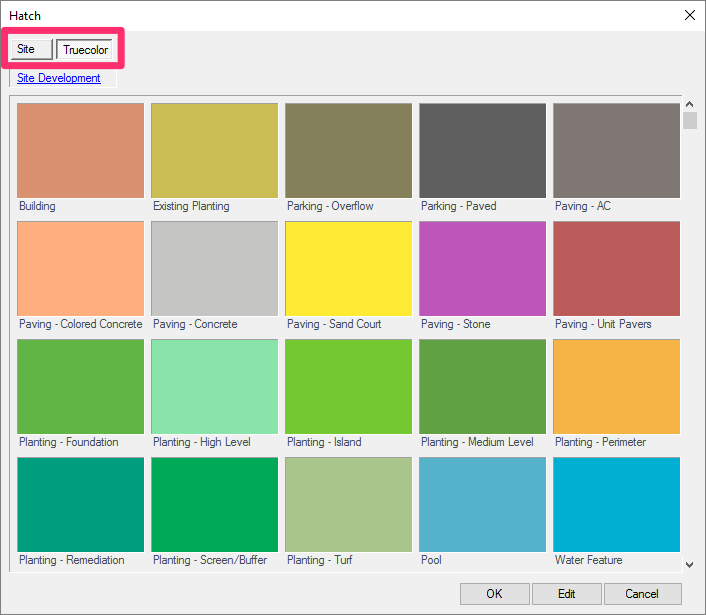
The Hatch dialog box opens immediately when you create a new Concept Area category.
This dialog box also opens when you select a new hatch or color for an existing Concept Area category.
Scroll through the color options using the scroll bar to the right, and select a color or a site hatch to represent your Concept Area category.
Click OK when finished.
While the name of the color may have some sort of land use suggested in the name, such as Planting-Foundation, that color does NOT have to be used for that purpose. It's just a color, and, in this case, the name happens to indicate planting.
The thumbnail views are representative, as AutoCAD may not show each color to a precise level.
Adding or Editing Data
After you select a color, the New Concept Area dialog box will open.

1. Give your new Concept Area category a Title.
2. If you want, enter a Note to provide additional detail on the category. The note will appear below the category title in the Concept/Site Development Schedule.
3. If you want, apply a Cost per square foot or meter to the category. If you add a cost to each category, you can use these costs to generate a total cost estimate for the site.
4. User Fields: Create as many subfields as you want for further development of the site definition. This optional feature is meant for more complex site designs.
5. Symbol: A sample of the color assigned to this category. Your screen may not display this color completely accurately, but it's the best example your computer can give you. Click this area to select a new color or hatch.
6. Check this box to place a Gradient on your new site area.
7. Selecting an option from the Linetype menu will affect the polyline boundaries of any areas where you place this category in your drawing. Making it Non-Plot will automatically convert the bounding line to a non-plotting line on a non-plot layer.
8. If you want, associate a photo with this site usage. You can then call out this category in your drawing using our Photo Callouts tool.

Example of information filled in

Example of a photo assigned to a site usage category (optional)
After you click OK, the site usage category will appear in the Concept Graphics Manager.

Placing a Concept Area
In Model Space, on any layer, draw a polyline border around where you want to place your Concept Area.
Open the Concept Graphics Manager. Select the category you want to place, then click Place.

The cursor will turn into a pickbox. You can now click an existing closed polyline area to place your Concept Area within that boundary. You can also:
- Begin drawing a closed polyline area. Your hatch will be applied to this area once you close it.
- Type M for Multiple: This option allows you to select one or more closed polyline areas within your hatch boundary and exclude them from the hatch.
If you type M for "Multiple," the cursor will change to a pickbox that will allow you to make a polyline selection.
To draw a Concept Area "on the fly," just start drawing a closed polyline after clicking Place. Once you close it, the hatched area will appear within the polyline boundary.
In previous versions, drawing your hatch boundary on the fly would require you to first type D for Draw. We've now built in the ability to simply start drawing your closed polyline. As long as the first point you select isn't an existing polyline, the Draw command will be fired automatically.
This feature works with all of our hatch types, including:
The area you select or draw will be filled in with the selected color, and the bounding polyline will be changed to layer L-BRDR-NPLT and be non-plotting.
Editing a Concept Area Category
To edit a Concept Area, select it in the Concept Graphics Manager and click Edit.

You can also use our Edit Object/Block Data tool to select a Concept Area you've already placed in your drawing. This tool opens a pickbox, which you can use to select an area in your drawing to edit.

The Edit Concept Area dialog box will open.

Here, you can make any necessary changes or additions to the Concept Area.
For a breakdown of information you can add or change, see the Adding or Editing Data section above.
Selecting a New Hatch or Color
To select a new hatch or color for a Concept Area category, click the Symbol thumbnail.


You'll be brought to the Hatch dialog box, where you can select a new hatch or color for the selected Concept Area category.
Select the Site tab to pick one of our site hatch patterns for your category.
Select the Truecolor hatch to select a solid color for your category (pictured to the left).
Editing a Placed Concept Area
You can edit a Concept Area you've already placed in a drawing by selecting that area using the Edit Object/Block Data tool.
Open Edit Object/Block Data:

F/X Site ribbon, Edit Object button
or type FX_PlantInfo in the Command line
The cursor will turn into a pickbox, and you'll be prompted to Select Object.
Click the interior or boundary of the area to select it.

The Edit Concept Area dialog box will open, allowing you to edit data for the selected category or select a new hatch or color.
Adding a Custom Color
Don't see the exact color you want? You can add your own custom color using our Site Color tool. Our default color wheels are now connected to tools that use True Color hatches, such as Concept Areas.
If you've previously added True Colors using the Hatch dialog box, note that this feature is no longer available as of our updarte of the Site Color wheels and you won't see your custom colors. If so, here's what to do to get your Truecolors back.
Deleting a Custom Color
To delete a custom color, type DELETEHATCH in the Command line and press Enter. Then select the color to delete. Note that Land F/X default colors or hatches can’t be deleted – they will continue to repopulate. Only custom hatches and colors you've added can be deleted.
Placing a Concept/Site Development Schedule
Concept Areas are included in the Concept Schedule with your other Concept Graphics. For information and instructions, see our documentation on placing a Concept Schedule
Importing Concept Area Categories from a Template or Project
If you find yourself adding the same Concept Area categories to multiple projects, we recommend setting up a project template and then adding your commonly used Concept items to that template. You can then import them into a new project from that template. This practice can save you immeasurable amounts of time, considering all the data you need to fill out for each category you create. With templates, you only need to add and configure your categories once, then import them – along with all attached data – into the present project.
For instructions, see our documentation on importing Concept Graphics from another project or template.
Related Webinars
- Tools at Early Design: Learn how our Zoning and Concept Graphics tools can be used to illustrate the designer’s intent for a site, while working quickly within CAD, from nothing more than a satellite image. (1 hr 2 min)
- Concept Site Plan Tools: Conceptual design is an important preliminary step in any site design. We’ve made some recent improvements to our site concept tools that will make it even easier for you to develop an initial plan that lays out your design intent in a logical and clear way. (56 min)
- True Color in CAD: The color wheels available within our Site Color tool are now tied to color books, allowing you to customize palettes for RefNotes, site development, land use regions, and other color areas. Take a full-color tour of the updated features. (52 min)
Troubleshooting
Issue: You are unable to send your Site Development Schedule to an Excel spreadsheet
Issue: Work Areas are not recognizing or calculating a Site Development hatch
Issue: The screen flashes several times when you place a Site Development/Estimator Schedule in Paper Space
Issue: Text in the Site Development Schedule columns is overlapping


