Railing
- Railing Tool Overview
- Apply Railing to Multiple Polylines at Once
- Reverting a Railing Back into a Polyline
- Troubleshooting
Our Railing tool allows you to place a linear graphic in your drawing that represents (and resembles) a specific railing, fence, or wall structure.
The options for these railing lines are:
Rails
- Planter/Queue Rail
- Guard Barrier Rail
- Removable Stanchions with Chain
- Handrail
Fences
- Chainlink Fence
- Wood Screen Fence
- Metal Screen Fence
Walls
- Freestanding/Seat Wall
- Retaining Wall
Before using the Railing tool, you'll need to draw a polyline or polygon in your drawing. (The Railing tool will work with polylines or polygons, but not with lines, circles, ellipses, or splines.) Once you open the Railing tool, you'll select a polyline or polygon to replace it with one of the Railing types.
It's important to note that Railings are NOT linetypes. They provide a way to represent a fence, railing, or wall accurately by, for example, showing post size and location. As such, the Railing tool is not a means for placing a scaled linetype.
Railing Tool Overview
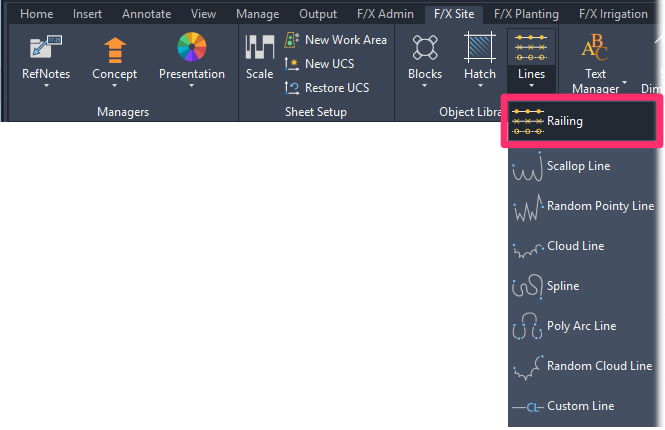
Open the Railing tool:

F/X Site ribbon, Railing flyout

F/X Site menu, Railing flyout
or type Railing in the Command line
Quick video
The cursor will turn into a pickbox, and the Command line will prompt you to:
Select polyline or rail, fence, or wall.
Use the pickbox to select a polyline in your drawing you would like to replace with one of the Railing types.
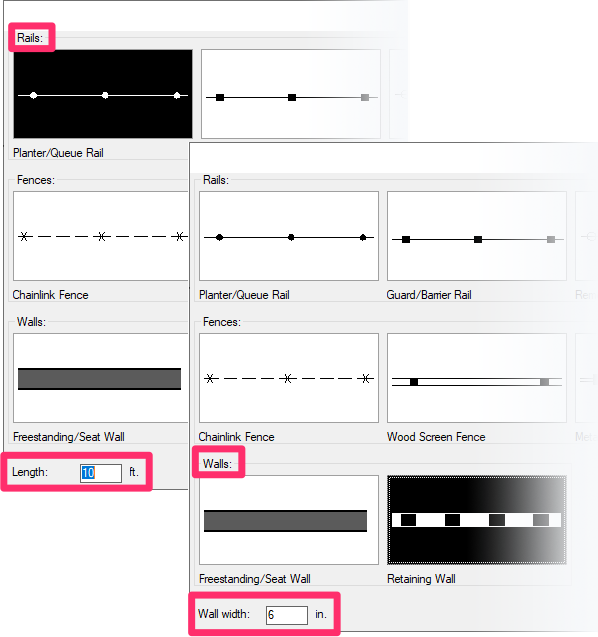
The Rails dialog box will open. Select one of the railing types (example: Planter/Queue Rail), then click OK.

The line in your drawing will be replaced by the railing you selected.
In our example, we've selected the Planter/Queue Rail option.


If you select one of the Rails types of railing, you can set the length of the railing's sections when placing it.
If you select one of the Walls types, you can set the width of the wall.
To set the length of the railing you're placing, enter a value in the text field in the bottom left corner of the Railing dialog box. You can then place your railing.
It's currently not possible to set the width of a railing, but we have this capability on our wishlist. Stay tuned!
The Planter/Queue Rail pictured to the right is the result of changing the Length to 10 feet, as shown above. Note the difference between this image and the Planter Queue Rail shown above, which depicts a railing with 5-foot sections.
The Railing tool will calculate the number of posts needed for the section length you've specified, fitting the sections evenly within the length of the polyline you've selected. If you want your sections to be spaced perfectly evenly throughout the length of the railing, the section length will need to be a factor of the length of the railing. So for example, if you want four-foot sections, the length of the railing should be a multiple of four feet (e.g., 20, 80, 100, etc.). Are you getting a smaller spacing than you want? Here's what to do.

Apply Railing to Multiple Polylines at Once
To speed up your workflow, you can assign a polyline's layer to a Length Reference Note (RefNote) to unlock the ability to apply a Railing to all polylines on that layer at once.
Length RefNotes turn linear objects into smart objects in your drawing, meaning you can assign them with data and calculate their length in a schedule. The following steps will also be useful in plans where you need to calculate and record the length of objects you're representing using our Railing tool, such as fences, walls, etc.
First, create a new Length RefNote and assign it to the layer of your choice. You can then draw the necessary lines on that layer by either:
- Drawing polylines on that layer, or
- placing your Length RefNote on that layer and drawing the lines where you want them
Open the Railing tool and select one polyline on that RefNote's layer.

After you select the Railing style and post spacing and click OK, you'll be asked Apply to all polylines on that layer?.
Click Yes.
All polylines on that layer will convert to your selected Railing style. The Railing will remain on the layer assigned to your Length RefNote and will be calculated correctly for all RefNote Schedules.
Reverting a Railing Back into a Polyline
To turn a railing back into a normal polyline, just click the railing and it will change back automatically. You can repeat the process back and forth as needed.
Troubleshooting
Issue: The Railing tool is giving you smaller spacing than you want


