The Pressure and/or Flow are Too Low in Your Irrigation System after Sizing the Mainline: Troubleshooting
Issue
You've sized the mainline, and your irrigation system design doesn't have enough pressure or flow relative to what is available at the point of connection (POC). That is, either the pressure or flow is too low (or both are too low).
Pressure available at the POC has been exceeded
If you saw this error message, the steps below can often resolve the issue.

Cause
Quick video
Excessively low pressure or flow in an irrigation system can have a number of causes, from the water pressure at the source or POC to equipment flow and and pressure rates, or loss through valve, friction, or backflow.
To get your pressure or flow up where it needs to be, you'll need to go through some specific troubleshooting steps to isolate, diagnose, and correct the issue.
The primary control in sizing the mainline is the velocity, which is extremely prominent in the Mainline Size dialog box. The system will also ask before reducing the velocity.
The fundamental nature of irrigation pipe sizing is a matter of physics, moving the required body of water through pipes of a fixed size. As the required flow and pressure downstream is fixed, the two remaining variables are the pipe diameter and the velocity of the water. Thus, the faster the same volume of water moves, the smaller the pipes can be – but the higher the friction loss will be. Conversely, in order to use smaller pipes, you must use a higher velocity.
The best way to visualize pressure loss through friction is to picture water not as a liquid, but as a substance such as sand. Imagine those many millions of water molecules bouncing along down the pipe. So the more water you are attempting to move, or the faster you move it, the more those molecules bounce and scrape along the sides of the pipe, slowing down other molecules and, in turn, resulting in a loss of pressure.
Want to learn more about how pressure and flow work in an irrigation design? See our Understanding Pressure and Flow webinar. The presentation covers this error message starting at 49:05.
Solution
Insufficient Flow
Excessively low flow rates are reasonably easy to remedy. Just use our Circuit tool to split your design into smaller zones.
Insufficient Pressure
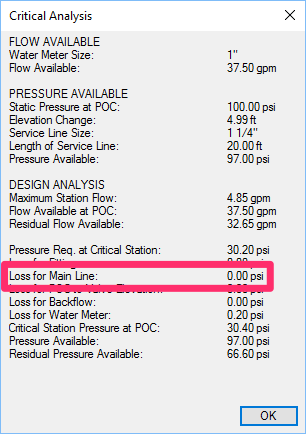
With Irrigation F/X, the Critical Analysis is the key to diagnosing the cause of insufficient pressure. This key set of data gives you everything you need to figure out where the pressure loss is occurring. This information will in turn help you determine how to remedy the issue.
Remember to resize the laterals and then resize the mainline after making any changes (such as changing the valve or valve size).
Step 1: Place a Critical Analysis & check the water source


2. Open the Irrigation Manager and click Source Data to open our Source Data tool.
In the Water Source dialog box, reconfigure the source or POC with the correct rates, making sure the available flow and pressure are accurate.
3. After making any changes, size the lateral pipe and mainline pipe for your design.
Still seeing excessively low pressure? Move on to Step 2: Check the Valves.
Step 2: Check the valves
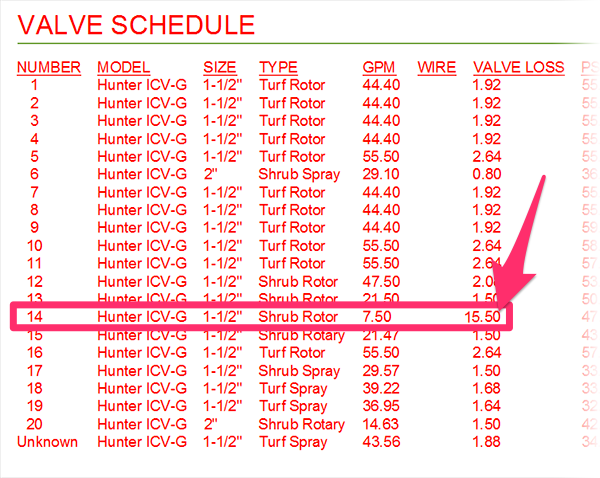
1. Place a Valve Schedule, making sure the Valve loss option is selected.


2. Check the Valve Schedule for abnormally high pressure losses in the Valve Loss column.
3. If one of the valves has an abnormally high pressure loss, use our Locate Valve command to jump over to that valve.
4. Open our Edit Equipment tool by clicking the Edit Equipment button on the F/X Irrigation ribbon.
Use the pickbox to select the valve with the abnormally high pressure loss.


5. The Equipment Info dialog box will open. Click the Analysis button.
Check the Station Analysis for abnormal rates.
Take note of the Design Pressure. This rate may have been selected incorrectly when this valve was added to your project.
Design Pressure Rule of Thumb
Depending on the types of equipment you're using, design pressure should be in the following ranges:
- Drip equipment: 25 – 40 PSI (1.72 – 2.76 bar; 172.37 – 275.80 kPa)*
- Spray heads: 30 – 45 PSI ( 2.07 – 3.10 bar; 206.84 – 310.26 kPa)*
- Rotors: 40 – 75 PSI (2.76 – 5.17 bar; 275.80 – 517.11 kPa)*
*Decimals rounded to the nearest .01
6. Just how high was the valve's Valve Loss in the Valve Schedule?
If the valve pressure loss in the Valve Schedule was extremely high, you might be using a drip kit valve. If you are, take another look at the amount of flow you have going through that valve. Then check the manufacturer's performance chart for that valve to understand the pressure required to use that valve.
If the loss wasn't excessively high (more than 10 PSI, 0.70 bar, or 68 kPa), you might be using a standard valve.

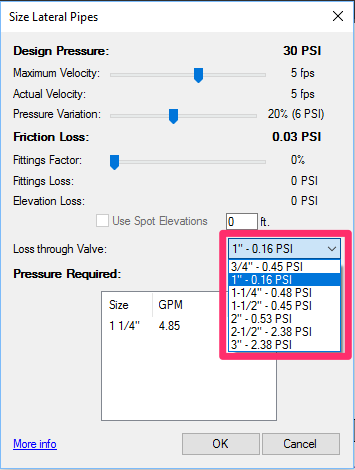
If so, try selecting a different size for that valve.
You can select a new size for the valve when sizing the lateral pipes for that valve. Use the Loss through Valve pull-down menu to select a new valve size.
Dont have other size options for this valve? You'll need to pick a new valve that has other available size options.
7. After making any changes, size the lateral pipe and mainline pipe for your design.
Still seeing excessively low pressure? Move on to Step 3: Check for Mainline Loss.
Step 3: Check for mainline loss
1. Check the Loss for Main Line entry in the Critical Analysis.

2. If you're seeing a loss through the mainline here, you can try speeding up or slowing down the water to affect the friction loss through the pipes. However, the water velocity is usually not the main issue. The resolution will depend completely on the length of these lines through the project on how much you can actually change.
3. After making any changes, size the lateral pipe and mainline pipe for your design.
Still seeing excessively low pressure and/or flow? Move on to Step 4: Check Loss Through Backflow.
Step 4: Check loss through backflow
Depending on the model and size of backflow you've selected, you could see a loss of up to15 PSI. This loss is sometimes unavoidable, but if you have the option to select another model that will render less loss, then do so.
Sometimes the lesser loss will still not be enough to allow the mainline to size, but that will be up to you to try. It's still important to note, however.
As always, if you've made changes to your system design, resize the lateral pipe and mainline pipe.
Step 5: Add a booster pump
Still having troubles getting enough pressure after trying all these options? You may have to add a booster pump to your project and then place it in your system to give you the added pressure.
Still appear to have insufficient pressure? You may actually need more pressure.
If you've tried all the steps listed above and the system is still telling you that you need more pressure, you may simply need more pressure at the water source or POC for the system you've designed.
If you're designing the system for a municipality, for example, you may need to design it as is and tell the municipality the pressure you need for the system to operate. You may need an additional POC closer to one end of the site that doesn't have enough pressure.


