Dimension Styles (DimStyles)
Quick video
- DimStyles and Our Dimensioning Tools
- DimStyle Options
- Creating a DimStyle Based on One of Our Default Styles
- Saving Your DimStyle into Our System
- Backing Up Your DimStyle
- Setting a DimStyle as Current
- Testing Your Saved DimStyle
- Changing the Units Shown in your Dimensions
- Related Webinars
- Troubleshooting
In CAD, dimension styles (DimStyles) automate the appearance of dimensions in your drawing. When you create a DimStyle, you are creating a preset for the way in which linear length, angle degrees, and radius widths appear in your drawing. We've simplified the process of creating and saving a DimStyle. We offer two methods of automating the placement of dimensions: the Site Dimension and Detail Dimension tools.
When you use the dimensioning tools mentioned above, you will be using a DimStyle you've created and saved. Your DimStylewill be scaled correctly when you plot.
We recommend printing your DimStyles and including them in your CAD Standards binder.
DimStyles and Our Dimensioning Tools
Our Site Dimension and Detail Dimension tools will only pull the DimStyle that is saved into the Land F/X system, or our default DimStyles if you haven't saved one in. If you have your own existing dimension standards, you’ll need to save that DimStyle into your Land F/X Preferences.
You can simply set your custom DimStyle to current and save it into the Preferences, but this practice can often result in issues with scaling. Instead, we recommend quickly re-creating your DimStyle starting with our one of our default DimStyles. It’s easier than you think. See the Creating a DimStyle Based on Our Default One section below for instructions.
DimStyle Options
For most offices, the DimStyle for site plans and details will remain virtually the same in look and feel. Detail and site DimStyles are saved separately, mainly because you may have a different precision for each. For instance, details may have a precision to 1/4 inch (0.635 cm), whereas site plans may have a precision to 1 inch (2.54 cm).
You have up to four different options for units when creating a DimStyle for Imperial units, and up to six options when creating a DimStyle for metric units. You don't need to create all of these DimStyles – just those that apply to the units your office uses.
Imperial Units
- Detail style with one unit representing 1 inch. Units are formatted to either architectural or engineering units, with the insertion scale set to inches.
- Detail style with one unit representing 1 foot. Units are formatted to decimal units, with the insertion scale set to feet.
- Site style with one unit representing 1 inch. Units are formatted to either architectural or engineering units, with the insertion scale set to inches.
- Site style with one unit representing 1 foot. Units formatted to decimal units, with the insertion scale set to feet.
Metric Units
- Detail style with one unit representing 1 millimeter. Units are formatted to decimal units, with the insertion scale set to millimeters.
- Detail style with one unit representing 1 centimeter. Units are formatted to decimal units, with the insertion scale set to centimeters.
- Detail style with one unit representing 1 meter. Units are formatted to decimal units, with the insertion scale set to meters.
- Site style with one unit representing 1 millimeter. Units are formatted to decimal units, with the insertion scale set to millimeters.
- Site style with one unit representing 1 centimeter. Units are formatted to decimal units, with the insertion scale set to centimeters.
- Site style with one unit representing 1 meter. Units are formatted to decimal units, with the insertion scale set to meters.
We recommend creating each of these DimStyles in a fresh DWG and then saving that DWG with the DimStyle. Having a separate DWG for each of your DimStyles will allow you to back them up quickly in the event that you lose them.

Typical Imperial units set to inches

Typical Imperial units set to feet

Typical metric units set to centimeters

Typical metric units set to meters
Creating a DimStyle Based on One of Our Default Styles
Whether you want to create a DimStyle for site or detail dimensioning, we recommend opening a new drawing to create it.
Do you already have a standard DimStyle that you want to use or save? You can simply set it as current to make it the active DimStyle that will be applied to our dimensioning tools. However, we recommend completing the following steps to re-create your existing DimStyle based on our default one, which will prevent potential scaling issues.
Note that you will be creating your DimStyle using the AutoCAD DimStyle Manager. You'll save it into our system after you've created it.
1. Open a new drawing.
2. Using our Scale tool, set your scale to the one you use most commonly. See our Set the Scale documentation for instructions.
3. Place a dimension anywhere in the new drawing using any of our dimensioning tools.
You'll see a message reading No user-saved dimstyle found. Use the default dimstyle?. Click Yes.

Our DimStyle for the scale you set will generate, allowing you to create your DimStyle based on that existing one.
4. Open the DimStyle Manager:

ACAD Manage ribbon, Dimstyle... button
or type DimStyle in the Command line
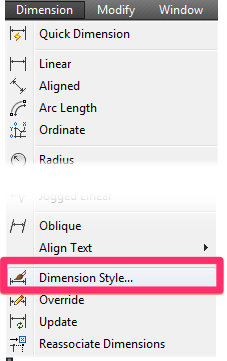
ACAD Dimension menu,
Dimension Style... option
5. Highlight our default DimStyle for the scale you set and click New.
In our example, we'll be creating a new DimStyle based on the LandFX-SDIM20 style.


5. The Create New Dimension Style dialog box will open.
Type a name for your DimStyle, then click Continue.
Because you highlighted our default DimStyle before clicking New, the DimStyle you're creating (or re-creating) will be based on our default one for the scale you set.
6. Configure your chosen settings for your DimStyle in the various tabs such as Lines, Symbols and Arrows, Text, etc. For details and instructions, see our DimStyle Settings documentation.
Once you've configured all your dimension settings to your standards, click OK to save your changes.

7. Place a dimension in your drawing. If it looks the way you want it to, you've successfully created your DimStyle. You can now follow our steps to save your DimStyle into our system.
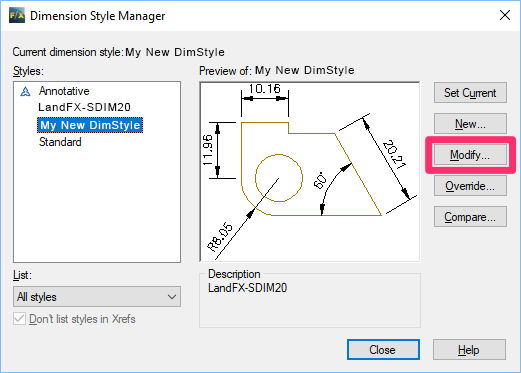
If the dimension you placed doesn't look right, open the DimStyle Manager again.
Highlight the DimStyle you just created, and click Modify.
Continue to configure your DimStyle settings as needed. As soon as you've saved your DimStyle and placed another dimension that looks right, you're ready to save your DimStyle into our system.
Change the Arrowhead Style for Radius, Diameter, or Angular Dimensions
You may want to use different arrowhead styles for different types of dimensions. For example, you may want to use ticks for your Linear Dimensions but arrows for Radius Dimensions.
First, select the DimStyle in the DimStyle Manager and click New.
Drop down the Use for: menu and select the type of dimension whose arrow style you want to change. In this example, we'll selectRadius dimensions.
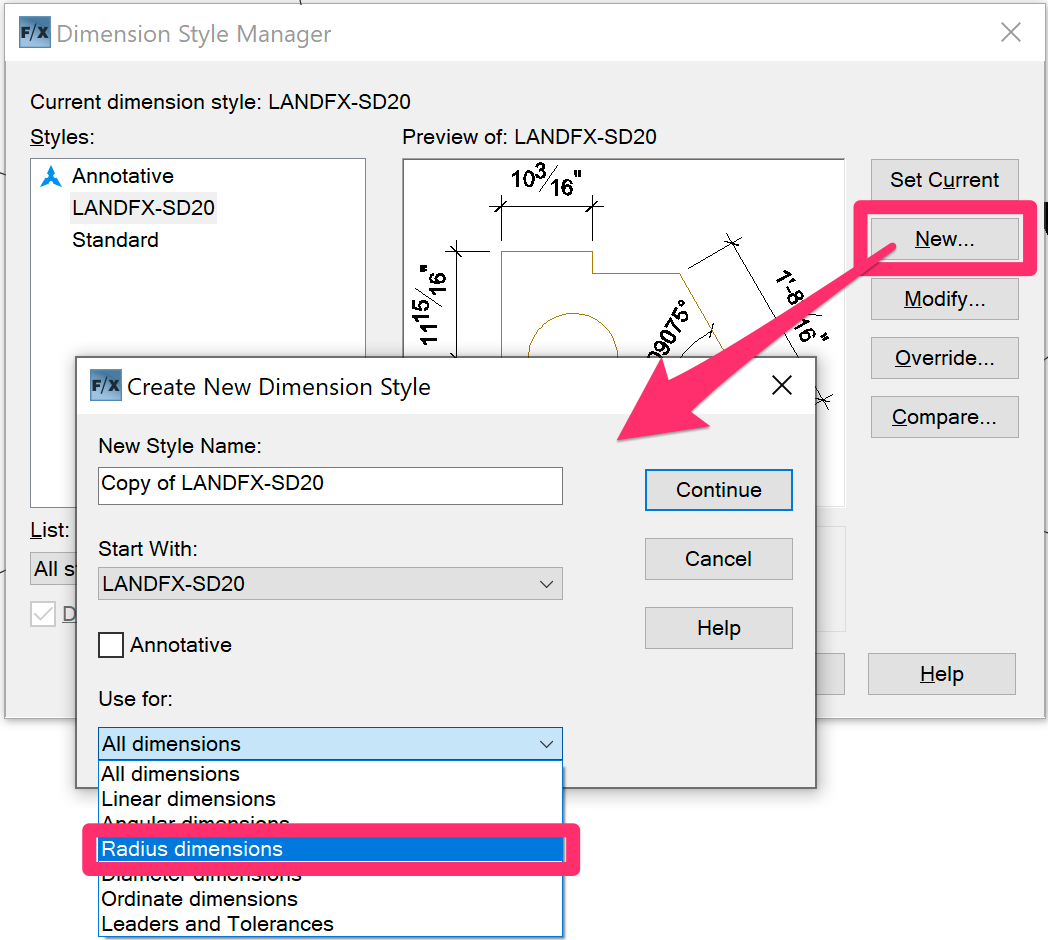

Click Continue.
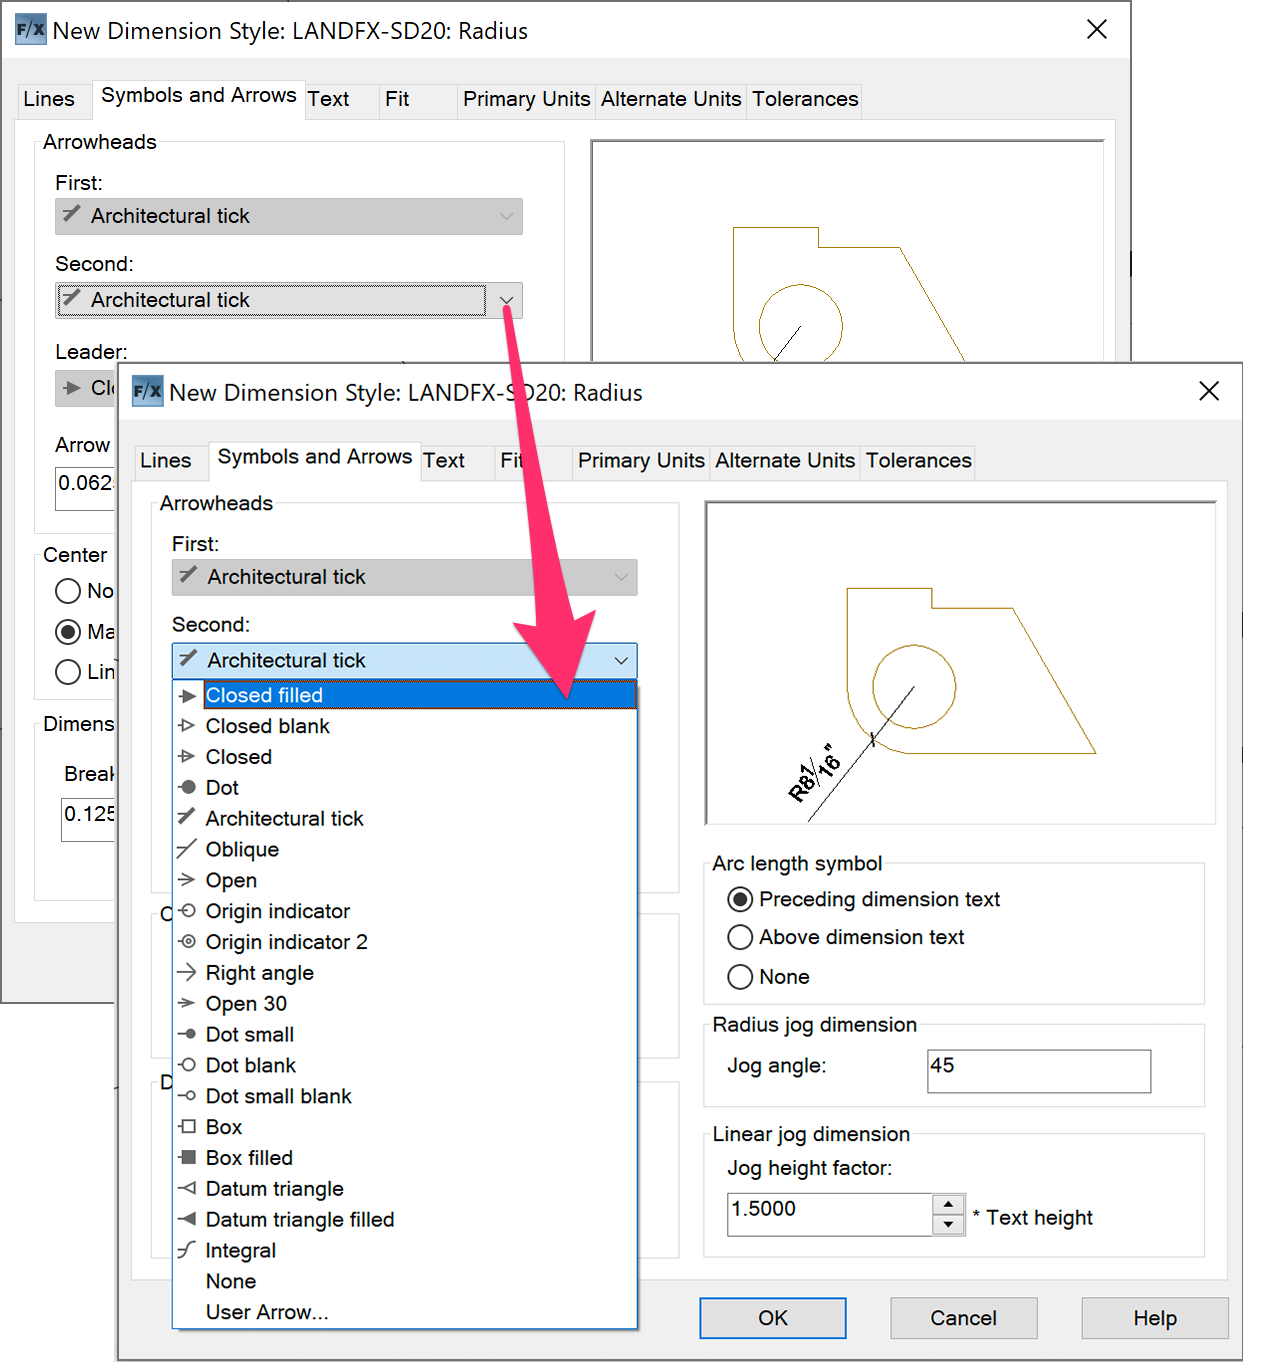
Select your arrow of choice from the Second arrowhead menu.
Click OK to save the change.
Finally, resave the DimStyle into the Land F/X Preferences.
You'll now have a separate DimStyle that uses your arrowhead of choice for the designated dimension type. In our example, Radius Dimensions will use arrows but other dimensions will use tick marks.
DimStyle Settings
For information on specific DimStyle settings under the tabs in the New Dimension Style dialog box, see our DimStyle Settings documentation.
Saving Your DimStyle into Our System
Quick video
Once you've verified that your DimStyle is correct, you can save it into our system. Prior to saving, however, you will need to verify a couple of extremely important settings from within the drawing where you created your DimStyle.
Important Considerations Before Saving
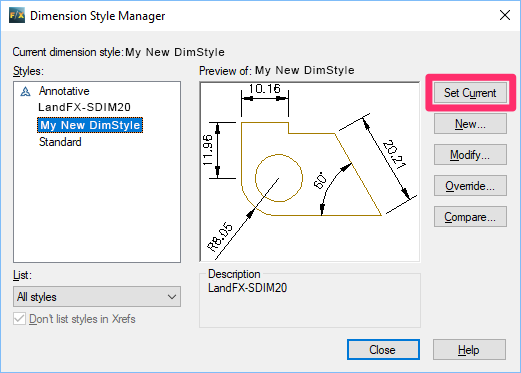
1. Open the DimStyle Manager. Highlight the DimStyle you're saving, and click Set Current. You can then close the DimStyle Manager.
You'll need to have your DimStyle set as the current style before you can save it into our system.
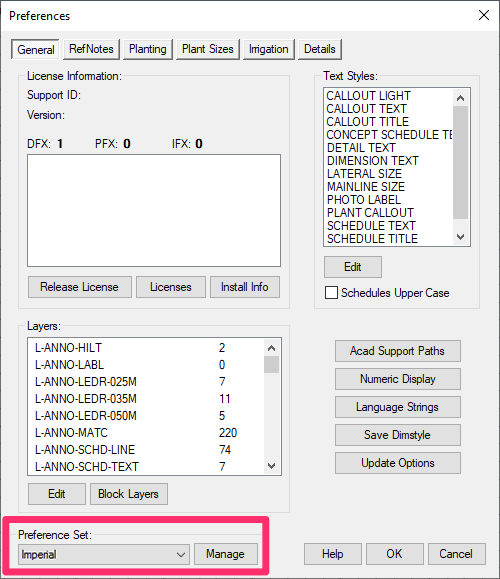
2. Ensure that the correct Preference Set is selected.
Open the General Preferences screen.
From the Preference Set menu, select the Preference Set to assign to the DimStyle you're about to save.
The DimStyle will be applied to your dimensions whenever you have that Preference Set active.
Learn more about saving your settings into a Preference Set.

3. Verify that you have the correct units (Metric or Imperial), scale, and drawing units (Architectural, Decimal, etc.) set in the Plot Scale dialog box.
The Units and Drawing Units settings, as well as the scale (example: 1" = 20 FT), should match the units you set for your DimStyle.
Learn more about setting the units and scale in your drawing.
How to Save Your DimStyle
Are you saving a DimStyle with a unique name? Land F/X will save everything except the custom style name. Our Dimension tools use their own standard style naming, always starting with LandFX-, followed by:
- S or D (for Site or Detail)
- DIM
- A number indicating the current Land F/X Plot Scale
For example, the style LandFX-SDIM20 is a site Dimstyle (indicated by the S) for the plot scale 1"=20' (indicated by the number 20).
This naming convention cannot be customized. Keep this in mind when testing your saved DimStyle.
1. With your newly created style as the active style, and the drawing containing your DimStyle open and active, open our Save Dimension Style tool:
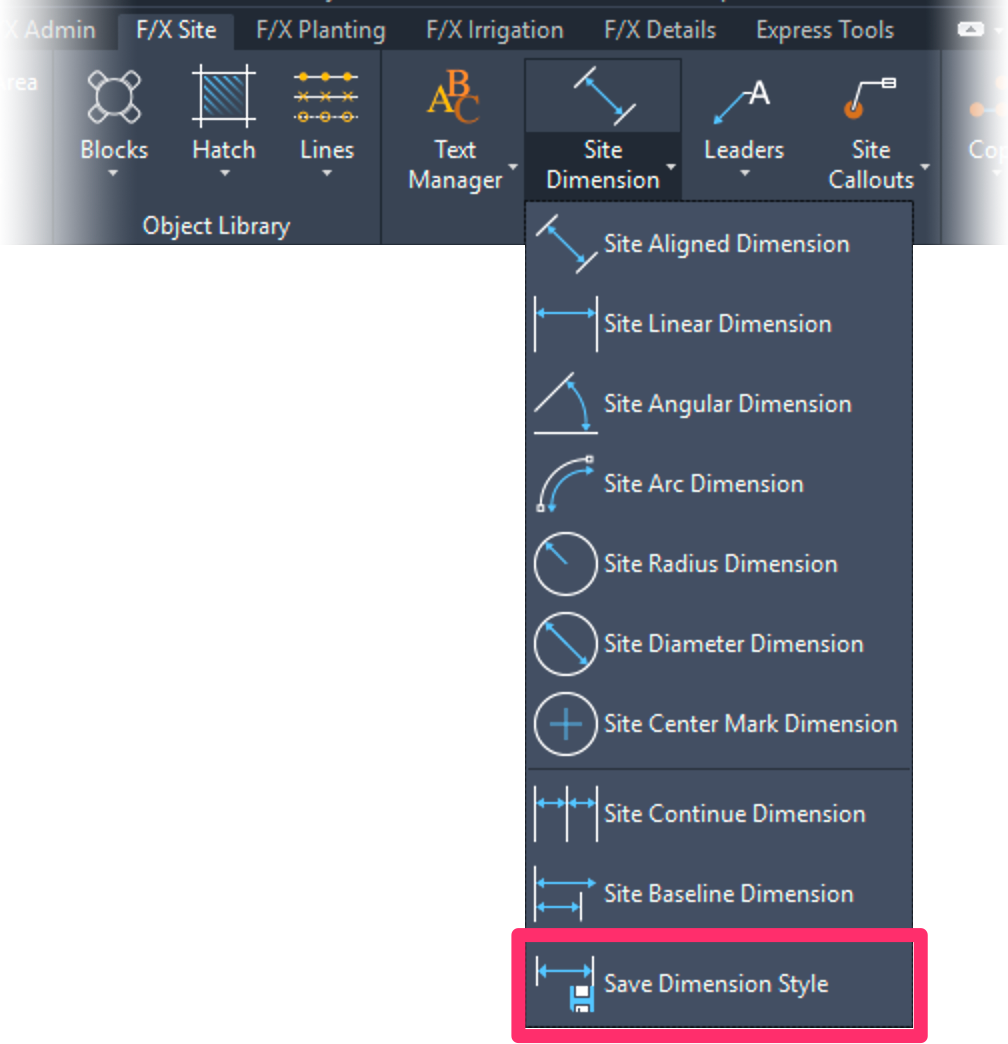
F/X Site ribbon, Save Dimension Style flyout

F/X Site menu, Save Dimension Style flyout

F/X Details ribbon, Save Dimension Style flyout

F/X Details menu, Save Dimension Style flyout
You can also open this tool by:
- Typing DimStyle in the Command line, or
- Opening the General Preferences screen (pictured to the right) and clicking Save Dimstyle


2. The Save Dimstyle dialog box will open.
You'll have four options for Imperial, and six options for Metric. Click the Save button for each category you want your DimStyle to affect. If the style applies to all unit settings and applications, click Save for all of them.
You can also click Preview to see a preview of the selected DimStyle.
Here are some examples:

Imperial units:
- Detail (in.): Used for the F/X Detail Dimension tool on the F/X Details ribbon, in architectural inch drawings.
- Detail (ft.): Used for the F/X Detail Dimension tool on the F/X Details ribbon, in decimal feet drawings.
- Site (in.): Used for the F/X Site Dimension tool on the F/X Site ribbon, in architectural inch drawings.
- Site (ft.): Used for the F/X Site Dimension tool on the F/X Site ribbon, in decimal feet drawings.

Metric units:
- Detail (mm): Used for the F/X Detail Dimension tool on the F/X Details ribbon, in millimeter drawings.
- Detail (cm): Used for the F/X Detail Dimension tool on the F/X Details ribbon, in centimeter drawings.
- Detail (m): Used for the F/X Detail Dimension tool on the F/X Details ribbon, in meter drawings.
- Site (mm): Used for the F/X Site Dimension tool on the F/X Site ribbon, in millimeter drawings.
- Site (cm): Used for the F/X Site Dimension tool on the F/X Site ribbon, in centimeter feet drawings.
- Site (m): Used for the F/X Site Dimension tool on the F/X Site ribbon, in meter drawings.
When you click the Save button, the Saved option will be selected to let you know the style has been saved.
Now when you use the Dimension tools, you'll be placing a dimension with your chosen size of the ticks, text, offsets, etc.. The dimensions will be scaled automatically for the scale you've set.
Important:
-
You can always revise the saved DimStyle at a later date. Open the original CAD drawing where you created the original DimStyle and revise it as necessary. With this drawing open, go to Preferences and save the DimStyle again.
-
You can have different DimStyles for different Preference Sets. Thus if you have clients that require a different DimStyle, make a Preference Set for their projects and retain your office standard DimStyle.
If you're saving multiple DimStyles, follow our steps to set each DimStyle as current just before you save it.
Backing Up Your DimStyle
You've made your DimStyle while in a fresh drawing. If you haven't already, use our Scale tool to verify that your drawing is set to your most commonly used scale, and that your units are set to the correct denomination (inches, feet, centimeters, or meters) for your DimStyle.
We recommend setting up an 8.5-by-11-inch sheet and having a viewport to Model Space set to a representative scale. This scale should match the scale you have set using the Scale tool.
It's a good idea to place several dimensions in the drawing and then save this drawing as an example of the DimStyle for your standards. This practice serves two purposes:
- You can immediately test whether your DimStyle meets your standards.
- The saved drawing will serve as a backup of your DimStyle. If you somehow lose your DimStyle, you can retrieve it by simply opening the drawing and saving the DimStyle again.
To test your DimStyle, we recommend drawing the following two objects in Model Space:
- A circle
- Two lines meeting at a 90-degree angle
Why? Because you can then place dimensions into this drawing in order to test your DimStyle – and then save it with a set of visual identifications, as well as print it and include the DimStyle in your CAD Standards binder.
Place your dimensions using either the Site Dimension or Detail Dimension tools. Check all the dimensions for aspects of your DimStyle, such as the arrow or tick type and size, text style and size, extension line lengths, precision, etc. For the sake of examples, the image below shows the Radius Dimension, Linear Dimension, and Angular Dimension. However, we recommend you place all available dimensions.
If you're creating a Detail Dimstyle, you'll need to place a Detail Template and then place these items and dimensions within that template.

Setting a DimStyle as Current
Before you can use a DimStyle or save it, you'll need to set it as current.
Open the DimStyle Manager. Click the DimStyle you want to use or save, and click Set Current.

The DimStyle you selected will be activated, allowing you to use or save it.
If you need to save multiple DimStyles, you'll need to repeat this step for each one just before you save it.
Testing Your Saved DimStyle
Having trouble saving a DimStyle to make it the default for either site or detail dimensions? Solution >
We recommend testing your DimStyle to make sure you've created it correctly. Here are a few important items to check:
Create a new CAD drawing for each DimStyle you want to save.
Include an 8.5-by-11- inch sheet so you can easily print to review the size of the dimension elements, such as the arrow size, the text size, the offsets, etc. If you're creating a Detail DimStyle, place a Detail Template in the drawing.
Verify that your units and scale are formatted correctly.
Check that you have the correct Units (Imperial or Metric), scale, and Drawing Units (Architectural, Decimal, etc.) set in the Plot Scale dialog box. When setting your DimStyle scale while using Land F/X dimstyles, the scale of items that will display in Model Space should reflect how they would appear at full size. For example, if you want a 1/8" arrow size, this is the value you would enter in the DimStyle settings.
Ensure that the correct Preference Set is active.
Open the General Preferences screen, and verify that the correct Preference Set is selected in the menu. Remember: If you have the wrong Preference Set active when saving, your DimStyle will be applied to that Preference Set, and not the one to which you would like to apply it.
Test all the dimensions.
Test your DimStyle by performing a sample of each dimensioning offered in our Site Dimension or Detail Dimension tools, such as Linear, Aligned, Baseline, Continue Dimension, Angular, Radius, and Center Mark. Examine aspects of the style such as the arrow or tick type and size, text style and size, extension line lengths, precision, etc.
Print the drawing containing your DimStyle.
Print this drawing to review what the final product will look like. You can then add the printout to your CAD standards binder.
Ensure That Your Style is Not an “Override” to Another Style
In the AutoCAD DimStyle Manager, the current style should not be an “override” of another style.

The DimStyle Manager indicating that the current style is a Styles Overrides – this is INCORRECT.

The DimStyle Manager indicating that the current style is not an override – this is CORRECT.
Changing the Units Shown in Your Dimensions
In some cases, you might find yourself needing to place a dimension in Architectural Inches in a drawing where you're working in Decimal Feet, or vice versa. If this is the case, you can follow our instructions to:
- Change Dimension Units to Architectural Inches When Working in a Decimal Feet Drawing
- Change Dimension Units to Decimal Feet When Working in an Architectural Inches Drawing
Related Webinars
- Working With Dimensions in Land F/X: We show you all the necessary steps for setting up Dimension Styles (DimStyles) and saving them into Land F/X. We also provide some general practice tips and go over some common troubleshooting items. (1 hr 5 min)
Troubleshooting
Issue: Style Override with Site Dimensions
Issue: I'm unable to save a DimStyle to make it the default
Issue: Your dimensions are showing incorrect lengths even though your scale and units are set correctly
Issue: Elements in your DimStyle (such as arrows) are appearing in the wrong scale (too large or small)


