Add New Plant Symbols
Quick video
- General Rules for Plant Symbols
- Symbol Sizes
- Layer Names of Symbols
- Saving Your Symbols with Save Plant Block
- Saving a Tree or Shrub Symbol
- Saving a Vine Symbol
- Saving Alphanumeric Symbols
- Re-Creating Your Custom Plant Symbols Using Our Default Blocks
- Saving a Groundcover or Shrub Area Hatch
- Creating and Saving a Shrub Area Boundary Linetype
- Related Webinars
- Troubleshooting
You can add your own plant symbols and hatches to our default libraries for trees, shrubs, and groundcovers. You can do so by saving a block (for plant symbols) or hatch (for groundcover hatch patterns) to the appropriate subfolder in your LandFX folder. The plant symbols are saved as DWG files, and the groundcover hatches are saved as PAT files.
Note: Groundcovers are represented by hatch patterns rather than standard plant symbols. For more information, visit our Groundcover Hatch Patterns documentation section. For information on saving hatches into our hatch library, see our Save Hatches documentation.
If one of our default symbols is close to fitting your needs but requires just a few changes, we recommend editing the DWG file of that symbol and saving it under a new name. For more information, see our Edit the Default Plant Symbols documentation.
Quick video
- Your plant symbol can be any size. Our system will automatically scale it correctly.
- Your symbol may be made up of lines, arcs, polylines, splines, and/or circles. We do not recommend using ellipses.
- Our software does not save its blocks on layer “0,” as that would result in the block taking the characteristics of whichever layer was active when the block was inserted. We want more control over the various line qualities that make up the block for more artistic reasons. Therefore, we use layers to achieve this goal. For more information, see the Layer Names of Symbols section below.
- Our plants are drawn with the shadows placed due east of the drawing area. When plant shadows are turned on, it will rotate all symbols from this due east orientation to the angle you select using the Plant Shadows tool. Therefore, if you include shadows in your symbols, place them due east. If you are not concerned with shadows, don’t worry about the orientation.
- When your symbol is ready to save, use our Save Plant Block tool to save your symbol into the system.
- You may wish to add a folder location for your symbols, which will result in a new category name. Use the naming considerations for this folder as discussed below.
- Name your plant symbol with the naming requirements discussed below.
- Vines are a little different from shrubs. Review those requirements as discussed in the Saving a Vine Symbol section below.
Symbol Sizes
Regardless of your tree or shrub symbol, the system will automatically size it to the Symbol width preference you set in the Plant Info dialog box.
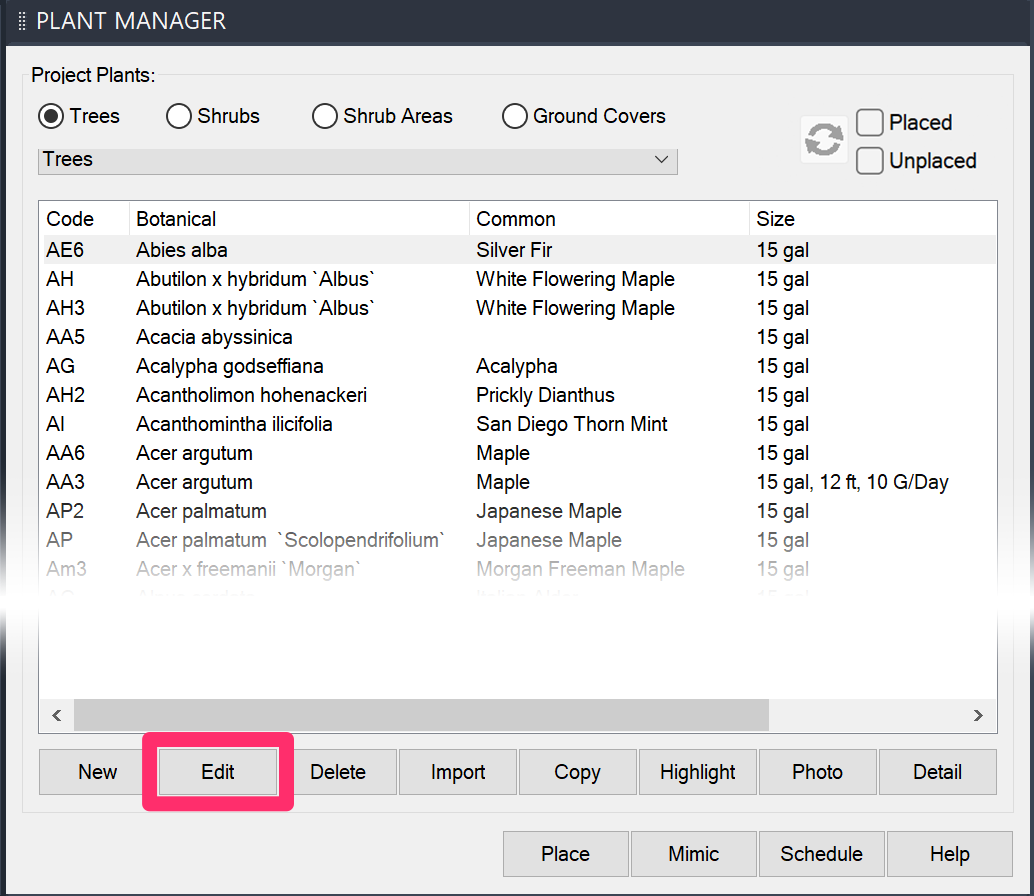
To access this dialog box for a particular plant, select the plant in the Plant Manager, then click Edit.
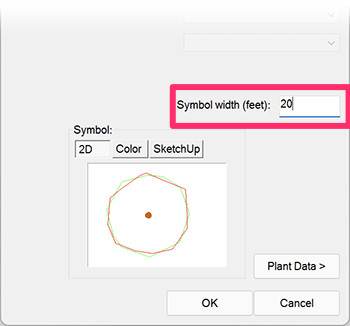
In the Plant Info dialog box, set the Symbol width in feet or meters, depending on the scale you've set for your project.
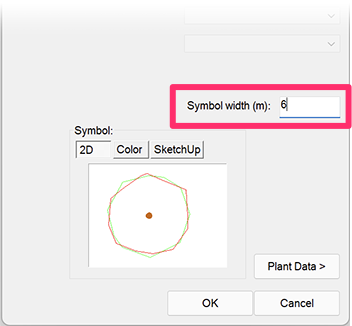
The system will determine the extents of your symbol, which will allow it to be sized appropriately when you place it in the drawing. The system accomplishes this calculation by measuring the height of your symbol between its highest and lowest points.
For example, here are two symbols that, while similar in size, appear to be in different sizes:
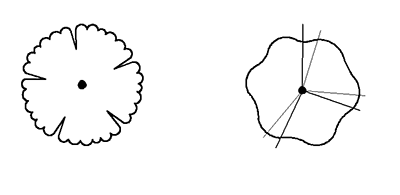
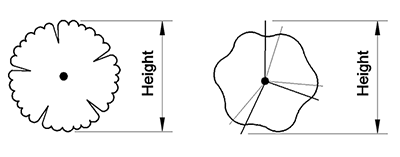
To our software, these symbols are the same size, as they both measure the same distance in height from their top and bottom points.
Because of this feature, try to avoid symbols with extremely long extended lines or objects that can be measured for the height of the symbol, as that may affect the look of the size you give it.
Also, the size you assign to a symbol in the Plant Info dialog box may vary depending on the symbol design. If you want a tree symbol represent a tree measuring 20 ft (6m), a size of 24 ft (7,3m) may be more appropriate for the look you seek.
The layer names of the symbols are essentially unimportant to our system. However, keep the following points in mind:
Layer "0"
Our software doesn't save any plant symbols on layer "0," as a block saved drawn on layer "0" will take on the characteristics of the layer that was current when the block was inserted. We simply want more control over the artistic nature of different line weights, hatches, patterns, and shadows. If you wish your symbols to be created on layer "0," go to the General Preferences and review the layers hard coded by our software for when plant symbols are inserted. Specifically review the layers LP-TREE (tree insertion layer), LP-SHRB (shrub insertion layer) and, if shadows are used, LK-TREE-SHAD (tree shadow layers), LK-SHRB-SHAD (shrub shadow layers), and LK-PALM-SHAD (palm tree shadow layers). The General Preferences allow you can set these layers to any color you wish for plotting.
Layer Naming
The layers used for our plant symbols start with the characters LK-TREE- for tree layers, and the characters LK-SHRB- for shrub layers. Each of these symbols has layer names for different line weights, shadows, non-plot layer, trunks, and screened or toned layers.
Shadows
Most of our plant symbols contain shadow indications, allowing you to turn shadows on or off. If you are using your own layer naming system and want shadows included, the system will look for the letters “SHAD” within the layer name to recognize it as a shadow layer. Thus, it's possible to turn shadow layers with SHAD in the layer name on or off. If you aren't interested in shadows, simply don't include the letters "SHAD" in any of your layer names.
If you're interested in using our naming conventions, you might use the our Load Layer States tool to quickly bring in a layer state into the drawing of your symbol.
Saving Your Symbols with Save Plant Block
After you've prepared your plant symbol for saving, you can save it into our system for easy access using our Save Plant Block tool.
Zoom in so the symbol somewhat fills your screen.
If you need to edit or rename any of the layers within the block, do so now. If you want to include shadows, make sure they are placed due east of the drawing area.
When ready to save the symbol, open our Save Plant Block tool:
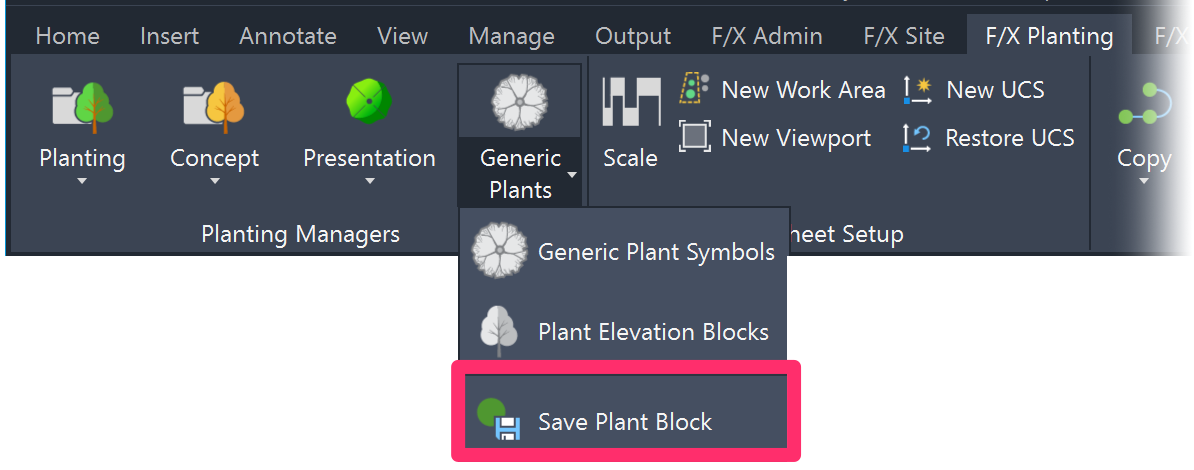
F/X Planting ribbon, Save Plant Block flyout

F/X Planting menu, Save Plant Block option
or type FX_SavePlantBlock in the Command line
The Command Line will prompt you to set an Insertion point.
You now have two options:
Option 1: Saving an Existing Block into Our System
To select an existing block, right-click.
When prompted, select the block you want to save.
Option 2: Saving Linework or an Exploded Block into Our System
If you're saving linework or an exploded block, click a location to set as the saved block's insertion point – usually at the center of the symbol or the center of a tree trunk, if applicable.
You'll then be prompted to Select objects.
Select all objects you want to include in this plant symbol, including the shadow (if you would like your symbol to include one).
You'll now see the Save Block As dialog box, which lists the folders where our software saves and accesses blocks.
When saving a plant block, browse to the folder LandFX\Blocks\Graphics\Planting. Then browse to a subfolder within the Trees or Shrubs folder, depending on whether you're adding a tree or shrub symbol.
Click Save to begin saving your symbol.

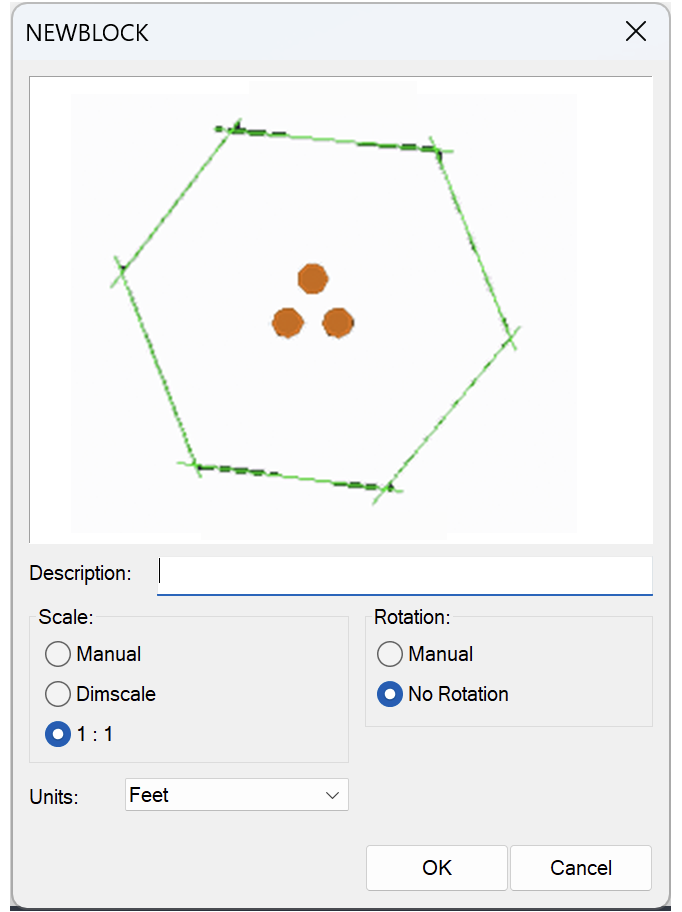
You'll see the Save Block dialog box showing your symbol. Click OK to save your symbol into our system.
Saving a Tree or Shrub Symbol
In this example, we'll save a tree symbol into our system.
Note that saving shrub symbols follows the same process, except you'll save them into a subfolder within the Shrubs folder rather than the Trees folder.
To save a tree symbol, first open the Planting folder in the Save Block As dialog box, then open the Trees folder.
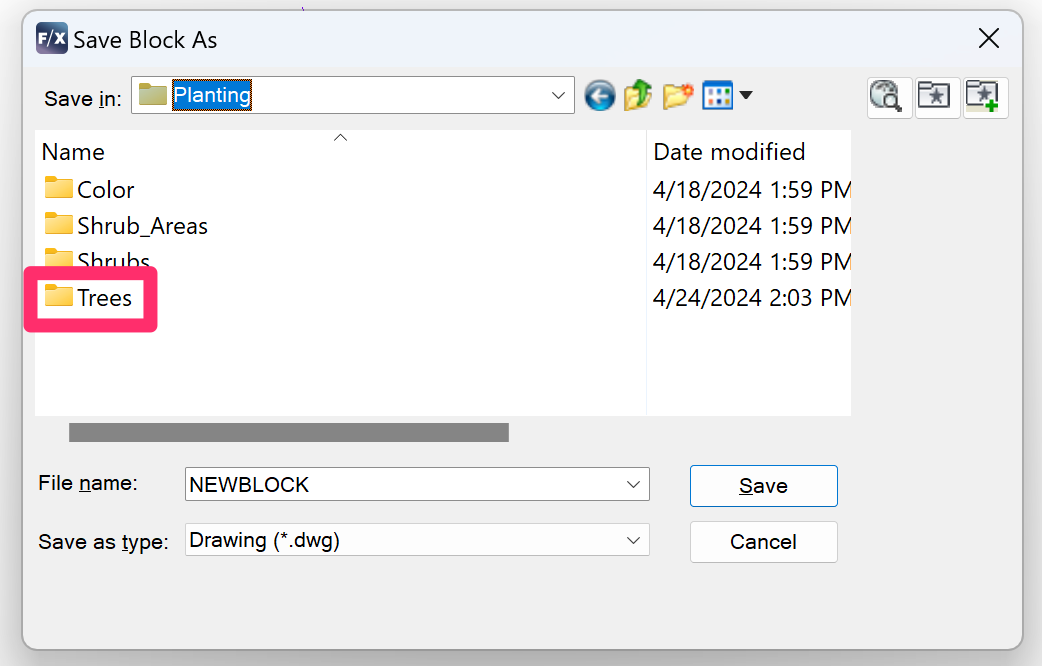
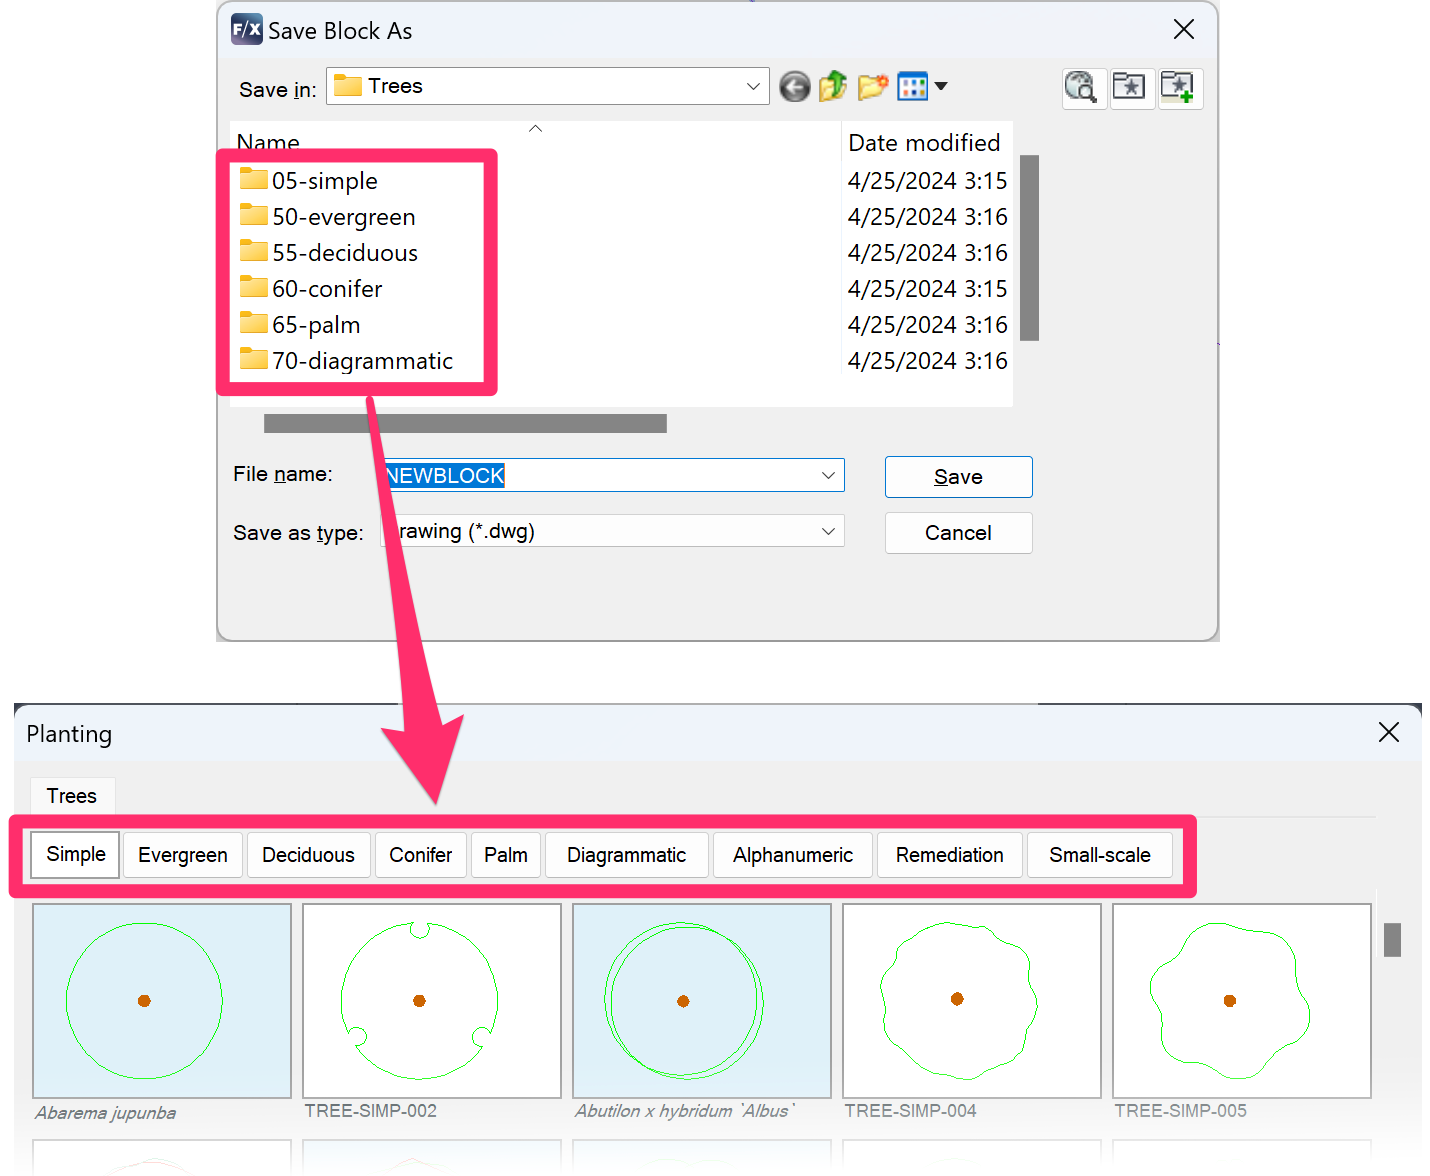
The Trees folder contains several subfolders, pictured to the left.
These subfolders mirror the available categories of tree symbols you see when assigning a symbol to a plant in the Planting dialog box.
Notice that these categories have the same names as the folders under the Trees planting folder, with the exception that the first three digits are not visible in the Planting dialog box. This is a deliberate setting that allows the folders under Planting/Trees to be ordered not alphabetically, but rather by the first three digits, which you will not see.
Thus, the folder 05-Simple is the first folder listed because of the number “05-“ before the title “Simple.” We listed the folders this way because we wanted the order of the categories (and thus the order of the folders) to be Simple, Evergreen, Deciduous, etc. You can change this order any way you wish by simply renaming these folders.
This system of folders, or categories, is simply a way to file symbols with similar appearances. It doesn't require an evergreen tree to be assigned a symbol from the folder Evergreen. It just means that the symbols under Evergreen generally resemble an evergreen tree.
Creating a Subfolder/Category for Your Trees or Shrubs
It's a good idea to save your tree symbols in a folder whose title includes either your name or your company name. In our example, we'll name the folder for the example company John Smith and Associates by including the initials "JSA."
Keep this new folder name to 15 characters maximum. With this in mind, we'll use Windows to create a new folder under Trees. We'll name the folder 01-JSA_Trees, which is 12 characters long. Notice that we didn't place a space between JSA and Trees, but rather an underscore: “_”. You could also use a hyphen here. Overall, it's best to avoid including a space in a folder that contains blocks, as spaces in folder names create problems in certain versions of AutoCAD.
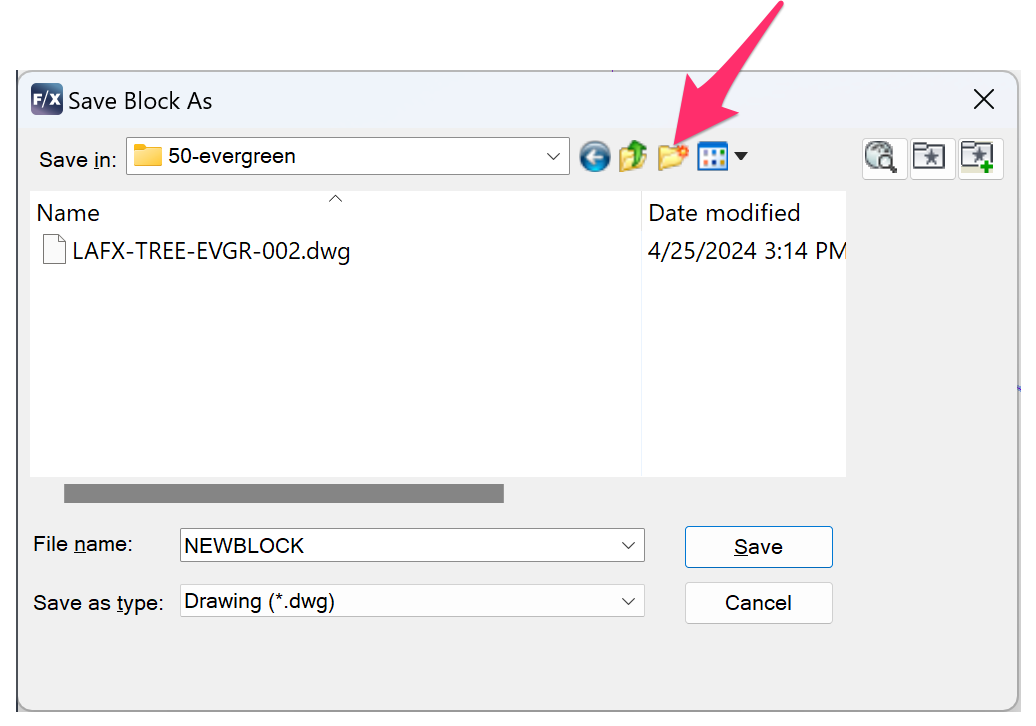
Click the Create New Folder button in Windows.
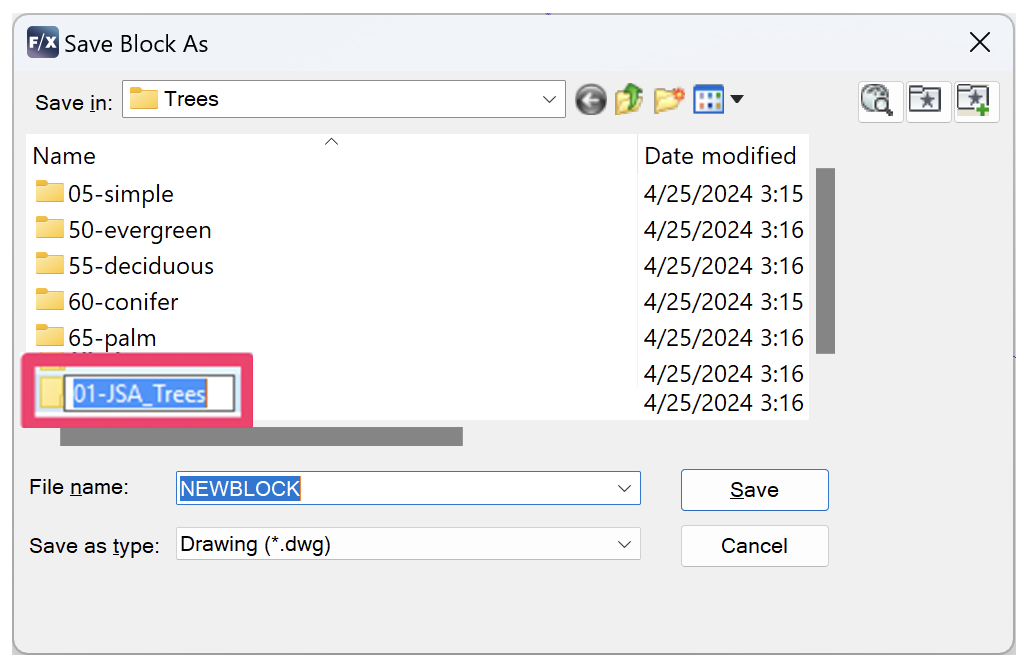
The folder 01-JSA_Trees has been created.
You'll now give your symbol a name. You can name your symbol files to your liking.
Note that all our default symbol blocks (those we've created and included with the software) will include the LAFX- prefix for ease of identification. You can choose whether or not to include this prefix in the filenames of your custom symbols. Note that the system will ignore this prefix when sorting symbols alphabetically.
In our example, we'll name the tree LAFX-TREE-JSA-001.
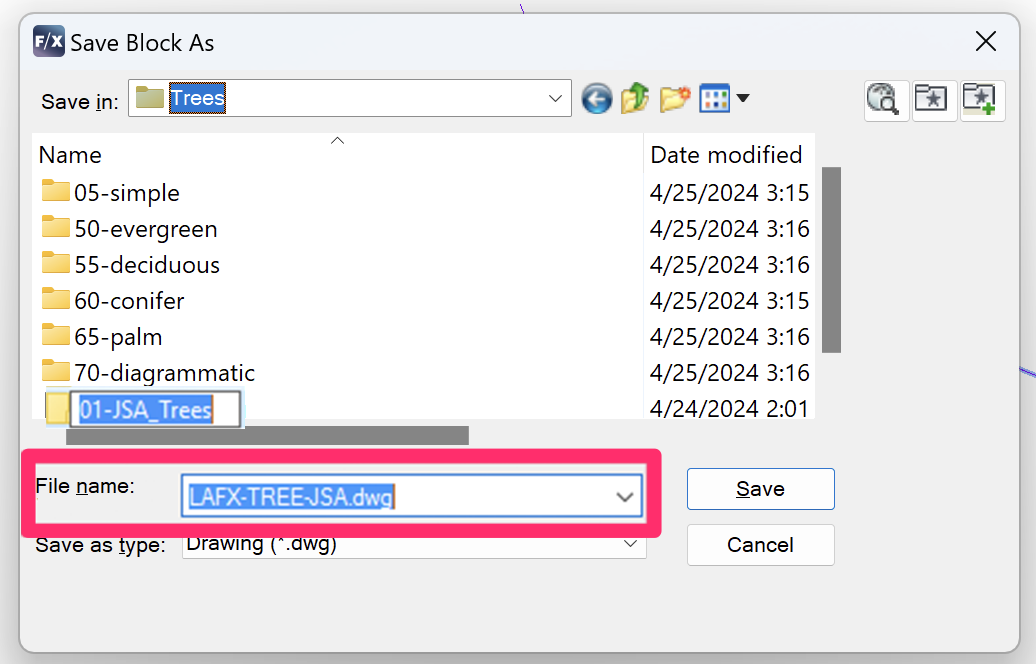
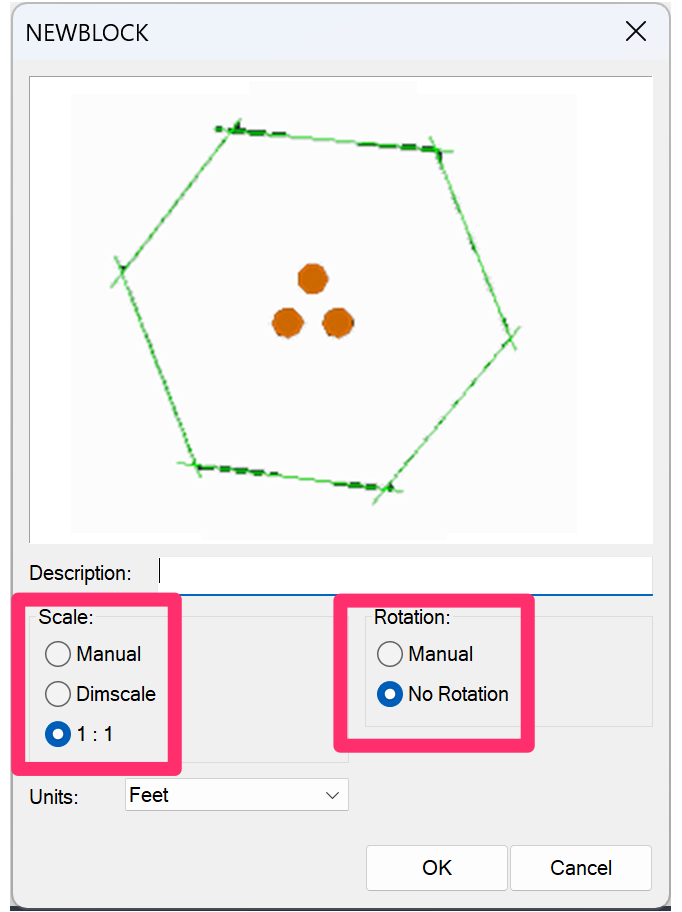
Clicking Save will open the Save Block dialog box. Remember to set Scale to 1:1 and set Rotation to No Rotation.
You can decide whether you want to save your symbol with a description. (You can do so by entering your description in the Description field.) If you save without a description, the symbol in this dialog box will reflect the file name. If you do use a description, the description will show instead. When using a description, use hyphens between words instead of spaces.
Click OK to save the tree symbol.
Now when you edit a tree and go to the symbol, a thumbnail image of the symbol you have saved will appear in the dialog box as pictured to the right.
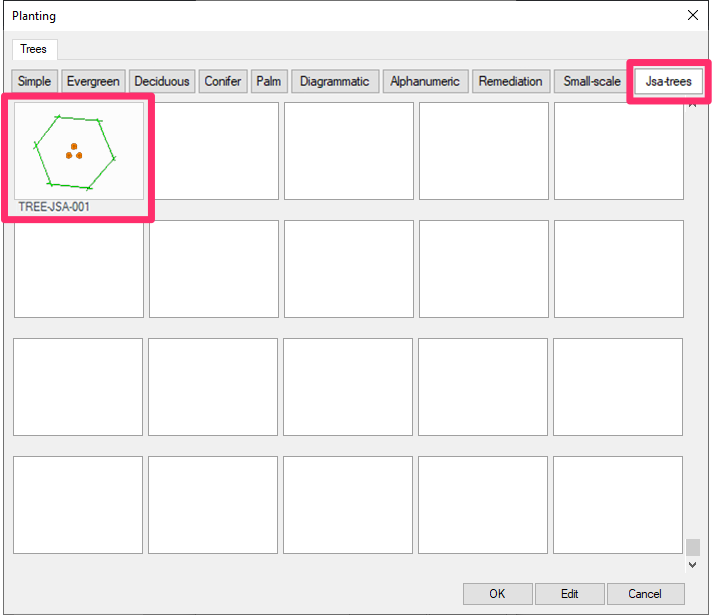
In our example, the tree library JSA_TREES appears first in the list of categories. This is because its folder starts with the digits “01." When you save other tree symbols to this folder location using Save Block, you'll see those symbols listed here as well.
You can always create more folders, and thus more categories, as needed for your tree and shrub symbols.
Saving a Vine Symbol
Vine symbols are a little different from tree and shrub symbols in that they're typically diagrammatic. For example, a vine symbol may incorporate a simple small triangle or other shape, or have some indication of a direction of vine growth, such as a couple of lines indicting a growth direction. For proper orientation, you'll want to rotate the symbol in this direction when you place it in your drawing.
You also don’t want our shadow feature to rotate a vine symbol as it would a tree or shrub symbol. Therefore, a vine symbol has to be named in such a way that the code won't rotate it.
As an example, we'll save a vine symbol into the system.
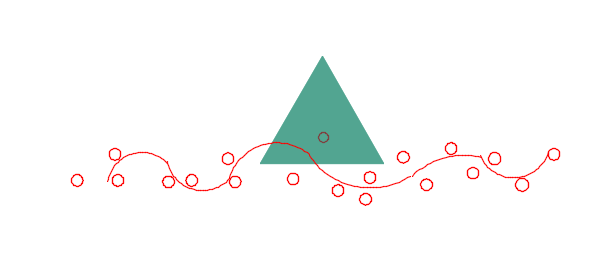
Note that the symbol doesn't have any orientation to the "east." Also note that the image is essentially horizontal for optimal appearance in the Plant Schedule.
The layers we use to define this symbol are the same as with any shrub, but when we save the symbol, we will save it with a VINE name.
Opening the Shrubs folder under Planting in the Save Block As dialog box will show the folder options for shrubs.
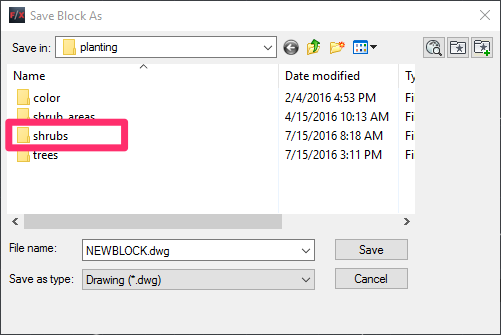
Open the Shrubs folder in the Save Block As dialog box.
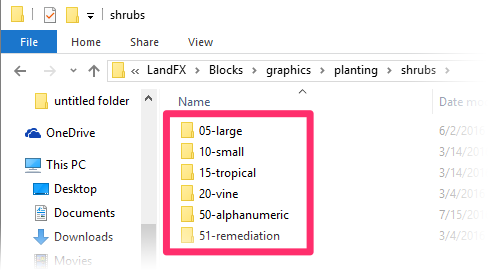
The Shrubs folder contains the shrub subfolders pictured above.
Creating a Subfolder/Category for Your Vines
As our default directory contains a small number of vine symbols, you might just add your symbols to that location.
For this example, let's say you want to create a folder for your office's vine symbols. As with the examples for trees and shrubs above, we will create a vine folder for the company John Smith and Associates.
Note: You'll need to keep this new folder name to 15 characters maximum. With this in mind, we'll use Windows to create a new folder under Shrubs. We'll name the folder 04-JSA_Vines. Notice that we didn't place a space between JSA and Vines, but rather an underscore: “_”. You could also use a hyphen here. Overall, it's best to avoid including a space in a folder that contains blocks, as spaces in folder names create problems in certain versions of AutoCAD.

Click the Create New Folder button in Windows.

The folder 01-JSA_Vines has been created.
You'll now give your vine symbol a name.
In our example, we'll name the symbol LAFX-VINE-JSA-001 for VINE-(identifier)-001. This identifier can also reflect your company name.
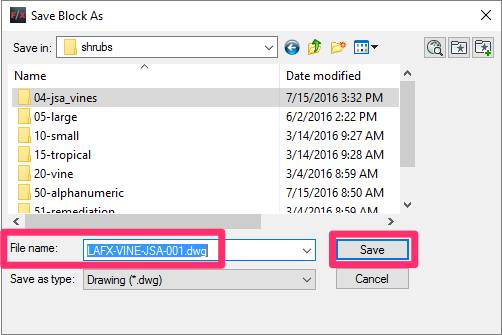
Clicking Save will open the Save Block dialog box.
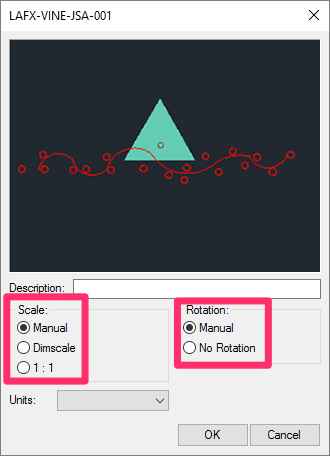
Remember to set Scale to Manual and set Rotation to Manual as well.
Note that this setting differs from trees or shrubs, as you'll want to rotate your symbol manually upon placement.
Click OK to save the vine symbol.
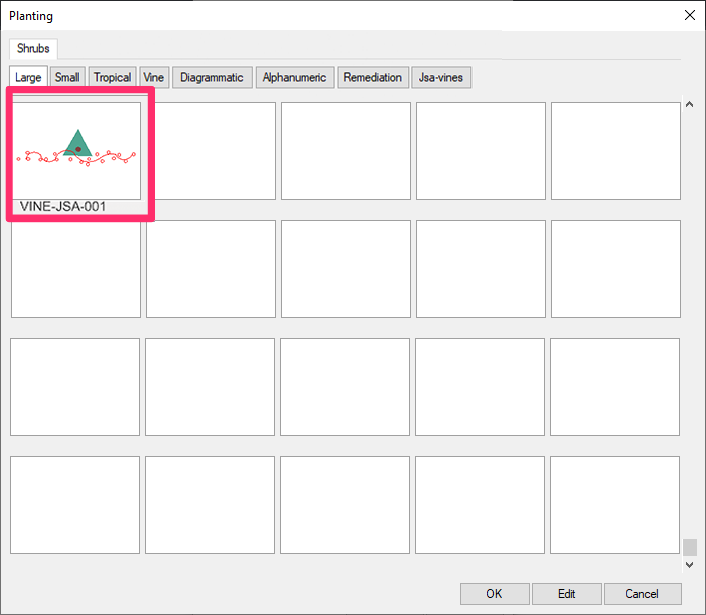
Now when you edit a vine and go to the symbol, a thumbnail image of the symbol you have saved will appear in the dialog box as pictured to the right.
Saving Alphanumeric Symbols
Our symbol blocks include a family of Alphanumeric symbols for trees and shrubs. Each of these symbols contains dynamic characters that, when placed in a drawing, will display the Plant Code of the plant represented by that symbol.
You're free to add your own Alphanumeric symbols to the symbol library. The easiest way to do this is to edit one of the existing Alphanumeric symbols and save it under a new name in the alphanumeric subfolder within either the TREES or SHRUBS symbol folder.
Because Alphanumeric symbols contain dynamic characters, they behave a little differently from other plant symbols when you save them. For more information, see our Saving Alphanumeric Symbols documentation.
Re-Creating Your Custom Plant Symbols Using Our Default Blocks
Has something gone wrong with any of your custom plant symbol blocks? We recommend using our default blocks as a basis for your custom blocks, as they're already set up correctly for best performance in CAD. Use them to repair or re-create your custom blocks.
See our Re-Creating Custom Blocks from Default Blocks Power Tip, linked to the right, for more information and instructions.
Saving a Groundcover or Shrub Area Symbol
Groundcovers and Shrub Areas are represented by hatch patterns, but you can add to our default library of hatch patterns for these items. See our instructions for saving a groundcover or Shrub Area hatch.
Adding to the Groundcover Hatch Library
The easiest way to add to the Groundcover Hatch Library is to edit an existing hatch pattern and then save it as a new hatch pattern.
For information on editing these hatches, see our Groundcover Hatch Patterns documentation page.
You may have downloaded or purchased a pattern, or just used one of the AutoCAD standard patterns that aren't available in our library. For information on adding a completely new hatch to our hatch library, see our Save Hatch Patterns documentation.
Creating and Saving a Shrub Area Boundary Linetype
If you add a plant to a project as a Shrub Area (as opposed to a groundcover), it will be represented by a hatch surrounded by a distinct linetype.
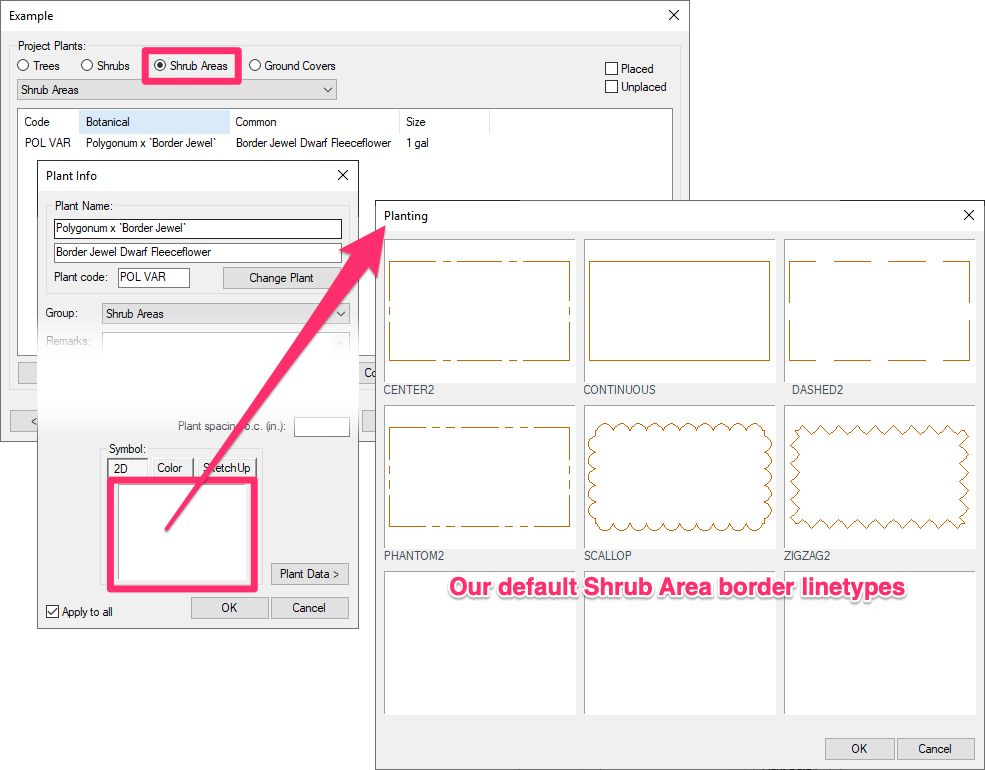
Want to add your own custom linetype to use as a boundary for Shrub Areas? See our steps for creating and saving a custom linetype for Shrub Area boundaries.
Related Webinars
- Implementing Your Office CAD Standards: Find out how easily you can adapt your own office standards to Land F/X – and how effectively the software will then apply them to your projects. (1 hr 2 min)
- Rock Out With Your Block Out: We’ve formulated a workflow that incorporates Adobe Photoshop and Illustrator along with AutoCAD to create custom block content. Learn how to transform an image into a polished, optimized, and unique block for your library. (1 hr 5 min)
- Planting F/X Setup: If you're trying to make Planting F/X work with your firm's existing style standards, this webinar is for you. (58 min)
- Working with Blocks: We go over the role played by blocks within our software, showing the various types of blocks you have access to and how they all function. We'll also show you how to integrate your personal set of custom blocks into our system. (51 min)
- Planting F/X Setup for a Multi-Office Firm: Wondering how to acquaint your office with our planting tools? Michael Bain, CAD manager at Boffa Miskell Limited, walks through his introduction of Land F/X into the New Zealand firm with 7 offices and 70+ landscape architects. Michael shows how easy it was to get the firm's standards into the software, and provides real numbers showing the time savings they experienced right away. (1 hr)
Troubleshooting
Question: Can I Create My Own Custom Color Plant Symbols?
Answer: The way the colorization system was engineered makes it difficult to allow user customization – mainly due to the way it renders the previews during the selection of symbols.
The colorization feature is still in its phase 1 of development, so please send us some of the symbols you have in mind and we'll take a look at them to see whether we can implement them for you.
Issue: Your customized tree or shrub symbols are appearing in the Plant Schedule at an incorrect rotation


