Civil and Survey (Grading Tools)
Quick video
- Civil and Survey Overview
- Creating a New Grading Category
- Placing a Grading Object
- Editing a Grading Category
- Creating a Grading Schedule
- Grading Annotation
- Importing Grading Categories from a Template or Project
- Related Webinars
- Troubleshooting
Formerly known as the Grading tool, our Civil and Survey tool includes smart Spot Elevation callouts, Northing-Easting points, and Slope Callout. Civil and Survey opens the Grading Manager, where various grading symbols can be added to and placed within a project, as well as a Grading Schedule option to generate a schedule of the Grading Manager symbols.
The Grading Manager is now a docked palette. Want to undock this palette? See our documentation on docking and undocking palettes such as the Grading, Irrigation, and Plant managers.
Civil and Survey Overview
Open the Civil and Survey Manager:
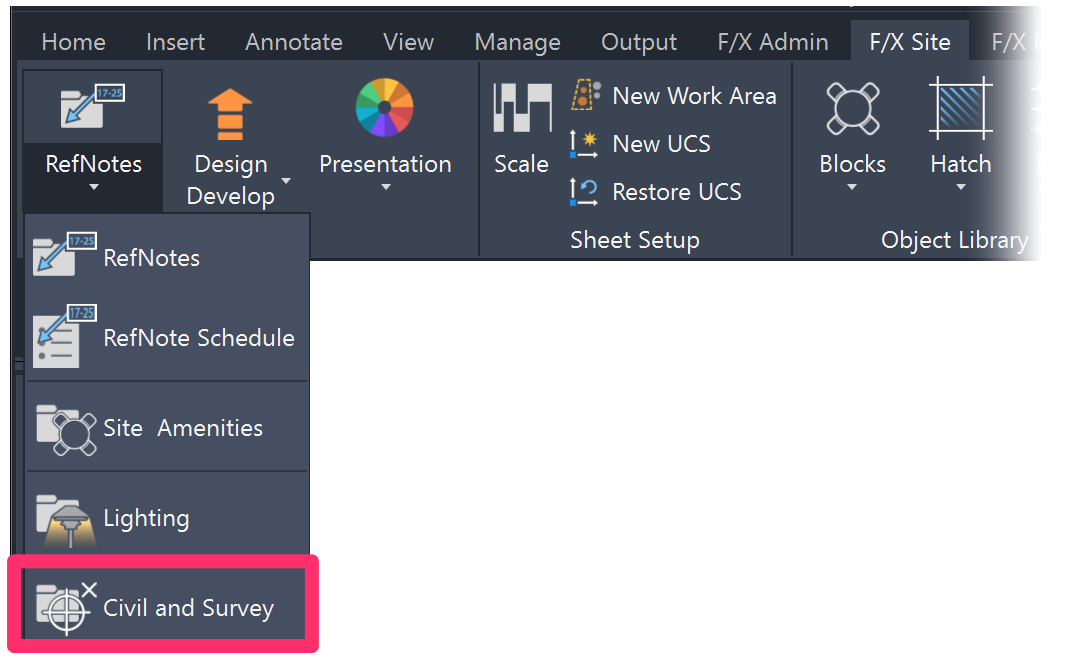
F/X Site ribbon, Civil and Survey flyout

F/X Site menu, Civil and Survey option
or type FX_CIVILSURVEYMANAGER in the Command line
The Civil and Survey Manager will open.
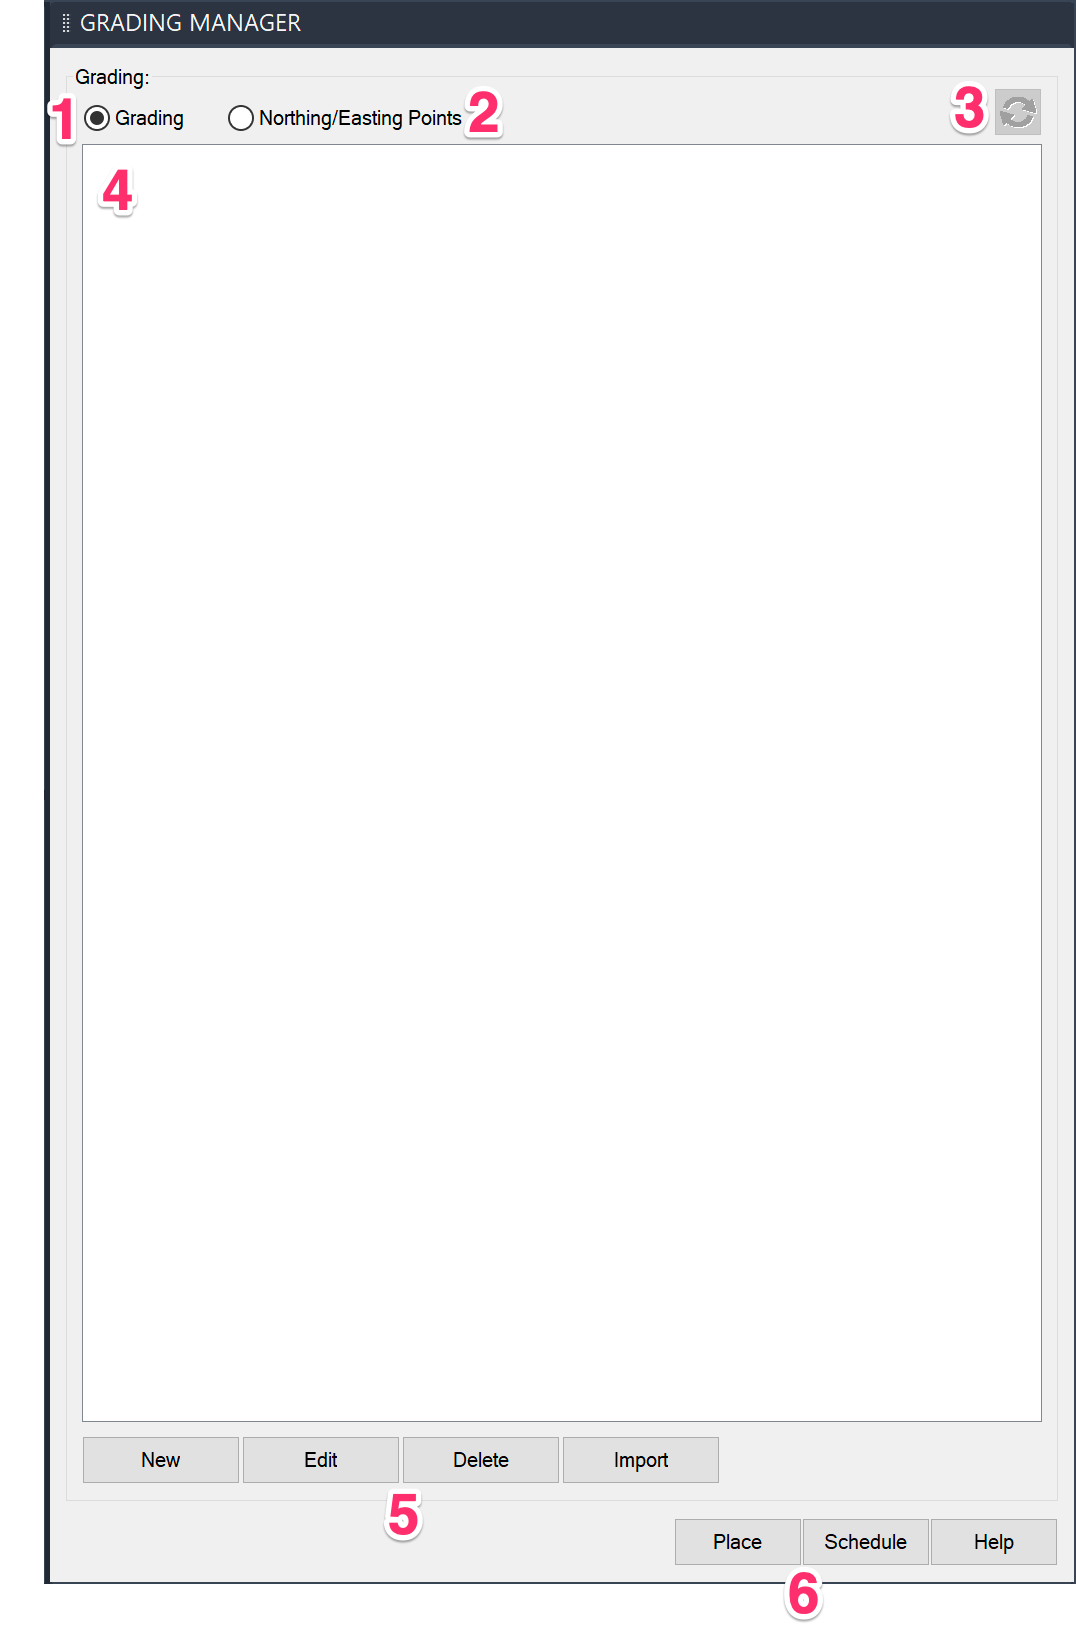
1. Grading: Select this option to add or place grading categories.
2. Northing/Easting Points: Select this option to review any Northing/Easting Points that have already been placed in your drawing.
3. Refresh button to refresh your grading list after making changes in your drawing.
4. Grading categories or Northing/Easting points you've added to your project will be listed here. (This area will be blank until you add these items to your project.)
5. Buttoms to:
- Create a New grading category
- Edit an existing grading category
- Delete a grading category
- Import grading categories from another project
6. Buttons to:
Creating a New Grading Category
To create a new grading category, click New.


You'll be brought to the Utilities section of the Civil library within our collection of Discipline Graphics.
Select a symbol for the grading category you're creating. Then click OK.
The existing libraries of symbols in this category are fairly limited. The intent is for you to add to this library with your own Grading categories.
If you want to add to this library, you can use our Save Block tool to build your own library of grading categories.
Additional notes on our grading symbol library:
- The first two symbol libraries are at full scale, so they'll be entered at the size at which they were drawn.
- The last library contains grading categories that will be placed at the scale you've set in your drawing.
- You can easily add more library options to this Civil library. See our Plan Graphics documentation.
The New Reference Note dialog box will now open, allowing you to edit the grading category you're adding and add a note to describe it.
In our example, we've added a Christy U21 catch basin.
If you want, you can also associate a detail with the new grading category.
Click OK to add the grading category to your project.

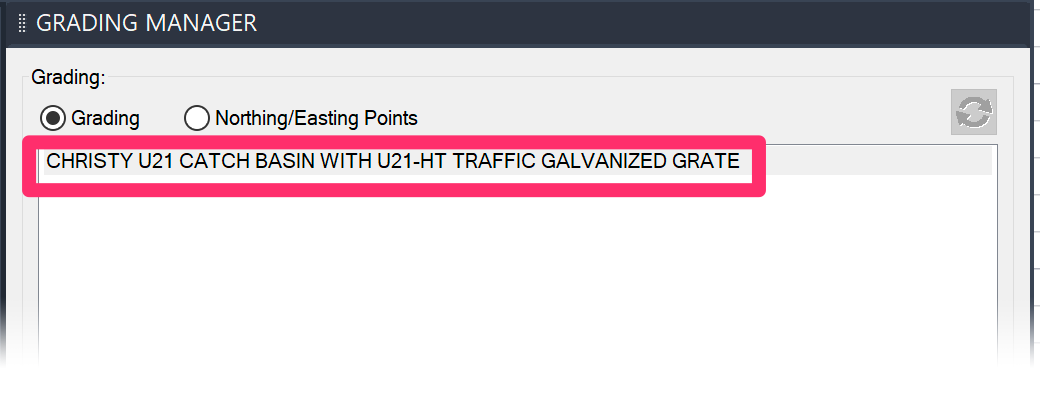
The grading category will now be listed in the Grading Manager.
You can always Edit or Delete any added categories by clicking the appropriate buttons. The Import button allows you to use similar categories from other projects.
Placing a Grading Object
To place a grading object, select it in the Grading Manager and click Place.
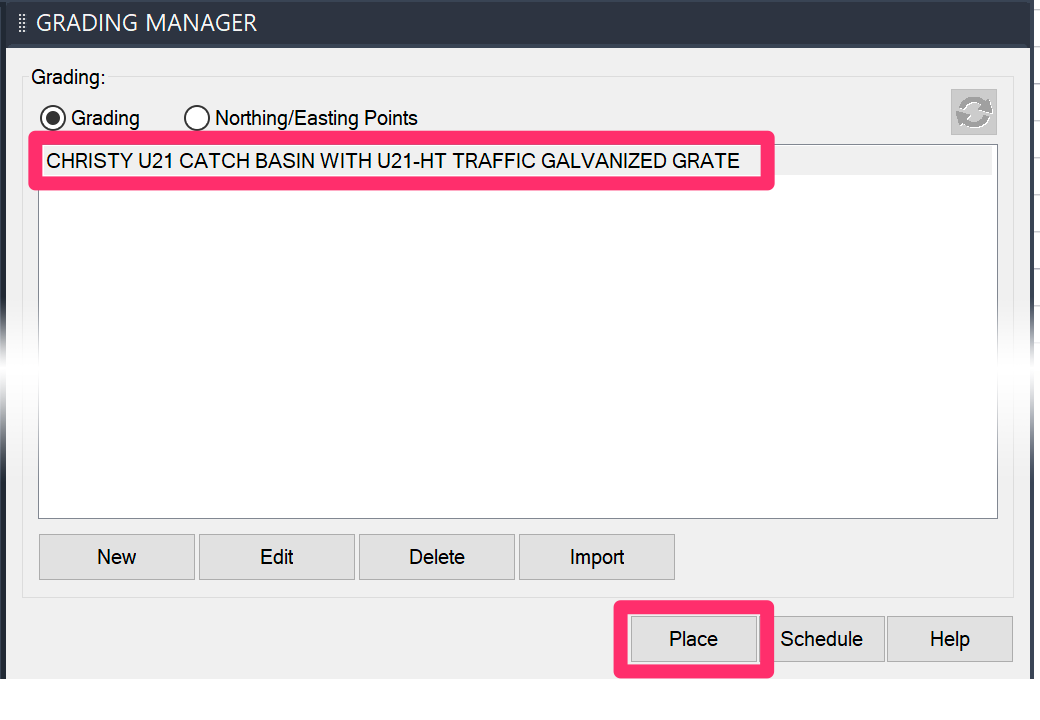
Click to place the Grading object in your drawing.
Editing a Grading Category
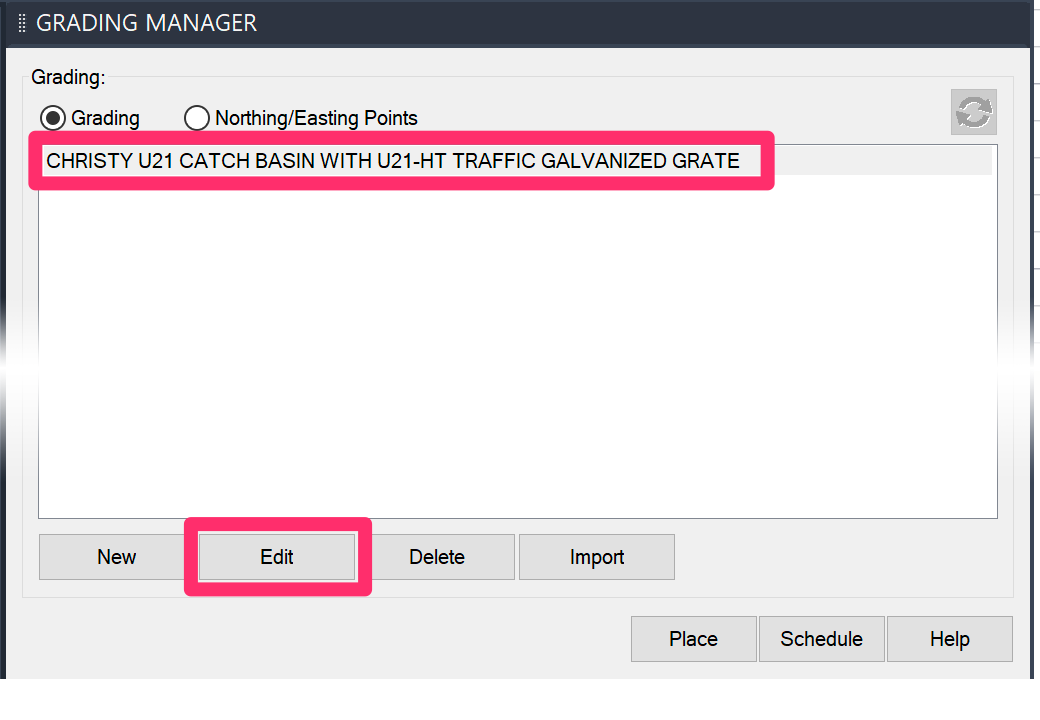
To edit a grading category, select it in the Grading Manager and click Edit.
You can also use our Edit Object/Block Data tool to select a Grading object you've already placed in your drawing. This tool opens a pickbox, which you can use to select an object in your drawing to edit.

The Edit Reference Note dialog box will open.
There, you can edit the note associate with the Grading category, assign it to one of your details, or select a symbol for it.

Creating a Grading Schedule
Go to the Grading Manager and click Schedule.

Select a destination for your schedule, then click to place it.
Schedule Text in Uppercase (or Upper and Lowercase)
You can control whether the text in any of your schedules in in all uppercase, or in upper and lowercase, from the General Preferences. For instructions, please see our Schedule Text in Uppercase Knowledge Base article.
This setting will apply to all schedules you place in your drawings, including:
- Plant Schedule
- Irrigation Schedule
- Details Schedule
-
Site schedules such as:
- Reference Notes (RefNotes) Schedule
- Lighting Schedule
- Concept Schedule
- Zoning Schedule
- Site Development Schedule
- Grading Schedule
Work Areas and Grading Schedules
Functioning essentially as drawings within a drawing, Work Areas allow you to divide your site into a number of distinct areas. In this way, you can break up your design into separate regions, phases, scope-of-work requirements, and virtually any other way you can imagine. This feature makes it possible to limit any of your site schedules, including the Grading Schedule, to specific Work Areas. You can also break up your schedule to show separate summaries of Site Development items in each Work Area. For information on dividing your Site Development schedule (or any other site schedule) in this way, see our Limiting Site Schedules With Work Areas documentation.
Create a Background Fill or Mask for your Schedules
Some designers want to give their schedules a background fill to allow it to pop from the rest of the drawing. You can create a background fill for your schedule using the Table Style Manager. Find out how. >
Grading Annotation
Northing/Easting Points
Northing/Easting Points provide markers of known survey points in your drawing. For more information, see our Northing/Easting Points documentation.
Spot Elevation
You can label elevations in your drawing using Spot Elevations.
For more information, see our Spot Elevation documentation.
Slope Callout
Slope Callouts display the percentage and direction of slopes in your drawing.
For more information, see our Slope Callouts page.
Importing Grading Items from a Template or Project
If you find yourself adding the same Grading categories to multiple projects, we recommend setting up a project template and then adding your commonly used Grading categories to that template. You can then import them into a new project from that template. This practice can save you immeasurable amounts of time, considering all the data you need to fill out for each Grading category you create. With templates, you only need to add and configure your Grading categories once, then import them – along with all attached data – into the present project.
The following steps also apply to importing Grading categories from regular Land F/X projects. However, we recommend setting up and importing from a template – mainly because templates are set up to be read-only. This means you can rest assured that the data in your templates hasn't changed when you import your Grading categories into a project.
To import Grading categories into the current project, open the Grading Manager and click Import.

The Select Project dialog box will open.
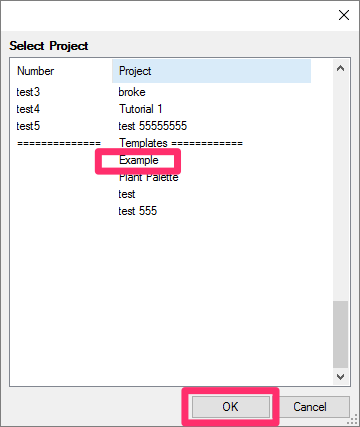
Select the project or template that includes the Grading categories you want to import. Click OK.
You'll now see a dialog box that lists all Grading categories included in the template or project you selected.
Highlight the Grading categories you want to import, and click Add to Project to add them to the current project.
Click Done when finished.


The Grading Manager will now include the Grading categories you've imported. Those categories, and all their data, are now added to your project, and you can place them as needed.
Related Webinars
- Simple Site Layout and Grading Tools: Our Civil and Survey Manager (formerly known as the Grading Manager) includes some easy-to-use tools designed to help you lay out a plan in AutoCAD with Northing/Easting points, Spot Elevations, and Slope Callouts. We'll go over a few basic examples showing how these tools work, and provide some tips on how to incorporate them into your construction documentation workflow. (58 min)
- Grading A, B, C for Landscape Architects: Follow along as we cover the basics of simple landscape grading. We cover some simple concepts like calculating slope and interpolating contours, and show you how to use our easy grading tools in a real plan. (1 hr 4 min)
- Common Land F/X Questions: This webinar covers some of our lesser-known tools, including our Spot Elevation and Slope Callout tools. (1 hr)
- Grading and Drainage: Learn simple grading processes using our annotation tools, as well as some basics in Civil 3D for more dynamic site modeling. We'll explore how to automate your grading workflow based on the needs of the project. (1 hr 2 min)
- Site Plans and Land F/X: Aaron Emerson of Mills Design Group will show some award-winning case studies of how the Land F/X Site tools, including the grading tools, are used throughout his office. Aaron will also go over some important lessons learned while setting up an efficient site design workflow. (57 min)
Troubleshooting
Issue: You are unable to send your Grading Schedule to an Excel spreadsheet
Issue: The screen flashes several times when you place a Grading Schedule in Paper Space
Issue: Text in the Grading Schedule columns is overlapping
Issue: CAD freezes or lags after you place a Grading Schedule


