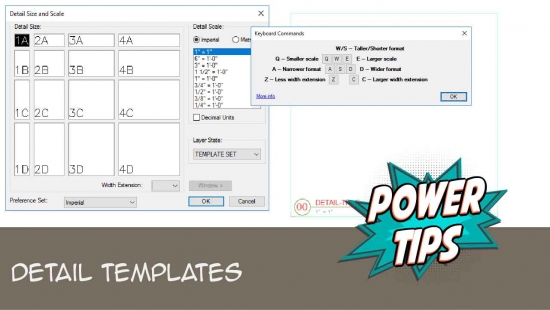
Customizing & Saving Detail Templates
Quick video
- How Detail Templates Are Saved: Read This First
- Detail Template Source Block Files & Preference Sets
- What to Do When the Wrong Custom Detail Template Loads
- Local Data Users: Working on Additional Computers
- How to Customize Detail Templates: Basic Edits
- Advanced Text Tags You Can Add to Your Detail Title Blocks
- Sheet Number
- Detail References (Referencing the Sheets Where the Detail Has Been Called Out)
- Multi-Line Title
- Reference Note Listing
- Drawn By & Checked By
- Detail Notes
- Important Note on Testing Your Detail Template Edits
- Related Webinars
- Troubleshooting
When you create a detail using our software, you'll place it inside a Detail Template. A Detail Template determines the size and scaling of your details, as well as the layout, font style, and layer colors of your detail title blocks.
Your installation includes a default Detail Template block. If you're happy with this template, you can use it as is. However, your office standards may call for details with a certain look or size. If so, the best way to create your custom template is to edit the default template drawing.
When you go to save your customized Detail Template, pay attention to which Preference Set you have open. Each time you place a Detail Template using that Preference Set, you'll place this customized template.
Looking for information on placing detail templates in your drawings? See our Placing Detail Templates documentation page.
How Detail Templates Are Saved: Read This First
Before you begin customizing Detail Templates, it's important to understand that:
- Detail Templates are saved and accessed as source files within your LandFX folder.
- Which Detail Template is applied when you place a detail in a drawing will depend entirely on which Preference Set you have open.
Detail Template Source Block Files & Preference Sets
Like our other default blocks (plant symbols, callouts, site amenities, etc.), detail templates are stored as DWG files in the folder LandFX/Blocks/Graphics/Templates.
Your installation includes two default template source DWG files: LAFX-DETL-000 (for Imperial units) and LAFX-DETL-000M (for metric units)
Like our other default blocks, these files won't download into this folder until you place them in a drawing for the first time.

These source files are tied directly to your Preference Sets. Each time you create a new Preference Set, a new Detail Template is created automatically based on one of our two default template files – LAFX-DETL-000 (Imperial units) or LAFX-DETL-000M (metric units). That new template is automatically associated with that new Preference Set and saved under the next available template number in the folder LandFX/Blocks/Graphics/Templates.
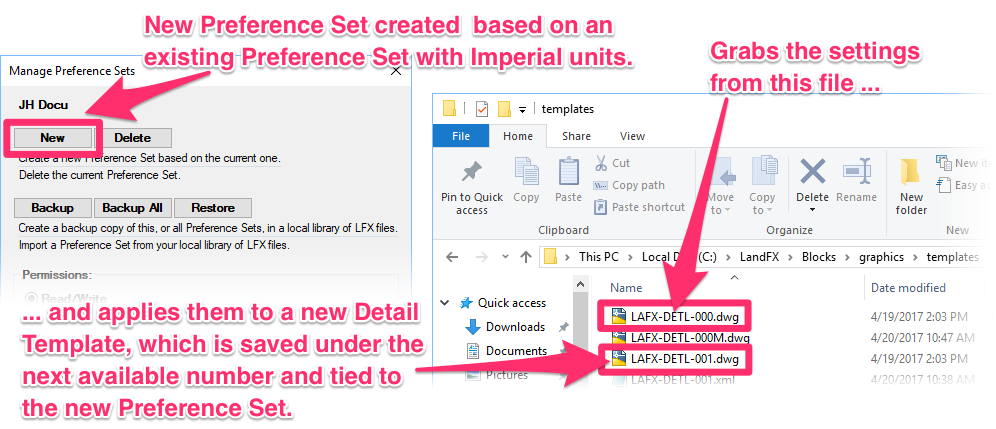
So when you create your first new Preference Set, the Detail Template associated with it will be either LAFX-DETL-001 or LAFX-DETL-001M, and so on as you create additional Preference Sets.
Once you've created a new Preference Set, you can start customizing the Detail Template that's associated with that Preference Set. Read on for instructions.
What to Do When the Wrong Custom Detail Template Loads
Is the wrong custom Detail Template loading when you move between Preference Sets? For example, you might want the Preference Set to load Template 001 but it's loading Template 009. If so, you'll just need to copy/rename the Template files as desired. In this example, the additional Preference Set is looking for Template 009, so you can resolve the issue by copying the source file for Template 001 in the location shown above and renaming it to 009.
Local Data Users: Working on Additional Computers
Each customized Detail Template you save will be tied to a specific Preference Set. If you have Local Data, you'll need to have that Preference Set saved to any additional computer where you want to complete work involving details. (Examples include a home computer or a laptop, as well as an additional computer in your office if you don't have a central server setup.) See our documentation on backing up a single Preference Set and backing up all your Preference Sets.
You'll also need to have the DWG file containing your customized Detail Template saved in the folder LandFX/Blocks/Graphics/Templates on any additional computer where you want to work with your details. In fact, if you create a large number of custom blocks, including Detail Templates, on one computer, it's a good idea to copy the entire Blocks subfolder over to any additional computer where you want to work with blocks.
How to Customize Detail Templates: Basic Edits
To make edits to a Detail Template, create a new Preference Set or open one of your existing ones.
Open the Detail Preferences screen, and click the Open Template button.
Pay attention to the Preference Set that's selected when you click Open Template. In our example, the Preference Set named JH Docu is active when we click the button. So we'll be customizing the Detail Template that's associated with that Preference Set.
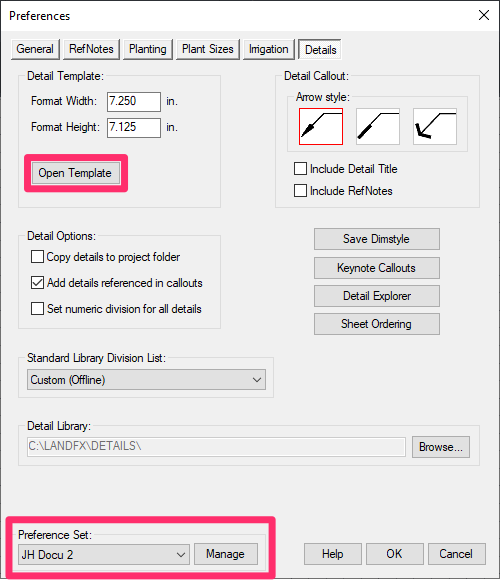
You can now begin making your edits in that source file.
Editing the Basic Detail Title Block
To make edits to the detail title bocks, click the Open Template button in the Details Preferences to open the template source file that's associated with the active Preference Set.
Don't forget to verify that you have the correct Preference Set open when you save a Detail Template.


The detail title block source file will open, and you can make any necessary stylistic changes.
Important notes on editing the default template:
- Although you can edit the color, text style, and even the text itself in the default template, you should not copy this text and use it for other purposes. These text entities have attached data, and the software looks at this data whenever you're working with a detail that contains it. If you need additional text, feel free to add it, but create thie new text using our Text tool.
- It's no longer necessary to change the Detail Template source blocks to conform to a new size you've set in the Preferences. Just set your desired template size in the Details Preference, and the template tied to the active Preference Set will automatically take on the size you set.
Editing the Text Styles in the Detail Title Block
Your installation comes with several default Text Styles, which control the appearance and size of specific applications of text in your drawings. The text in the detail title block is governed by a few of these Text Styles.
Have you tried our Reload All Text Styles REAT command? It's a fast and easy way to apply all the Text Styles from the current Preference Set to the current drawing – including a Detail Template source file you have open. Just make sure the correct Preference Set is active when you have the Template source file open. Then type REAT in the Command line and press Enter. All Text Styles in the Template will now match the detail-related styles in your Preference Set. More information about the REAT command
If you don't want to use the REAT command, you can edit the Text Styles in a Detail Template source file using our Text Manager.
Open the Text Manager:
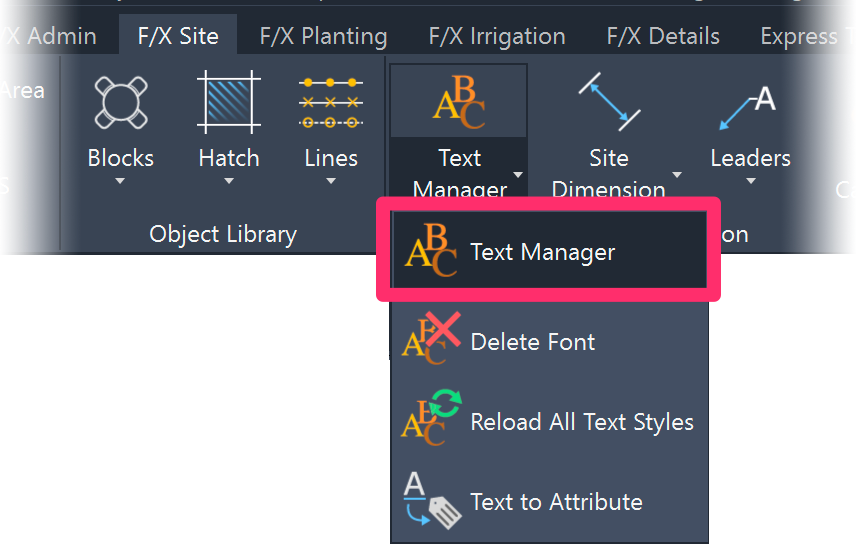
F/X Site ribbon, Text Manager button
or type *FX_Fonts in the Command line
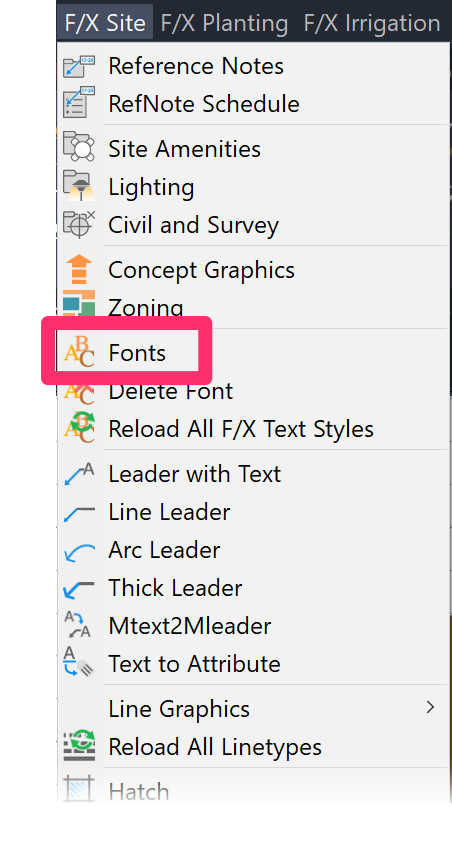
F/X Graphics menu, Fonts button
The Text Styles relating to details are the four that start with the word Detail.
You can edit the settings of each of these Text Styles by selecting the style and editing the Specifications items such as Font, Point Size, etc.

The image below shows how each of the three main detail Text Styles is used in a Detail Template (and, consequently, when you create a detail based on that template).

1. Detail Number: Auto-lists the number assigned to a detail when that detail is placed into a sheet.
2. Detail Title: When saving the detail, give it a name and the system will insert that title in the Detail Title placeholder text.
3. Detail Text: (also used as general annotation text when creating a detail) Controls two sets of text:
- DETAIL-SCALE: Shows the scale of the detail. The system will insert the proper scale based on the scale chosen when placing the detail template.
- DETAIL-FILE: Shows the saved detail path, which also determines what the system does with the detail when it's saved. For existing details previously saved into the system, it will give prompts to overwrite existing or save new. If the system doesn't see a proper path already saved, it will prompt you where to save the detail into the system.
Because of the underlying data, if you copy these two pieces of text for other use, the system will not function properly when you save the detail. Note also that this text should not include spaces (example: DETAIL-FILE, not DETAIL - FILE)
Not shown above is the Detail Subtitle Text Style, which you can use when you need a detail to have a subtitle.
If you want the text in the detail title block to appear in a different size, you can physically scale it up or down to suit your needs.
You can make other changes to the layout of the detail title block and move text to different locations as necessary. In addition, you can add some extra text tags to your title block. For more information and instructions, see the Advanced Text Tags section below.
Detail Template Size
Open the Details Preferences. There, you'll see the Detail Template settings, including the Template size that's tied to the current Preference Set.
When you change the basic Detail Template size in the Details Preferences, the template associated with the current Preference Set will automatically conform to the size you set here.
It's no longer necessary to change the Detail Template source blocks to conform to a new size you've set in the Preferences. You're still free to click Open Template and customize the detail title blocks to your liking. However: If you do decide to edit the source block, keep in mind that the system needs some kind of object(s) at the edges of the template to indicate how wide it should be, as well as an object aligned with 0,0. Although you can choose to add anything to the source file that meets these requirements, the existing corner tick marks in our default template satisfy them perfectly, so we recommend keeping them in place.

Why We Recommend Keeping Our Default Detail Template Size
If you don't have a substantial library of existing details, you might consider simply using our default Detail Template size.
Our default Detail Template size has a width of 7.25 inches and a height of 7.125 inches. We developed this default size to allow for the efficient division of both 24×36 and 30×42 (D and E) sheet sizes – that is, division of the sheet after considering the sheet border offset for edges and a title block. Based on this template, your details can be wider, taller, or both, as required. Keep in mind that perhaps 90% of an office’s details will conform to the basic template size, and usually only a small portion of your details will need to be larger.
In truth, most offices don't have a good idea of what their standard Detail Template size actually is or should be. After all, details may have been created over a long period of time, by a variety of different people – many of whom may no longer be working at the firm. Usually, an office will only be able to determine its "official" Detail Template size after some review of past details.
Changing the Detail Template Size
When you decide on a basic Detail Template size, consider how your sheet is broken into a grid to organize the drawings and information on the sheet.

This grid layout is based on your Detail Template size. You might have notes or text in one grid column, details on others, and maybe a portion of the plan drawing filling still other parts of the grid. This grid layout can help you organize your sheet and keep notes, plans, and details lined up and orderly.

To change the Detail Template size, fill in your desired dimensions in the Format Width and Format Height fields in the Details Preferences.
This setting translates into the size of your "basic" Detail Template as it will appear in a Paper Space layout tab. You no longer need to edit detail title block widths so they conform to that new width size.
The finished detail can grow from this basic template size as needed for taller and/or wider details. This size will be adjusted when you save a detail for the scale you select when saving.
Changing the Template Size in Existing Details
Let's say you've already started using either our Default Template size or a custom size for your existing details, and you then later that you actually want it a different size. In this case, you'll need to edit each detail individually. Why? Because any process to automate a Detail Template size or style change across an already-saved detail library would pollute your existing details with lines or text overlapping the new Detail Template, making the automation useless.
If you decide on a new template size for your standard details, we recommend making this change one detail at a time as you go. This way, you'll avoid an up-front burden of time. To change the size of a detail's template:
1. In the detail drawing, delete the old Detail Template.
2. Place a new Detail Template, making sure you've selected the correct Preference Set.
3. Adjust the detail so it fits within the new template
4. Save the detail using our Save Detail tool. You'll see a message asking whether you want to overwrite the existing detail. Click the option to overwrite.
The Save Detail tool will remember the old title and other details, so this is still a relatively fast method of changing the template. It should require less than one minute per detail – as long as you don't need to edit the detail to fit within the template.
Advanced Text Tags You Can Add to Your Detail Title Blocks
We offer some advanced text features, or tags, that you can add to your detail title block. You're free to add these text tags to individual details when saving them into our system.
- Sheet Number
- Detail References (Referencing the Sheets Where the Detail Has Been Called Out)
- Multi-Line Title
- Reference Note Listing
- Drawn By & Checked By
- Detail Notes
These features are not included in the default title block.
Although you can edit the color, text style, and even the text itself in the default template, you should not copy this text and use it for other purposes. These text entities have attached data, and the software looks at this data whenever you're working with a detail that contains it. If you need additional text, feel free to add it, but create thie new text using our Text tool.
When you need to add text features to a detail title block, you should NEVER copy some existing text in the title block for your new text.

Instead, open the Text Manager, select the details-related Text Style you want to use (pictured to the left), and click TEXT or MTEXT to enter new text.
Make sure you're on a text layer when placing the text.
Sheet Number
Our default title block includes the detail number in a circle at the left side of the title block.
If you want, you can also include the sheet number in the detail title.

Move this number aside, and scale the circle up to make it slightly larger. Then bring the number text back to where you want it.
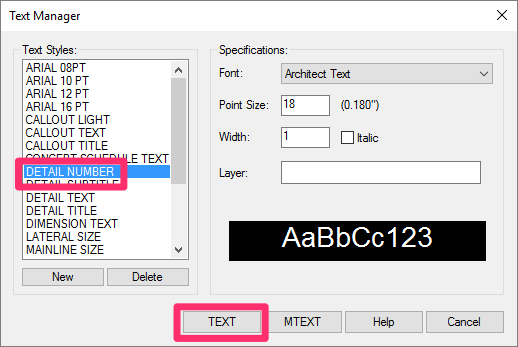
Open the Text Manager and select the Detail Number style.
Click Text to place the text.
Making sure you're on the same layer as the detail number, type the word SHEET where you want the sheet number to appear.
You may need to reduce the scale and point size of the Detail Title Text Style to fit it into your sheet correctly.
You'll most likely want to edit the properties of your "SHEET" text to justify it to the "Center."
When you place this template in a drawing, the detail and sheet numbers will appear here automatically.

Detail References (Referencing the Sheets Where the Detail Has Been Called Out)
A detail title block can list all sheet locations in a drawing where you've called out the detail. This list can be fairly extensive on a large project. As a result, you may want to create a new Text Style for the sheet references at a smaller point size. You can also use our default Detail Text style, as it's relatively small at 9 pt.
Using the Text Style of your choice, type the text as DETAIL–REFERENCES in the detail title block.
We recommend making this text "Left" justified, as well as allowing it the room to expand the length of the detail title block as needed for a number of sheet indications.

If you do decide to use the Detail Reference text described above, you'll need to place your detail callouts within a Paper Space layout tab you've set up as a sheet. This is the only way to know which sheet this callout is relating to.
Quick video
Multi-Line Title
Firms performing work internationally may be required to have all aspects of a detail in two languages. For the Title, you can replace the Text object in the default template with an Mtext object that consists of the wording "DETAIL|TITLE." When the system then fills out the title, it will turn the "|" character into a linebreak.
Reference Note Listing
The detail title block can also list any Reference Notes that have assigned that particular detail to the notation. The Detail Text style may be a good choice for this label, but you can also create a new Text Style for this purpose.

The title will include the word REFNOTE in the detail title block.
While detail title blocks are fairly standard, there's no limit to how they might look. Here's one example of a customized detail title block:

Drawn By & Checked By
The DRAWNBY and CHECKEDBY tags correspond to the Drawn By and Checked By fields in the Save Detail dialog box, which you'll fill out when saving one of your details into our system.
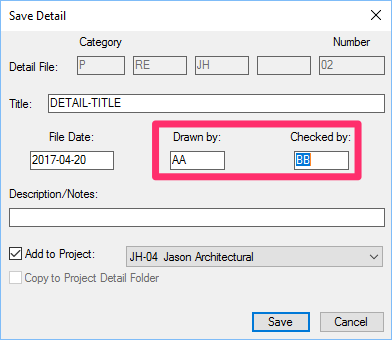

When creating your detail title block or an individual detail you plan to save, you can add the tags DRAWNBY and/or CHECKEDBY.
When saving your detail, fill out the Drawn by and/or Checked by text fields.


The text you add to these fields will automatically populate at the corresponding text tag in the saved detail.
Detail Notes
The DETAIL-NOTES tag corresponds with the Description/Notes text field in the Save Detail dialog box.
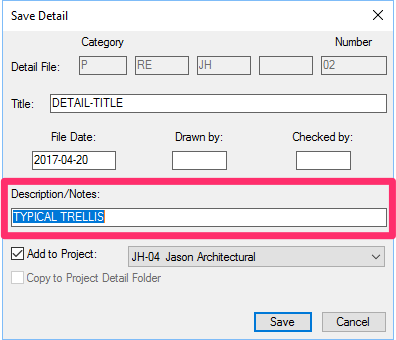
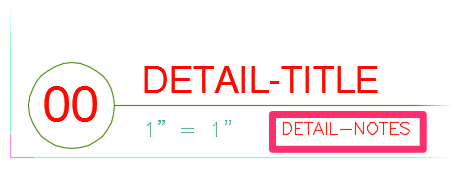
To add your description and notes to your details, include the text DETAIL-NOTES in your template, or when creating an individual detail.
When saving a detail, type the notes you want to add to it in the Description/Notes field.

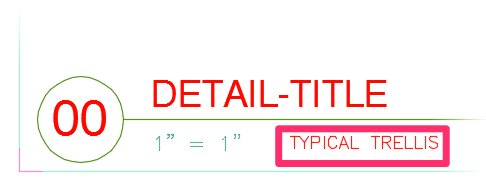
The notes will autopopulate in place of the DETAIL-NOTES tag in the saved detail.
Important Note on Testing Your Detail Template Edits
When placed in a drawing, a Detail Template is inserted as a block, which will establish the block definition for that Template. If you need to test your edits to the Detail Template you'll need to either place the edited Template in a blank drawing, or, if you need to test the edited Template in a drawing where the Detail Template block has already been defined, purge the original Detail Template block definition from that drawing between edits.
Related Webinars
- Design F/X Setup: Join us for a complete demonstration on how our software helps you manage and use construction details. We’ll provide an overview of our entire system, from creating your detail drawings to compiling your detail library. (53 min)
- Creating a Detail from Scratch: Land F/X provides all the tools you need to draft your own details quickly and efficiently. Learn how our details tools will help turn you into a detail virtuoso. You’ll also pick up some recommended techniques for drawing up a detail from the ground up. (1 hr)
- Getting Started with the Detail Tools: We'll show you the basic tools you need to familiarize yourself with on the F/X Details ribbon, including setting your Details Preferences. (58 min)
- Detail Tips And Tricks: Learn some advanced techniques and best practices to create details that communicate your design intent clearly, including how to load a layer state, save a custom detail block, and place a detail template. (59 min)
- Details and Specifications: Tyson Carroll of Urban Tree Foundation queried industry leaders in the creation of landscape architectural details and specifications that satisfy the best possible construction documentation standards. Join us for an exciting look at his project. (46 min)
Troubleshooting
Issue: Text layer coming in on the wrong color
Issue: You want to create a mulitline detail title (a detail title with two or more lines)


