Label Plants in Paper Space
Quick video
- Why Label in Paper Space?
- Labeling in Paper Space: Prerequisites
- Labeling in Paper Space
- Plant Label Scale
- Moving Labels After Placement
- Verify Labels & Make Corrections
- Plant Labels and External References (Xrefs)
- Using REDEFINEBLOCK to Repair Plant Labels
- Related Webinars
- Troubleshooting
Many landscape architects prefer to label their plants in Paper Space, rather than Model Space. We've made it easy. You can use any of our plant labeling options to place plant labels into Paper Space, and still perform all error checking as if they were placed in Model Space.
Why Label in Paper Space?
You might choose to label in Paper Space for several reasons, including the following:
- Your plan might be extremely dense, like a virtual jungle, with no real negative space (such as a building, walk, or paving), and any labels will fall onto other plants, with the possibility of covering up vital information. In this situation, you can place labels in areas outside the boundaries of the viewport, into blank areas of the Paper Space sheet layout.
- You simply prefer the labels to be placed in a Paper Space layout tab, and perhaps outside the site image viewport and into a blank area on the sheet layout.
- Your office traditionally labels in Paper Space, and you want to keep up that tradition. (We've found that this argument has broken down, as it is much faster, and in most situations more flexible, to label within Model Space while reserving Paper Space for the sheet layout only.)
Labeling in Paper Space: Prerequisites
Viewport Scaling
Before labeling your plants in Paper Space, make sure the Paper Space viewport scale matches the scale you've set using our Scale tool.
The Move to Paperspace Option
If you plan to label your plants in Paper Space, make sure you have the Move to Paperspace option selected beneath Label Options in the Planting Preferences.

This option will allow your labels to be visible outside your viewports in Paper Space.
Labeling in Paper Space
Once you've taken care of the prerequisites outlined above, you can begin labeling in Paper Space.
Our Plant Labeling Tools
When you label in Paper Space, you'll use any of our standard labeling tools:
- Label by Group
- Label Single Plant
- Label by Connecting Line
- Label by Connecting Arc
Here's how to open these tools:
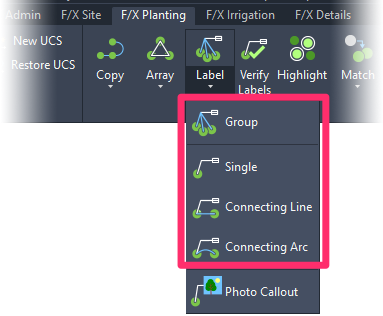
F/X Planting ribbon, Label flyouts
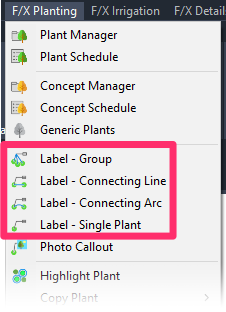
F/X Planting menu, Label options
or type one of the following commands in the Command line:
- FX_PlantLabelGroup (Label by Group)
- FX_PlantLabelSingle (Label a Single Plant)
- FX_PlantLabelLine (Label by Connecting Line)
- FX_PlantLabelArc (Label by Connecting Arc)
Placing Labels in Paper Space
In this example, we'll place a Group label in Paper Space for the three plants in the bottom right corner of the viewport in the image to the right.
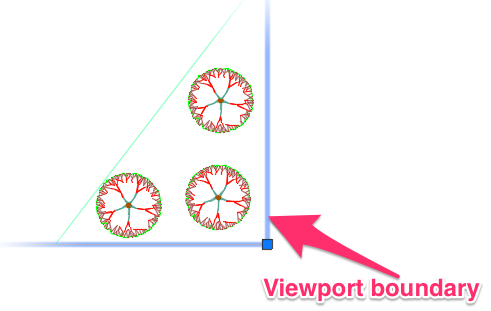
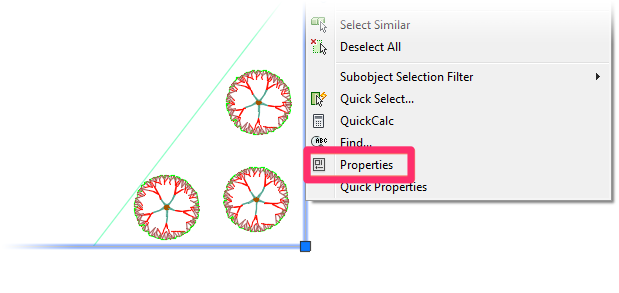
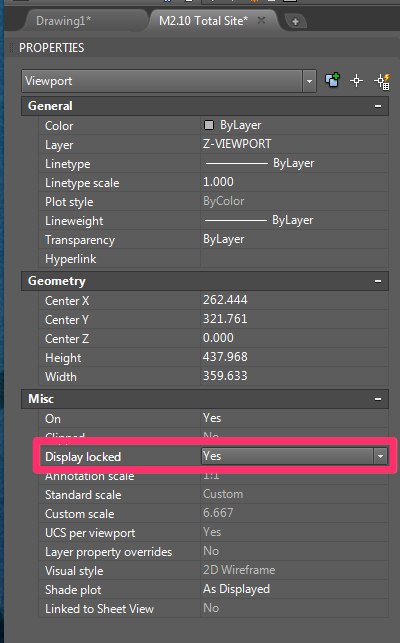
To label in Paper Space, you'll need to "lock" the viewport display.
To lock the viewport, click the viewport's bounding line to highlight it.
Then right-click and select Properties from the menu that opens.
Once in the Properties panel, go to Display Locked and select Yes.
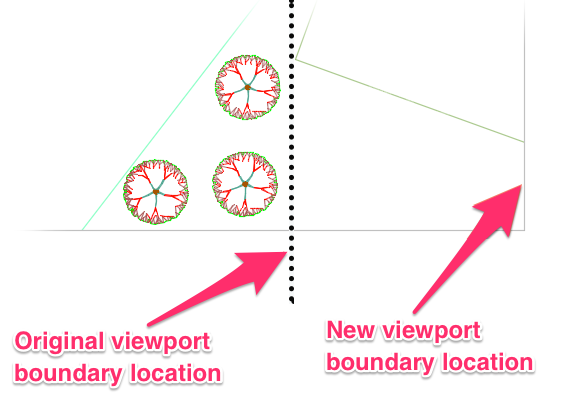
Now select the viewport and use the "grip points" to expand the viewport outward (in our example, to the right).
This will expose more of the drawing in Model Space and leaving the plant labels outside the viewport view area, and within Paper Space.
Double-click within the viewport to work in “Floating Model Space,” or Model Space while you are in Paper Space.
Place your plant labels, and make sure you are extending the leader lines outside the original viewport area.
The labels will appear to be on other parts of the drawing, but they are automatically being moved to Paper Space when you place them.
You'll eventually move the edge of the viewport back to its original location to see only the callouts.
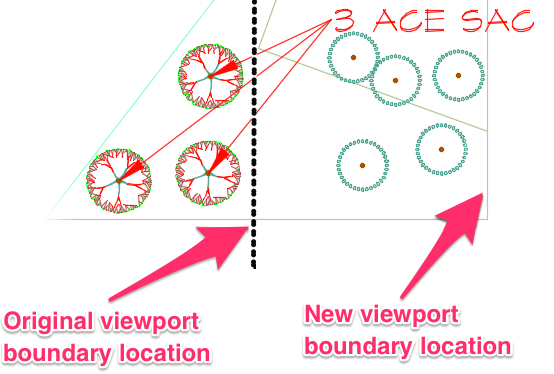
Important: If you’re labeling by Group, Connecting Line, or Connecting Arc in Paper Space, do not press the Escape (ESC) key before completing the command. Pressing ESC will prevent the label from moving from Model Space to Paper Space. Once you’ve placed a label and you want to end the command, you can right-click, or press Enter or the space bar – just not ESC.
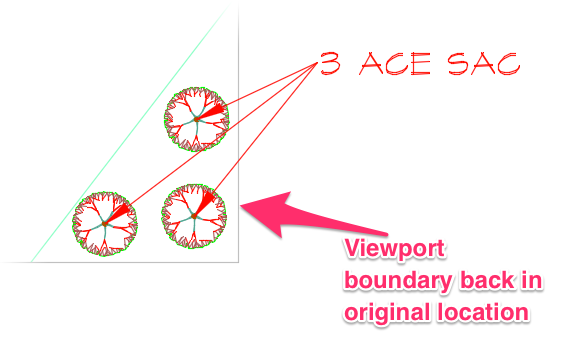
In the image to the left, the viewport is moved back to the original position, leaving our label in Paper Space outside the viewport.
If you want to place your labels in and around the site, you have no real reason to place the labels into Paper Space. If you don't have the room to place the labels in the Model Space site layout, the Paper Space placement is a logical solution.
If you place labels in Paper Space, you can still perform all the necessary label error-checking functions, such as Verify Labels.
Are your labels rescaling immediately to an incorrect size when you place them in Paper Space? If so, you may have your Paper Space viewport scale set incorrectly. Read more >
Plant Label Scale
The scaling of your plant labels in relation to the rest of your drawing depends not only on the scale you've set, but also on the text size assigned to the PLANT CALLOUT font in the Text Manager. For more information, see the Plant Label Scale section on our How to Label Plants page.
Moving Labels After Placement
You'll probably find yourself having to move some of your labels to make new for new ones. Or you may simply place a label and decide immediately that you want it in a different location. For information on moving your labels after placing them, see the Moving Labels section of our How to Label Plants documentation page.
Verify Labels & Make Corrections
To ensure that your labeling is correct, use our Verify Labels tool. For more information, see our Verify Labels page.
Did you make changes to your planting plan by adding, deleting or replacing plants? If so, you'll need to update your plant labels to reflect the revised plant counts.
Plant Labels and External References (Xrefs)
We do not offer the ability to label plants within an external reference (Xref). Our long-term solution is to allow multiple users to label a single planting plan at the same time.
In the meantime, users who are working on large projects will often tend to split up the plan for labeling purposes, and then use the WBLOCK command to combine it again. Larger firms sometimes separate the tree and shrub plans, so each portion can be handled by a single drafter.
Using REDEFINEBLOCK to Repair Plant Labels
Plant labels can sometimes behave somewhat strangely. Examples include:
- You inserted a plant label, and the callout box contains no information or text – it's empty.
- The right and left sides of the same callout style are coming in at different sizes.
- The layer colors are wrong.
This list is not exhaustive; it's just a sample of some common label/callout-related issues our users have faced, which can often be resolved by a simple step.
Remember: Callouts are just blocks, each of which is contained in its own .dwg source file. Problems can sometimes occur with these blocks that cause them to behave strangely in a drawing.
If any of your labels or callouts seems out of order, the first and easiest step to take is to redefine the block from the source file using the REDEFINEBLOCK command. For more information, see our Redefine Block article.
Related Webinars
- Getting Started with the Planting Tools: This webinar shows how to label plants in Model Space and Paper Space, as well as using the Verify Labels tool to error check your plan. (1 hr 3 min)
Troubleshooting
Issue: Plant labels are not showing up in Paper Space, or plant label text is missing
Issue: Plant labels are rescaling immediately (to the incorrect size) when placed in Paper Space
Issue: Plant labels are appearing behind hatches or other objects when placed in Paper Space
Having other issues related to labeling plants? Please see our Plant Label Troubleshooting section.


