
Plant Color Board (Bloom Schedules & Color Legends)
- Plant Color Board Overview
- Schedule Destination
- Entire Palette & Include Xrefs
- Editing or Regenerating Existing Schedules
- Applying the Current Schedule Settings as the Default
- Work Areas
- Make the Schedule Narrower, or Change the Column Widths
- Schedule Text in Uppercase (or Upper and Lowercase)
- Related Webinars
- Troubleshooting
You can use our Plant Color Board tool to create a Gantt chart style schedule of all trees, shrubs, Shrub Areas, groundcovers and plant mixes you've placed in a drawing or added to a project, with options to generate either or both of the following schedule types for your planting design based on data from our master plant database:
- A Plant Color Legend displaying bloom color information, including primary and accent colors
- A Bloom Schedule displaying season of bloom
Plant Color Board Overview
Open our Plant Color Board tool:

F/X Planting ribbon, Plant Color Board flyout
type FX_BLOOMSCHEDULE in the Command line
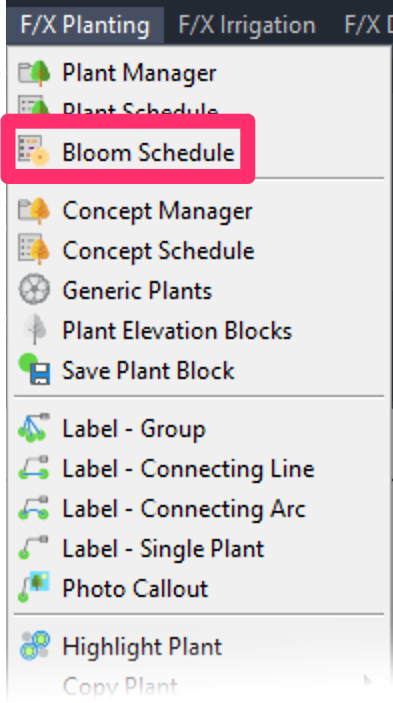
F/X Planting menu, Bloom Schedule option
The Plant Color Board dialog box will open.
The Plant Color Board dialog box allows you to customize several settings for your Bloom Legend.
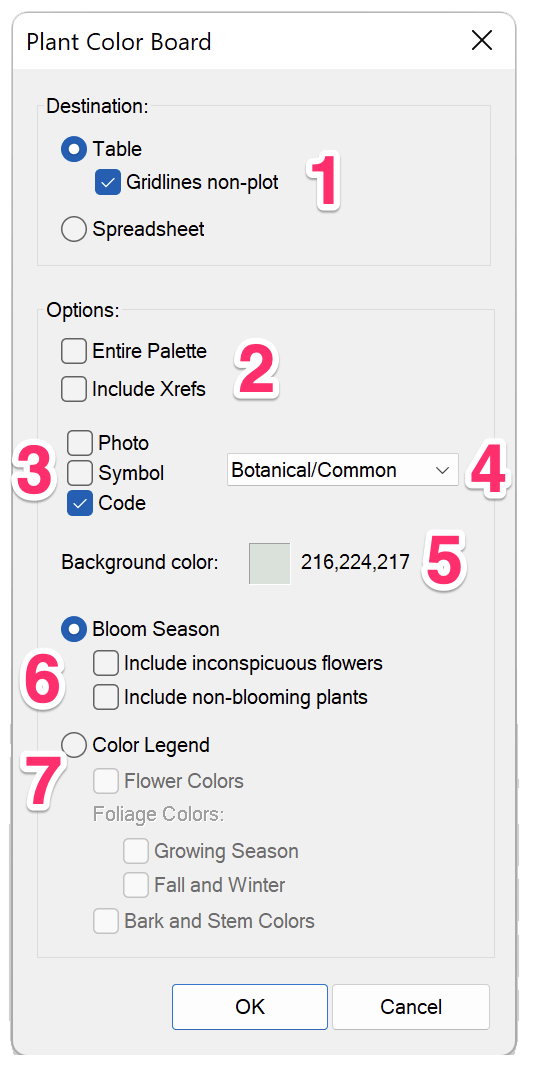
1. Destination: Select where to place the schedule – in the Drawing, in the drawing as a Table, or in a Spreadsheet.
2. Options to:
- Include the Entire Palette in the schedule
- Include plants from your external references (Xrefs) in the schedule
3. Options for choosing how your plants will display in the schedule.
- Photo: Include the photo you've assigned to each of your plants using our Photo Callout tool
- Your assigned plant Symbol
- Your assigned plant Code
4. Use this menu to control whether each plant will be listed by its botanical or common name, or both, in the schedule.
5. Set the Background Color for the schedule.
6. Select the Bloom Season option to place a Bloom Schedule, and choose from sub-options to:
- Include inconspicuous flowers
- Include non-blooming plants
7. Select the Color Legend option to place a Color Legend, and choose from sub-options to include:
- Flower Colors
- Foliage Colors during:
- Growing Season
- Fall and Winter
- Bark and Stem Colors
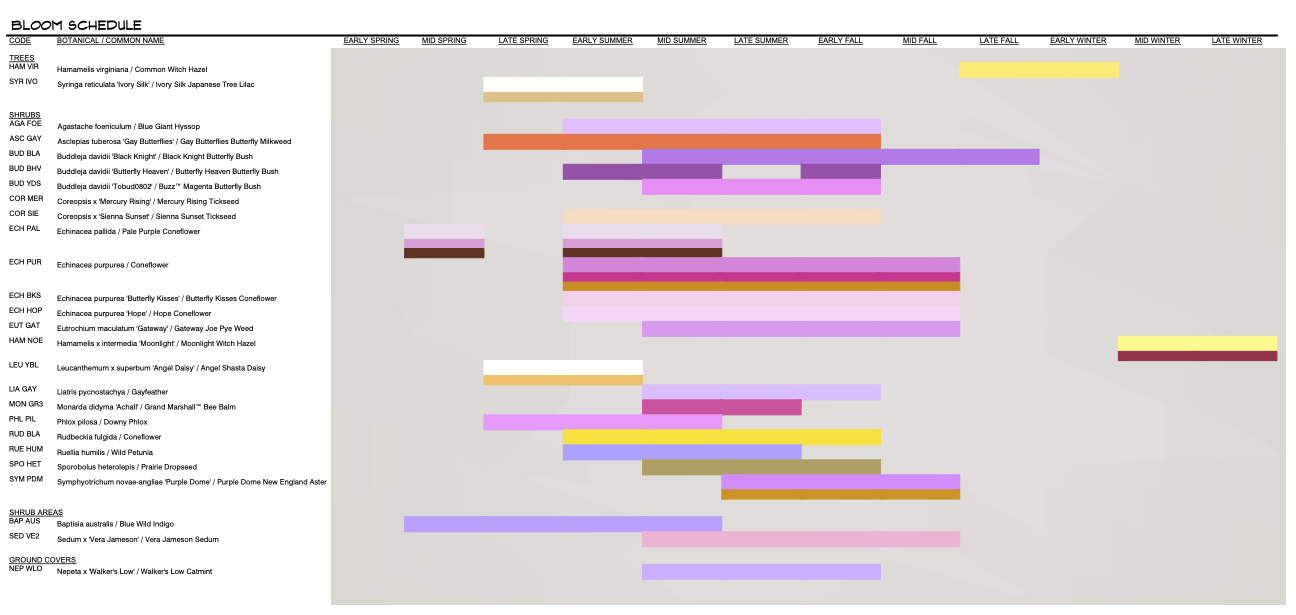
Here is an example of a Bloom Schedule generated by selecting the Bloom Season option:
Schedule Destination
The options in the Destination area determine the location where you want to place your Bloom Schedule.
- Table: Place the schedule in your drawing as a table.
- Gridlines non-plot: Check this option if you want the lines separating the table cells to be non-plot. Uncheck this option if you want the table lines to plot.
- Spreadsheet: Export the schedule to a spreadsheet program such as MS Excel.

Sending a Schedule to a Spreadsheet
Exporting a schedule to a spreadsheet using a program such as MS Excel gives you an infinite number of options in formatting and enhancing that schedule. In a spreadsheet, you can easily make edits, add specific calculations, create new information columns, and make the schedule available to a client or contractor who doesn't have AutoCAD.
Quick video

Creating a Macro for a Schedule in MS Excel
A macro is a recorded set of actions that can be applied automatically to a spreadsheet with the click of a button. You can create your own macro in Excel to include custom columns, carry out automatic calculations on preset columns, and much more. For example, you might need to calculate the percentage of the plant total occupied by each plant in a project. With a macro, you can carry out these calculations instantly. See our article on creating a macro in MS Excel for a schedule.
Entire Palette & Include Xrefs
Entire Palette: Check this box to include the entire palette of plants you've added to the project in the schedule, whether or not you've placed the plants.
Use this option to review the plant palette early in a project, which will help you determine what you might need to add or delete.


Include Xrefs: If your drawing has an external reference (Xref) attachment that includes plants, check this box to include those plants in the schedule.
Editing or Regenerating Existing Schedules
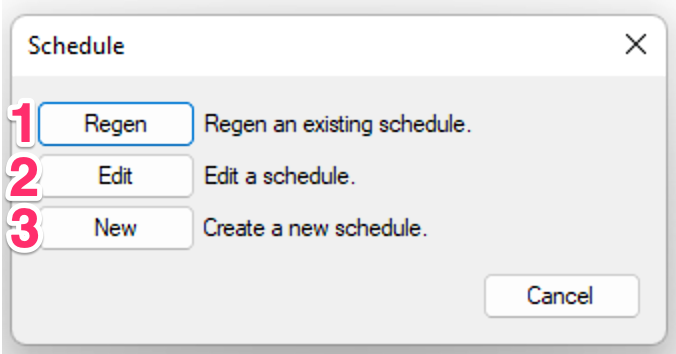
If you open the Plant Color Board tool in a drawing that already includes one or more existing Bloom Schedules or Color Legends, you'll see the Schedule dialog box, which includes the following buttons:
1. Regen: Regenerate an existing schedule after making changes in your drawing.
2. Edit: Edit the settings of an existing schedule. Clicking this button opens the Bloom Schedule dialog box, allowing you to reconfigure a selected schedule. Any changes you make to the schedule settings at this point will apply to the selected schedule in your drawing when you click OK.
3. New: Create a new Bloom Schedule.
Schedule Text in Uppercase (or Upper and Lowercase)
You can control whether the text in any of your schedules appears in all uppercase, or in upper and lowercase, from the General Preferences. For instructions, see our Schedule Text in Uppercase Knowledge Base article.
This setting will apply to all schedules you place in your drawings, including:
- Bloom Schedule
- Color Legend
- Irrigation Schedule
- Details Schedule
-
Site schedules such as:
- Reference Notes (RefNotes) Schedule
- Lighting Schedule
- Concept Schedule
- Zoning Schedule
- Site Development Schedule
- Grading Schedule
Related Webinars
- Ask Us Anything! Spotlight on Plant Schedules Join us for the first "Ask Us Anything," which focused on Plant Schedules, including the massive 2023 update that overhauled the Plant Schedule dialog box and opened new possibilities for your Plant Schedules. (1 hr 7 min)
- Plant Schedules: Land F/X provides a wide range of options for configuring a Plant Schedule for your landscape design. We’ll show you how to organize your columns and include or omit elements such as plant symbols, codes, cost estimates, spacing, and plants from your Xrefs. Join us to explore these choices and pick up valuable insights for crafting your ideal schedule. (1 hr 5 min)
Troubleshooting
Issue: My schedule is too long. How can I break it up?
Issue: Text in the schedule columns is overlapping
Issue: Error: Not all plants in the drawing match the project data
Issue: Error: Non-Planar Entity
Issue: You are unable to send your schedule to an Excel spreadsheet
Issue: The schedule is not recognizing or calculating objects in an Xref
Issue: Work Areas are not recognizing or calculating a Shrub Area or groundcover hatch
Issue: The screen flashes several times when you place a schedule in Paper Space
Issue: Text boxes are displaying in your drawing where your schedule text should be
Issue: "Cannot find Work Area title" error message when placing a schedule in a drawing with Work Areas
Issue: Your schedule is listing plants that are not in your drawing
Issue: You saw an "Unable to read plant list" message when trying to run a schedule
Issue: CAD freezes or lags after you place a schedule
Issue: Your schedule header is showing up in the Arial font (and you don't want it to)
Issue: Automation Error. Description was not provided message, when attempting to run a schedule
Contact
- Land F/X


Our software tailors AutoCAD®, Revit®, and SketchUp® to the needs of landscape architects, irrigation designers, and other professionals. We automate your most tedious tasks and ensure accuracy, giving you more time to design.