Objects in Xrefs Are Not Being Counted or Calculated Properly
Issue
You ran a schedule in order to count or calculate objects such as plants or Reference Notes (RefNotes) placed in an external reference (Xref), and some items are not being counted correctly. You may be experiencing this issue when running a Plant Schedule or RefNotes Schedule.
Cause
This issue can have several possible causes:
- A bug with AutoCAD 2018 that prevents the system from reading objects in Xrefs.
- You may have run your schedule without selecting the option to calculate objects in your Xrefs.
- A non-standard character or symbol in one or more of the Xrefs' filenames could be blocking the Include Xrefs option.
- You might have corruption in your drawing, Xrefs, and/or drawing template (DWT).
- The objects that aren't being counted may actually be in a nested Xref – that is, a file that was Xrefed into one of your Xrefs
- The INSBASE setting may not be matching between Work Areas and plants within an Xref – most likely because an Xref was inserted into your drawing while a User Coordinate System (UCS) was set.
Solution
Step 1: Update your installation (AutoCAD 2018 and newer only)
If you're having this issue while using AutoCAD 2018 or newer (not F/X CAD), your first step should be to update your installation using the Autodesk desktop app.
Have F/X CAD, or an older version of AutoCAD? Or still seeing incorrect calculations after you update? Move on to the next step.
Step 2: Verify that you've selected the option to Include Xrefs
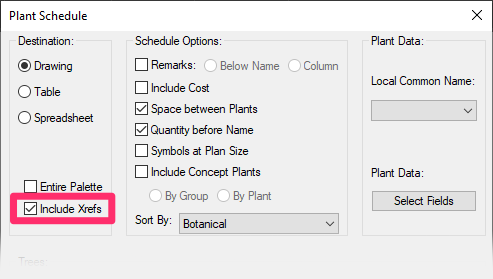
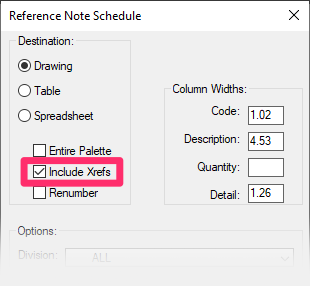
Our Plant Schedule and Reference Note Schedule dialog boxes both have options to Include Xrefs. If your schedule is failing to recognize all objects in the Xrefs, you've likely left this option unchecked. Make sure you select this option when running your schedule.

Option to include plants from Xrefs when running a Plant Schedule

Option to include RefNotes from Xrefs when running a RefNotes Schedule
Still seeing incorrect calculations? Move on to the next step.
Step 3: Check for and address file naming issues.
As a general rule, you should avoid non-standard symbols in a file name and stick to alphanumerics, underscores and dashes. Other symbols such as #, $, @, !, ~, and * (among others) can cause conflicts with software. Try renaming your Xref file(s) to something simpler that doesn't include these characters.
Step 4: Check for & address drawing corruption
Corruption in your drawing may be blocking the data connection through the Xref.
4A. Follow our steps to clean your drawing and all Xrefs.
4B. Test this issue in a blank drawing to ensure the source of corruption isn't coming from a custom template you've been using to start each new drawing.
If you're still having the issue in the blank drawing, there's a good chance that your drawing template (DWT) is corrupt. You may need to create a new template.
Drawing corruption causes a number of issues, including the inability to calculate objects in Xrefs. Always clean outside consultant drawings before attaching them to your own drawing. See our article on preventing drawing corruption for more information.
Step 5: Check for & address objects in nested Xrefs
If you're sure you've selected the Include Xrefs option when running your schedule, it's time to investigate the objects that are not being calculated. This is especially important if some objects from your Xrefs are being counted and others aren't.
Our Include Xrefs feature will only recognize plants and Xrefs that have been placed in a drawing that has been Xrefed directly into the main drawing. Chances are, the uncounted objects are in a nested Xref – that is, an Xref within an Xref. To address the problem, you'll need to change your Xref setup so the nested Xref is instead directly referenced within the drawing where you're trying to place the schedule.
Note that you'll first need to cancel out the nested reference (steps 1 through 3 below) before directly Xrefing the file into the main drawing. If you don't complete these steps first, you'll likely experience conflicts between the nest and the direct Xref of the same drawing.
Complete the following steps to make the necessary changes to your Xref structure:
5A. Open the drawing file you've Xrefed into the main drawing that itself includes the nested Xref where the problematic objects have been placed.
5B. Open the Xref Manager by typing Xref in the Command line and pressing Enter.
5C. In the Xref Manager, right-click the nested Xref that contains the uncounted objects.
Hover the cursor over the Xref Type option on the menu that opens, then select the Overlay option from the submenu.

5D. Open the main drawing.
5E. Open the Xref Manager, and bring in the nested Xref (the file that contains the uncounted objects) as an Overlay. To do so, please follow our instructions to attach an Xref, making sure to select the Overlay option in the Attach External Reference dialog box.
5F. Run your schedule again, making sure to select the option to Include Xrefs. Your schedule should now include the plants or RefNotes from the Xref.
5G. Repeat these steps for any additional nested Xrefs that include objects that your schedule is not recognizing.
Still having issues with calculating objects in your Xrefs? Move on to the next step.
Step 6: Restore the World Coordinate System (WCS)
At this point, you likely have a User Coordinate System (UCS) set in your drawing, which was also set when the Xref was inserted. Inserting an Xref while a UCS is active can interfere with the system's ability to calculate objects within Work Areas in the Xref.
6A. Detach the Xref.
6B. Use our Restore UCS tool to restore the WCS in your drawing.
6C. Re-insert the Xref.
Your calculations should now function correctly. If you want, you can safely restore your original UCS at this point.
To prevent this issue in the future, restore the WCS before before inserting an Xref into your drawings. You can also use our fxREF tool to attach Xrefs. fxREF will make these UCS adjustments for you when you insert Xrefs.
Step 7 (F/X CAD users only): Back up your profile, then uninstall and reinstall F/X CAD
If you're still experiencing the issue and you have F/X CAD:
7A. Open the Options dialog box, then export your F/X CAD profile in the Profiles tab. This step will allow you to retain your F/X CAD settings.
7B. Uninstall and reinstall F/X CAD.
Uninstalling and reinstalling F/X CAD should resolve the issue.
7C. Open F/X CAD after reinstalling. Open the Options dialog box again, and set your profile as current in the Profiles tab.


