Place Area for Dripline
Quick video
- Place Area for Dripline: Overview
- Scaling Your Dripline Hatches at Row Spacing
- Important: Avoid Arcs in Your Drip Area Boundaries
- Changing the Hatch Symbols for Areas for Dripline in Your Projects and Drawings
- Piping to Dripline Areas
- Having a Hatch Issue? Download Our Updated Hatch Patterns Manually
- Related Webinars
- Troubleshooting
An Area for Dripline is intended for a planting area that will receive a grid pattern of either above- or below-grade dripline, which consists of poly pipe tubing with emitters built into the pipe at various intervals by the manufacturer.
Areas for dripline are represented by a hatch pattern and a dashed border outline.
Before you place drip irrigation equipment into your drawing, you'll need to select the equipment from our database and add it to your project. For more information, see our Add Drip Equipment to a Project documentation.
The default install does not include all symbols, but many of them will download on demand. If you go to place a head, the symbol should download as necessary.
Place Area for Dripline: Overview
Dripline spray emitters are either above- or below-grade multiple driplines laid parallel to one another. Generally, the spacing of the drip emitters on the dripline matches the spacing between driplines.
Draw a polyline (on any layer) around the areas that are to be irrigated with a dripline system.
Open the Area for Dripline tool:
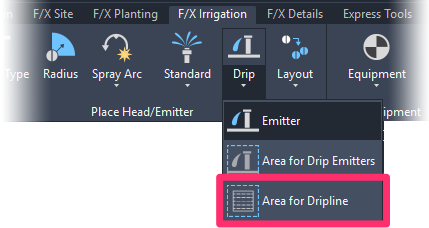
F/X Irrigation ribbon, Area for Dripline flyout

F/X Irrigation menu, Area for Dripline option
Or type FX_PlaceDripLine in the Command line
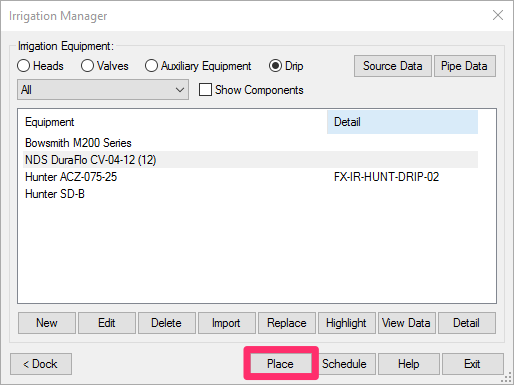

The Select Dripline dialog box will open. This dialog box lists all driplines you've added to your project. Select a dripline, then click Place.
If you used the Irrigation Manager to place your dripline, you'll skip this step.
The cursor will turn into a pickbox, and the Command line will prompt you to Select polyline to hatch, [Draw Multiple].
You can now place your Area for Dripline in an existing closed polyline area or:
- Begin drawing a closed polyline area. Your hatch will be applied to this area once you close it.
- Type M for Multiple: This option allows you to select one or more closed polyline areas within your hatch boundary and exclude them from the hatch.
If you type M for "Multiple," the cursor will change to a pickbox that will allow you to make a polyline selection. More information >
Selecting an Existing Polyline Boundary
Select a closed polyline that represents the area intended for dripline.


The polyline border will change to a dashed drip border area line, and a hatch pattern represented the selected dripline will be inserted in the area.
Note that the angle of the hatch pattern will match the angle of the polyline segment selected. In this way, the dripline hatch will express the general direction in which the dripline tubing will be run when installed.
The hatch patterns will automatically differ depending on the type of dripline, as pictured to the right.

Drawing a Hatch Boundary "On the Fly"
If you haven't yet drawn a polyline boundary for your Area for Dripline, you can do so "on the fly" after selecting the type of irrigation zone to place.
When you go to place an area, the Command line will prompt you to Select polyline or interior point to hatch, [Draw Multiple].
Start drawing your closed polyline. Once you close it, the hatched area will appear within the polyline boundary.
In previous versions, drawing your hatch boundary on the fly would require you to first type D for Draw. We've now built in the ability to simply start drawing your closed polyline. As long as the first point you select isn't an existing polyline, the Draw command will be fired automatically.
This feature works with all our hatch types, including:
Excluding Interior Objects from a Dripline Hatch (Multiple Option)
In many cases, areas where you want to place dripline will contain objects that you want to exclude from the dripline hatch – such as benches, paths, or boulders.
To exclude these objects from the hatch, type M when placing the dripline area.
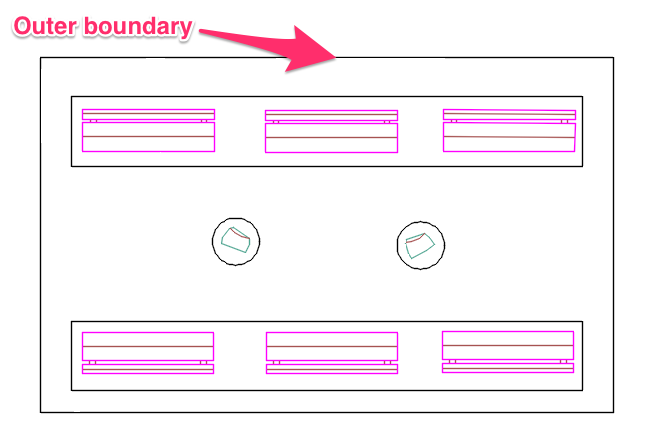
The cursor will turn into a pickbox, and you'll be prompted to Select outer boundary.
Use the pickbox to select the outer boundary of the area where you want to place the dripline.
Having issues placing your drip hatch using the Multiple command? Here's what to do.
You'll then be prompted to Select interior boundary.
Use the pickbox to select any interior objects you want to exclude from the hatch. You can just keep clicking until you've selected all the objects you want to exclude.
When finished selecting interior objects, right-click or press Enter.
In some cases, you may need to draw circles or rectangles around objects you want to exclude.
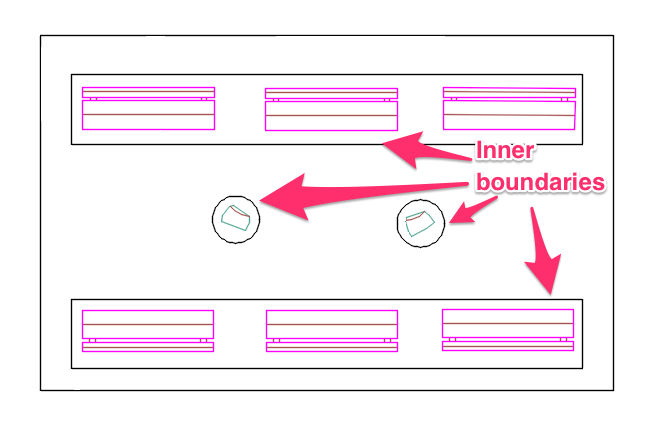
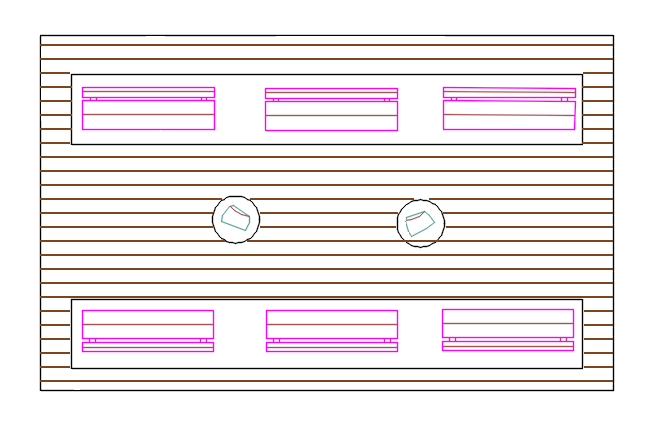
Once you've right-clicked or pressed Enter, the hatch will be placed and will exclude all the objects you selected.
Cannot process multiple boundaries because the outer polyline includes loops.
Seeing this error message when trying to use the Multiple option while placing a dripline hatch?

Excluding Trees from a Drip Emitter Hatch
You have a couple of options for excluding trees from a dripline hatch. For information and instructions, see our article on excluding trees from a dripline area.
Scaling Your Dripline Hatches at Row Spacing
We've added the option to scale your dripline hatches at the exact row spacing you've set for them. This option is available in the Irrigation Preferences.
Check the Dripline hatch scaled at row scaling option to scale your Areas for Dripline according to the row spacing you've set for them.
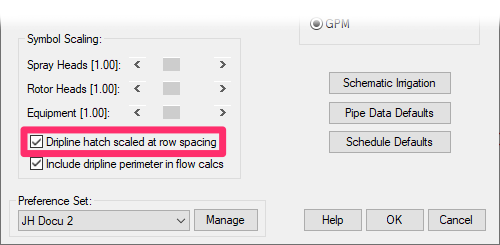
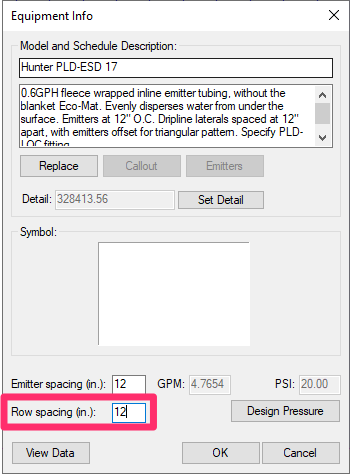
For example, if you've set your row spacing at 12 inches for a dripline area, that area will be scaled to reflect that 12-inch spacing when placed in a drawing if you have this option selected.
You can set your row spacing, as well as configure other options, for your dripline areas by using our Edit Equipment tool.
The system won't scale any hatches that have already been placed in your plan while this scaling option was unchecked. If this option is checked and a hatch is then placed in the drawing, that hatch will match row spacing. If the row spacing changes, the hatch will automatically update to match the row spacing.
Important: Avoid Arcs in Your Drip Area Boundaries
It's extremely important to avoid using arcs in your drip area boundaries. Here's why:
For drip areas, we need to be able to determine whether a point lies within any given area. This determination will in turn allow the software to see whether a freestanding emitter is part of that drip area, as well as for flush valves and pipe transition points. Because running the pipe sizing can require dozens and even hundreds of these crosschecks, all this calculation has to happen extremely quickly. So long story short: If the boundary path consists of all straight lines, it can be accomplished with a simple operation. If arcs were allowed, the system would need to convert each arc to a series of straight lines – each and every time. Or, failing that, it would need to convert every object to a 3D Region object, and use the Region modeler routines. But again, all of those are quite involved and tax the computer, as opposed to simply converting any arcs to straight lines when the drip area is initially placed.
Changing the Hatch Symbols for Areas for Dripline in Your Projects and Drawings
If you've already added a particular Area for Dripline to your project – even if you've already placed it in a drawing – you may want to change its hatch to another one of our default hatches, or a version you've created. See our documentation on changing symbols for Areas for Dripline and Drip Emitters.
Piping to Dripline Areas
After placing your dripline areas, you'll need to take some specific considerations into account when piping to them. See our Piping to Drip Areas documentation.
Having a Hatch Issue? Download Our Updated Hatch Patterns Manually
Are you experiencing any of the following issues with your dripline area hatches?
- Hatches looking fragmented or broken apart
- Hatches with scales that are too large or too dense
- Hatches that place blank or empty
- Hatches that are not appearing in schedules
- File size bloating
If so, follow our steps to download our updated hatch patterns manually.
Related Webinars
- Irrigation for Beginners: We'll show how to navigate through the Irrigation ribbon and build a familiarity with our conceptual-level tools. You'll also learn the basics of adding equipment to a project, placing, piping, sizing, and scheduling. (1 hr 45 min)
- Designing with Drip: Learn to use drip irrigation, from placing drip rings, bubblers, single emitters, emitters by area, and dripline by area all the way to zoning and piping. (1 hr 3 min)
- Drip Irrigation: We’ll go through the entire process – from placing drip rings, bubblers, single emitters, emitters by area, and dripline by area to zoning and piping. (1 hr 5 min)
- Drip Irrigation Selection: Shelly Walker of GPH Irrigation goes over some applications that will help make your projects as efficient and environmentally responsible as possible. (50 min)
- Irrigation Tools – What You Need to Know: We'll show you the ins and outs of basic irrigation setup using our software, including how to add drip, sprays, and rotors to a project. (1 hr 6 min)
- How The Manufacturer Connection Works: The Manufacturer Connection is the relationship between the designer and manufacturer that Land F/X has used to separate ourselves from other design software programs. Learn how it helps you spec equipment for irrigation designs. (53 min)
Troubleshooting
Issue: Your drip hatches are not showing up in Paper Space
Issue: You are unable to pipe or connect to an Area for Dripline
Issue: High flow (GPM) calculated in your drip valves
Having another issue with placing an Area for Dripline? See our Place Drip Emitters Troubleshooting section.
Issue: Error: "Unhandled exception in dcl-slideview-load ARX" when placing areas for dripline
Issue: You need to remove the hatch from internal objects within a drip area
Issue: Your drip hatches are showing up incorrectly, or as random lines or solid colors
Issue: A placed dripline area hatch looks fragmented or isn't joined like it should be
Issue: Error 404: Missing Remote File and missing SLD files when attempting to place a dripline area


