Concept Plant Schedule
Quick video
- Concept Plant Schedule Overview
- Plant Spacing & Percentage Fills
- Combining the Concept Plant Schedule With the Standard Plant Schedule
- Editing or Regenerating Concept Plant Schedules
- Schedule Text in Uppercase (or Upper and Lowercase)
- Rearranging the Column Order in Your Schedule
- Some Notes on How the Concept Plant Schedule Works
- Concept Plant Schedules and Slope Areas
- Related Webinars
- Troubleshooting
The Concept Plant Schedule lists all Concept Plants you've used in your plan. You can place a Concept Schedule in either Paper Space or Model Space.
We've completely overhauled our Concept Plant Schedule dialog box as of November 2023, giving it an updated look and a number of new capabilities. Want to use the old version of the tool? Just type CONCEPTPLANTSCHEDULE_LEGACY in the Command line and press Enter.
Concept Plant Schedule Overview
Choose an option to begin creating a Concept Plant Schedule:
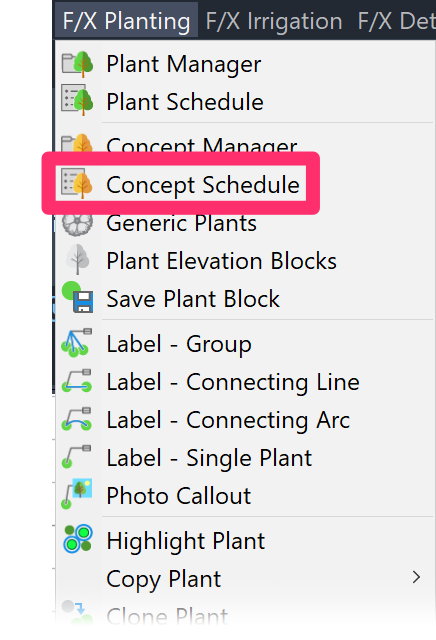
F/X Planting menu, Concept Schedule option
or type FX_PlantScheduleConcept in the Command line
The Concept Plant Schedule dialog box will open.
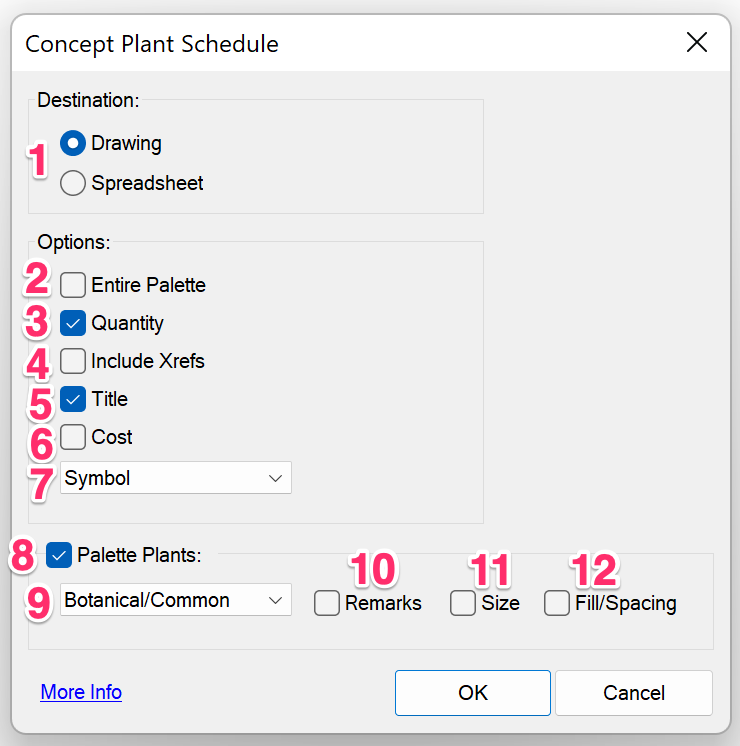
1. Destination: Select one of the following :
- Place the schedule directly in your Drawing.
- Export the schedule to a Spreadsheet.
2. Entire Palette: Check this box to list the entire Concept Plant palette in the schedule.
3. Quantity: Check this box to show the quantity of each plant in the schedule
4. Include Xrefs: Check this box to include Concept Plants from Xrefs in the schedule.
5. Title: Include a title in the schedule.
6. Cost: Include a per-unit cost for Concept Plants.
7. Symbol: Menu options to include the following items with your plants in the schedule:
- Symbol: Include each plant's assigned symbol.
- Photo: Include a photo you've assigned to each plant using our Photo Callout tool.
- Both: Include the symbol and photo assigned to each plant.
- Neither: Do not include the symbol or photo assigned to each plant.
8. Palette Plants: Include the plants you've added to your Land F/X project (i.e., palette plants), in the schedule.
9. Options: Select an option in the pull-down menu to determine how the Concept Plant names will display in the schedule: Botanical/Common, Common/Botanical, Botanical, or Common.
10. Remarks: Check this box to include remarks, or notes, in the schedule.
11. Size: Check this box to show the size of each plant in the schedule.
12. Fill/Spacing: Include the percentage fill and plant spacing of Concept groundcovers and Shrub Areas.
Click OK to place your schedule.
You can now place the Concept Plant Schedule in your drawing by clicking in either Model Space or Paper Space.
- Use the Up and Down buttons in the Concept Plant Manager to organize the order in which the Plant Design Group will appear in the Concept Plant Schedule.
- If a project's Concept Plant palette and related symbols seem applicable to future projects, save it as a template from the Plant Manager. The next time you have a new project that is similar, simply click the Add from Project button in the Plant Manager. A list of templates and current projects will appear, allowing you to select one. All design groups, plant palette plant names, and the related symbols will be added to your new project for immediate Concept Plan use.
- After you complete a Concept Plan, all plant data entered into the Concept Plant palette will be ready for creating a working drawing planting plan. You may continue to add more plants as necessary during the working drawing process to fine-tune your design.
Plant Spacing and Percentage Fills
The Plant Info dialog box, where you edit Concept Plants, includes entries for Plant Spacing and Percentage Fill. This data is also included in the Concept Plant Schedule, as shown below.

For more information, see the Plant Spacing & Percentage Fills section of our Concept Manager documentation page.
Combining the Concept Plant Schedule With the Standard Plant Schedule
We've engineered the ability to include your Concept Plants in the regular Plant Schedule.
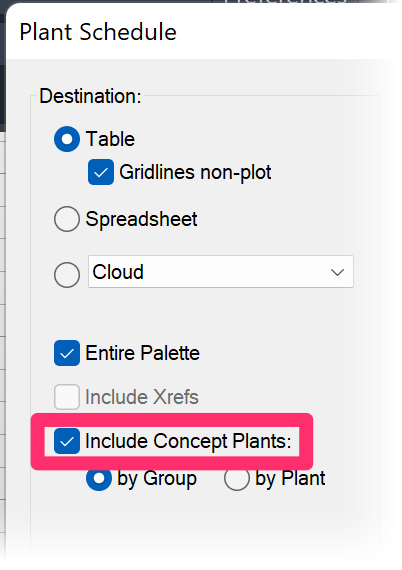
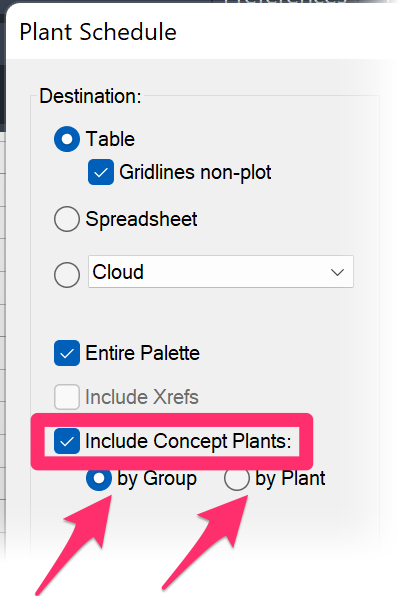
When creating a Plant Schedule, just make sure the Include Concept Plants option is checked. Your Concept Plants will be completely integrated with your project plants in the schedule. To exclude your Concept Plants from the Plant Schedule, just uncheck this option.
Editing or Regenerating Existing Concept Schedules
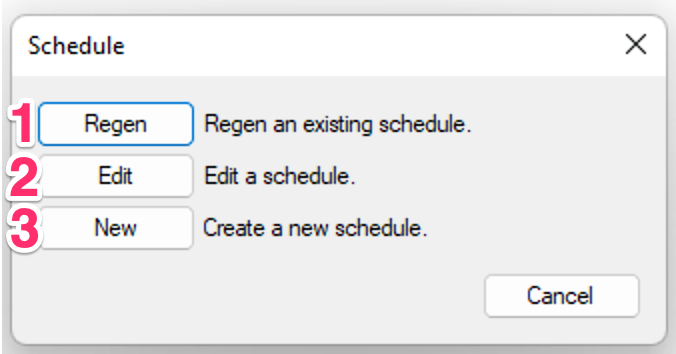
If you open the Concept Plant Schedule tool in a drawing that already includes one or more existing Bloom Schedules, you'll see the Schedule dialog box, which includes the following buttons:
- Regen: Regenerate an existing schedule after making changes in your drawing.
- Edit: Edit the settings of an existing schedule. Clicking this button opens the Concept Plant Schedule dialog box, allowing you to reconfigure a selected schedule. Any changes you make to the schedule settings at this point will apply to the selected schedule in your drawing when you click OK.
- New: Create a new Concept Plant Schedule.
Schedule Text in Uppercase (or Upper and Lowercase)
You can control whether the text in any of your schedules appears in all uppercase, or in upper and lowercase, from the General Preferences. For instructions, see our Schedule Text in Uppercase article.
This setting will apply to all schedules you place in your drawings, including:
- Plant Schedule
- Irrigation Schedule
- Details Schedule
-
Site schedules such as:
- Reference Notes (RefNotes) Schedule
- Lighting Schedule
- Concept Schedule
- Zoning Schedule
- Site Development Schedule
- Grading Schedule
Rearranging the Column Order in Your Schedule
In the interest of keeping our software easy to use – and limited by some restrictions from the CAD platform – we’ve decided to limit the built-in arrangement options to more widely accepted arrangements. However, you can easily rearrange your schedule columns at will while also keeping the ability to regenerate the schedule.
Some Notes on How the Concept Plant Schedule Works
The Concept Schedule and Flats
We've found the Concept Schedule to work better in not displaying quantities in flats, so this option is currently not available for flats.
Plant Quantities
Now that the regular Plant Schedule provides the option to include Concept Plants, you essentially have three options in generating a Concept Schedule:
- Concept Schedule
- The two options in the Plant Schedule for including Concept Plants (pictured to the right):
- Plant Schedule including Concept By Group
- Plant Schedule including Concept By Plant
Of these three schedule options, the Concept Schedule has the most "overall" quantities. As the system assembles the Concept Plant quantities from your drawing, it only sees each hatch area as the Concept Design Group it represents. When you run a Concept Schedule, an overall total area quantity of those hatches is calculated. Then, as the system creates the individual line items in the schedule that correlate to these areas, the percentage fills of each individual Concept Plant within that group are multiplied by the overall quantities within the areas. As a result, if you were to label these areas with our pending new itemized label type, you would see rounding differences between the total of the individual label quantities and the overall schedule quantities.
Next, in terms of accuracy, is the Plant Schedule including Concept Plants by Group. This option should always provide an exact match with what the Concept Schedule is showing – which, again, is not perfectly accurate. For example, let’s say you have 9 Concept Trees placed, with 2 member trees within that Concept Tree Group. Without percentage fills assigned to them, both trees will automatically receive a percentage fill of 50%, which calculates to 4.5 and then rounds to 5. In the Plant Schedule, the line item for each of those member plants will show a quantity of 5, even though the line item directly above, for the group, clearly shows 9. We are currently working out a way to engineer a fix for this discrepancy.
The highest form of quantity accuracy is the Plant Schedule including Concept Plants by Plant. The way this schedule assembles quantities ensures the highest level of accuracy. As it processes each hatch area, it calculates all individual plants that would be within the area, rounded up to the next whole plant. Further, as it processes groups such as our example Trees from above, the first tree is assigned 4.5, which rounds to 5, but as it processes the next (and last) member of the group, that member plant will receive the remaining quantity – hence 4 – thus matching exactly with what the plan shows.
Stay tuned for further news in our efforts to engineer these vast amounts of code. (For example, the Plant Schedule alone comprises 3,500 lines, which if printed would take up 140 pages.) It's a slow and careful process – and one we're motivated to carry out with accuracy, which takes time.
Concept Plant Schedules and Slope Areas
Slope Areas work with our Slope Callout tool to apply a specific grade percentage or ratio to a closed polyline area in your drawing. Objects represented by any smart hatches within those closed polylines (Slope Areas) will have their quantity, volume, or area recalculated based on that slope percentage or ratio.
If you run a Concept Plant Schedule in a drawing that includes one or more Slope Areas, the schedule will scan all Concept groundcover and Shrub Area hatches, as well as other Concept hatches such as seed and grass mixes, to determine whether they are inside a Slope Area. If so, the schedule will recalculate the square footage/meters of those areas, along with any resulting changes in plant counts, based on their slope factor.
Slope Areas in Xrefs
Schedules will recognize Slope Callouts in Xrefs, as long as the Xref is on the layer L-SLOPE-AREA and the schedule is configured to include Xrefs. Schedules configured to include Xrefs will also recognize Slope Areas in the live drawing even if the Concept Plants calculated by the schedule are in an Xref.
Related Webinars
- Ask Us Anything! Spotlight on Plant Schedules Join us for the first "Ask Us Anything," which focused on Plant Schedules, including the massive 2023 update that overhauled the Plant Schedule dialog box and opened new possibilities for your Plant Schedules. (1 hr 7 min)
- Plant Schedules: Land F/X provides a wide range of options for configuring a Plant Schedule for your landscape design. We’ll show you how to organize your columns and include or omit elements such as plant symbols, codes, cost estimates, spacing, and plants from your Xrefs. Join us to explore these choices and pick up valuable insights for crafting your ideal schedule. (1 hr 5 min)
Troubleshooting
Issue: Plant Schedule errors – general troubleshooting
Issue: My Concept Schedule is too long. How can I break it up?
Issue: Column spacing in the schedule is off
Issue: Error: Not all plants in the drawing match the project data
Issue: The schedule is showing the wrong square footage (or square meters) for a groundcover such as sod
Issue: The schedule shows an incorrect symbol for a plant in my drawing
Issue: Error: Non-planar entity
Issue: You are unable to send your Concept Plant Schedule to an Excel spreadsheet
Issue: Work Areas are not recognizing or calculating a Shrub Area or groundcover hatch
Issue: Schedule Text or Schedule Title is appearing in the wrong font, point size, etc.
Issue: The screen flashes several times when you place a Concept Plant Schedule in Paper Space
Issue: CAD freezes or lags after you place a Concept Plant Schedule
Issue: Your plant symbols are showing up with transparency when placed in your drawing
Issue: Hatches are missing or coming in at the wrong scale/size in the Concept Plant Schedule
Issue: Your schedule header is showing up in the Arial font (and you don't want it to)


