Placing Heads (Emitters): Overview
Quick video
- Methods for Placing Heads
- Keyboard Commands for Placing Heads
- Placing Spray Heads
- Placing Standard Heads (Rotary, Rotor, Impact Head, or Bubbler)
- Layout Tools for Placing Heads
- Editing or Viewing Information about Heads
- Replacing Heads
- General Information About Heads
- Changing the Symbols for Heads in Your Projects and Drawings
- Moving Heads from an Xref to Your Irrigation Plan
- Related Webinars
- Troubleshooting
The Place Head tool allows you to access the project irrigation head information. It also allows you to access spray, rotor, and bubbler heads that have been added to the project and place them into your drawing.
The default install does not include all symbols, but many of them will download on demand. If you go to place a head, the symbol should download as necessary. If you want, you can also have the system download all irrigation symbols from the Check for Updates feature.
Methods for Placing Heads
We offer several methods for placing irrigation heads:
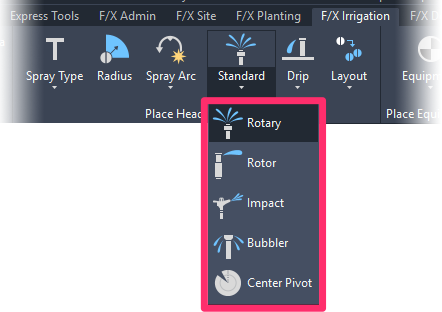
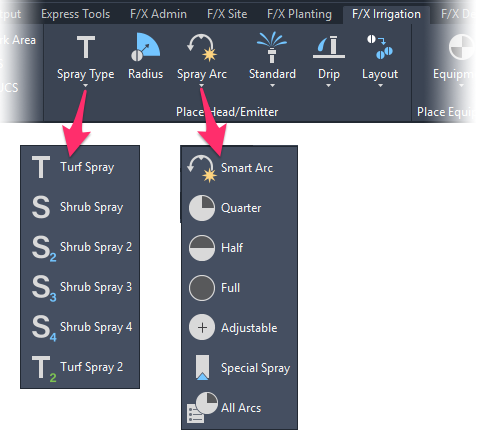
A series of buttons and flyouts on the F/X Irrigation ribbon

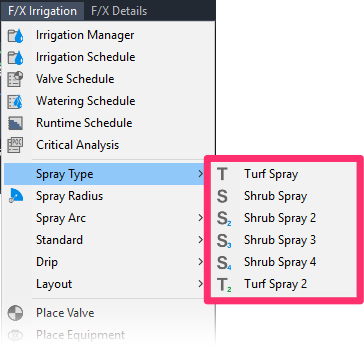
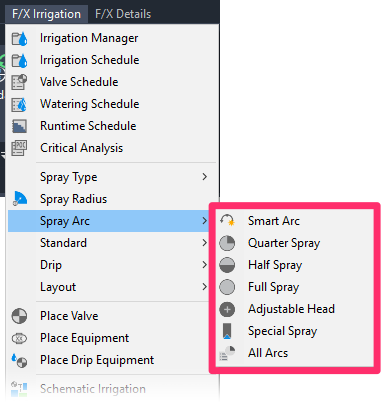
Flyouts on the F/X Irrigation menu
Keyboard Commands for Placing Heads
Quick video
Using certain keyboard commands gives you added speed and flexibility when placing any type of head.
When you're ready to place a head from any Place Head function, such as a spray, rotor, rotary, etc., the CAD Command line will prompt:
Position, or <K>eyboard commands.
You can either:
- Click to place the head, or
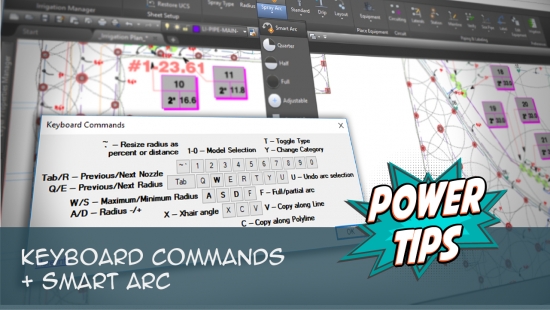
- Type K to display a list of the keyboard commands (pictured to the right).
You don't need to type K to use the keyboard commands – it's just a quick way to reference each of the commands and what it does in the dialog box pictured to the right. To use the keyboard commands, just press the corresponding keys on your keyboard.
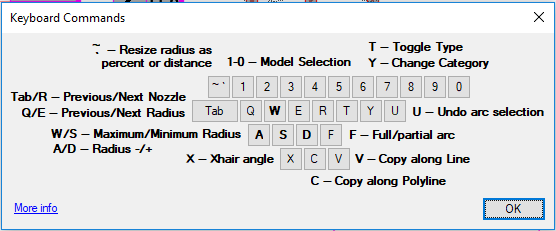
- Resize radius as percent or distance: ~`
- Toggle spray type: T
- Toggle to a different model: 1–0
- Change equipment category: Y
- Previous (smaller) radius: Q
- Previous (smaller) nozzle: Tab
- Maximum radius adjustment: W
- Undo arc: U
- Radius adjustment +5%: D
- Copy along Polyline: C
- Set a crosshair angle (Xhair Angle): X
- Next (larger) radius: E
- Next (larger) nozzle: R
- Minimum radius adjustment: S
- Radius adjustment -5%: A
- Copy along Line: V
Our Suggestion for the Best Use of These Keyboard Commands
We chose the keys for these commands carefully, basing them on the keys you'd use in any number of computer games that require some sort of movement up, down, left, and right.
Think of the W, A, S, and D keys as your home keys, where you should be keeping your hand while placing heads. Then think of each key as a partner to the corresponding arrow key. So A and D toggle you "left" (-5% radius adjustment) and "right" (+5% radius adjustment), respectively, while W and S toggle you "up" (maximum radius adjustment) and "down" (minimum radius adjustment), respectively.

Get on-the-road training on our keyboard commands by playing our Drive game. It's a fun way to learn the commands, and you can do it inside any DWG drawing!
Once you've memorized and mastered how these keys work, you'll start to see that the surrounding keys are just as intuitive. For example, the Q key (just to the left of W) toggles you to the next smaller radius, while the E key (to the right of W) toggles you to the next larger radius.
Beyond those keys are Tab (left – next smaller nozzle) and R (right – next larger nozzle). So if you use W-A-S-D as your home base, you'll begin to realize that the commands are built intuitively around this axis. Start here, and you'll have all the commands memorized in no time.
What the Keyboard Commands Do
Select a Different Model
1–0: If you have multiple equipment types in your Irrigation Manager (turf sprays, shrub sprays, rotors, etc.), press 1 to go to the first added spray type, 2 for the second type added, 3 for third, and so on.
Toggle to a Different Spray Type
T: When placing turf sprays, pressing T will toggle to placing shrub sprays. Pressing T again will go back to placing turf sprays. When placing rotaries, pressing T will toggle through the turf and shrub rotary equipment, then move right over to turf and shrub rotor equipment, then back to rotaries.
Select a Different Equipment Category
Y: After placing heads, pressing Y will shift to placing valves. Continue pressing Y to place the controller and finally drip area.
Undo an Arc
U: As you place the first position when defining your spray pattern (arc), pressing U will unhook (undo) so you can reposition if you are not pleased with the location where you initially clicked.

Remember to keep your left hand on the W-A-S-D keys, which will make it easy for you to begin tapping all of these keyboard commands from memory.
Soon, it will feel automatic!
View Larger or Smaller Radius Nozzles
Q: The Q key will shift the placement target to the next available smaller radius nozzle for the head type selected.
E: The E key will shift the placement target to the next available larger radius nozzle for the head type selected.
Once you see your target size for the nozzle selected, the Q and E keys become quick methods of viewing your radius options – either larger or smaller than the radius you originally selected. Thus, if you have selected a 12-foot-radius spray nozzle, pressing the Q key will take the radius down to 10 feet. Pressing the Q key again will take it down to 8 feet, and pressing it additional times will continue to reduce the radius until you have reached the smallest option offered by this nozzle type. Pressing the E key numerous times will bring the radius back up until you have reached the largest radius offered by this nozzle type.
View Larger or Smaller Arc Nozzles
Tab: The Tab key shifts the placement target to the next available smaller arc pattern for the nozzle type selected.
R: The R key shifts the placement target to the next available larger arc pattern for the nozzle type selected.
Once you see your target for a nozzle selected, the Tab and R keys become quick methods of viewing arc pattern options – either larger or smaller arcs, respectively, than the one you originally selected. Thus, if have selected a 180 arc nozzle, pressing the Tab key will take the arc down from 1/2, to 1/3, to 1/4, and so on, down to the smallest arc offered by this nozzle type. Pressing the R key will start to bring the arc pattern back up until you have reached the largest arc offered by this nozzle type.
Keys for Changing the Radius Size
~`: This key (near the top left corner of your keyboard) will set whether the A and D keys change the radius as a percentage or distance:
- If you press this key once, the A and D keys will change the radius size as a percentage.
- If you press this key again, the A and D keys will change the radius size as a distance.
A: The A key reduces the radius by either a percentage or a distance, depending on what you set with the ~` key. Each time you press the A key, you will reduce the radius by 5% until it reaches 75% of the full radius, or by 6 inches (or the metric equivalent).
D: The D key increases the radius by either a percentage or a distance, depending on what you set with the ~` key. Each time you press the D key, you will increase the radius by 5% until the nozzle is at full radius, or by 6 inches (or the metric equivalent).
W: The W key adjusts the radius to the maximum size allowed by the selected nozzle.
S: The S key adjusts the radius to the minimum size allowed by selected nozzle.
Once you see your target for a nozzle selected, the A and D keys offer methods to reduce the radius much the same as if you are turning down the radius reduction screw at the top of a head you have installed. When the radius is reduced on an actual head, the spray pattern is disrupted to reduce the radius. Most head types can be reduced to about 75% of the full radius before the pattern is too disrupted for good coverage, so we will only reduce a nozzle to 75% of the full radius.
The W and S keys simply maximize or minimize the radius reduction, respectively, with one quick step.
Keys for Copying Heads Along a Path
C: Copy a head along a polyline in your drawing. (You can select an existing polyline or draw the polyline on the fly.)
V: Copy a head along a line in your drawing
Placing Spray Heads
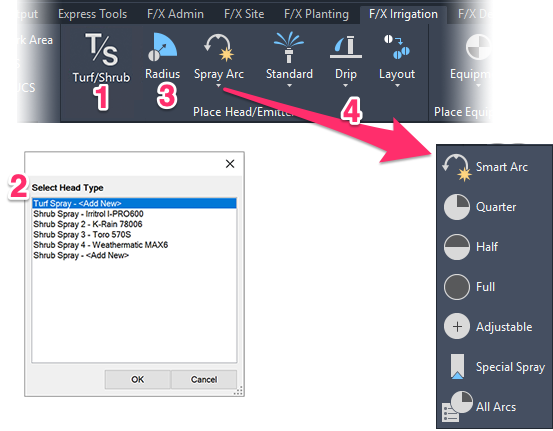
The tools for placing a spray head are available from the Place Head/Emitter panel of the F/X Irrigation ribbon. To place a spray head from the ribbon:
1. Open our Turf/Shrub tool from the F/X Irrigation ribbon.
2. You'll now see a dialog box displaying a list of spray head models you've added to your project. Select the model you want to place, then click OK.
You can also click Turf Spray - <Add New> or Shrub Spray - <Add New> to add a turf or shrub spray head model to your project as you would from the Irrigation Manager, then proceed with placing that model in your drawing.
3. Select the radius of the nozzle you want to place.
4. Select an arc or spray pattern for the nozzle.
For detailed instructions, see our documentation on placing spray heads.
Placing Standard Heads (Rotary, Rotor, Impact Head, or Bubbler)
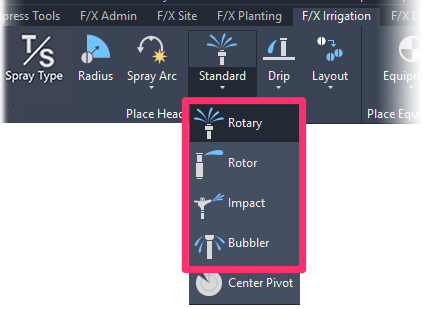
The tools for placing rotary, rotor, impact, and bubbler emitters are available as buttons on the Standard flyout menu on the F/X Irrigation ribbon.
For information and instructions, see our documentation on Placing Standard Heads (Rotary, Rotor, Impact, Bubbler).
Layout Tools for Placing Heads
Besides the keyboard command tools, which allow you to quickly jump between different nozzle radius or arc patterns, we offer a series of Layout tools to help you lay out and place heads quickly throughout your drawing. See our documentation sections on the following tools:
- Rectangular and Triangular Grid tools
- Rectangular and Triangular Array tools
- Copy Along Polyline
- Copy Along Line
- Clone Equipment
- Mimic Equipment
Editing or Viewing Information about Heads
The Edit Head / View Data tool allows you to see the model, flow, and design pressure of any selected head. This feature can be helpful in familiarizing yourself with a plan, or in finding out the flow required by an adjustable spray head. It also allows you to edit the design pressure, description, or nozzle. For more information, see our Edit Equipment / View Data documentation page.
Replacing Heads
The Replace tool, available in the Equipment Info dialog box, allows you to replace all instances of an existing head in your drawing with another model. For more information, please see our Replace Equipment documentation section.
Many users run the Replace tool unnecessarily. Note that you can edit the text and model of any piece of equipment directly, without the need to use Replace.
General Information about Heads
For general information about sprinkler heads, see the Sprinkler Heads portion of our Irrigation Equipment Definitions section.
Changing the Symbols for Heads in Your Projects and Drawings
If you've already added a particular head to your project – even if you've already placed that head in a drawing – you may want to change its symbol to another one of our default symbols, or a version you've created. The method of changing out the symbol varies slightly between head types. See our documentation on changing symbols for irrigation heads.
Moving Heads from an Xref to Your Irrigation Plan
Need to move irrigation heads from one drawing into another? For example, did you accidentally start drafting an irrigation plan in the wrong file, or had the Xref in Edit mode while designing more of the irrigation system, and now you need to move them from the Xrefed file to the irrigation design file? Here's how.
Related Webinars
- Irrigation for Beginners: We'll show how to navigate through the Irrigation ribbon and build a familiarity with our conceptual-level tools. You'll also learn the basics of adding equipment to a project, placing, piping, sizing, and scheduling. (1 hr 45 min)
- Getting Started with Irrigation F/X: This tour and tutorial will help you make the most of everything Irrigation F/X has to offer. We start with the fundamentals, such as how to set up your projects and Preferences, before diving into our collection of time-saving irrigation design tools. (59 min)
- Irrigation Tools – What You Need to Know: We'll show you the ins and outs of basic irrigation setup using our software. You'll also learn the essentials of placing equipment such as drip, sprays, and rotors. (1 hr 6 min)
- Irrigation Tips & Tricks: We'll show you some advanced tools you may or may not know about. You'll also learn techniques and best practices that will help speed up your workflow. (1 hr 3 min)
- Existing Irrigation: Learn the techniques, tools, and tricks you'll need to expand an existing system, including how to use a pipe cap to account for existing flow and add new valves to an existing mainline. (56 min)
- Advanced Irrigation Troubleshooting: Learn to think like a Land F/X irrigation troubleshooter. We'll show you why your symbols don't match, why you would see the message "Error accessing equipment data" (and how to fix these issues, as well as tips on pressure losses and precip rates, pipe caps, system monitors, and flow zones. (1 hr 3 min)
- Golf Course Irrigation: We'll demonstrate some of the great tools Irrigation F/X offers to help ensure proper mainline sizing and scheduling. We'll also discuss the use of using flow zones, shut-off valves, and valve-in-head rotors. (1 hr 4 min)
- Digital Irrigation Heads: IrriGreen CEO Shane Dyer shows you how digital heads function, which landscape areas to incorporate them into, how they can be programmed to spray complex shapes, and why they reduce water consumption. (1 hr 7 min)
- Efficient Irrigation for Small Spaces: Chris Roesink from Hunter takes you through the challenges of and solutions to irrigating in restricted areas. (1 hr 8 min)
Troubleshooting
Question: Is there a good way to show that a particular spray head is on a riser in an irrigation plan?
Issue: When I pipe to a head, the "snap" point is wrong
Issue: One of my heads is coming in oversized. All others seem to be fine.
Issue: Error accessing equipment data in the project
Issue: Wrong irrigation symbols coming in
Issue: When you place heads or other equipment, they are coming in at the wrong scale
Issue: You want to make the spray radius lines of your heads visible when you plot or plot preview
Issue: Heads in separate areas are connecting or sizing automatically
Issue: You need to rescale irrigation heads in your drawing to accommodate a new drawing scale
Issue: Heads' insertion points seem to be slightly offset from each other when placed
Issue: When placing a rotor, you are unable to see your desired nozzle size
Issue: Bad DXF group (10) error when placing irrigation equipment
Issue: Symbols for the model of head have different scales or sizes in your drawing
Issue: You changed the scale in your drawing, but new heads you place are not respecting the change
Issue: You are trying to switch from turf spray to shrub spray, but the symbols are not changing
Issue: You want to turn sprinkler arcs on once they are turned off
Issue: Error: File ... .dwg Was Created by an Incompatible Version of AutoCAD when placing heads
Issue: Error: "Unhandled exception in dcl-slideview-load ARX" when placing heads
Issue: Rotor nozzle sizes are not visible in your plan but are visible in the Irrigation Schedule
Issue: Your heads are placing with the incorrect symbol family
Issue: You saw a Missing File Error when attempting to place a head
Issue: Your irrigation head symbols are showing up with transparency when placed in your drawing
Issue: You saw a Missing File Error when attempting to place a head type besides a rotary head
Issue: You saw a Missing File Error when attempting to place a rotary head


