Irrigation Schedule
- Irrigation Schedule Overview
- Destination & Schedule Integration
- Spray Heads by Group
- Spray Heads by Nozzle
- Quantity Options for Drip (Dripline) & Valves / Equipment / Pipe
- Irrigation Schedule Contents
- Using the Irrigation Schedule to Create an Initial Inventory **Highly Recommended**
- Calculating Every Sprinkler Head and Pipe Size Individually
- Calculation of Individual Drip Emitters Within Emitter Areas
- Irrigation Schedules and Slope Areas
- Multiple POCs
- Editing or Regenerating Existing Schedules
- Revisions of Equipment
- Advanced Customization of the Irrigation Schedule Width
- Applying the Current Schedule Settings as the Default
- Limiting the Irrigation Schedule Using Work Areas or POCs
- Critical Analysis
- Changing Irrigation Schedule Column Widths
- Rearranging the Column Order in Your Schedule
- Schedule Text in Uppercase (or Upper and Lowercase)
- Create a Background Fill or Mask for Your Schedules
- Related Webinars
- Troubleshooting
An Irrigation Schedule is a list of the equipment used in the project. If you choose, it can include quantities and detail references. You can place the Irrigation Schedule in the drawing or send it to a spreadsheet for cost estimation.
If you run the Irrigation Schedule by selecting a point of connection (POC), the schedule will not include sleeves, controllers, and anything else that is not physically connected to the pipe. To show all of these items, you can:
- Right-click and select All when running your schedule, or
- Create your Irrigation Schedule using Work Areas.
Once you've configured the settings for your Irrigation Schedule, you can apply those settings as the default in the active Preference Set using the Irrigation Preferences. You can set different defaults for schedule placed in your drawings and in a spreadsheet. You can also create additional Preference Sets and apply new default settings to each one. Find out how
Irrigation Schedule Overview
Open our Irrigation Schedule tool:
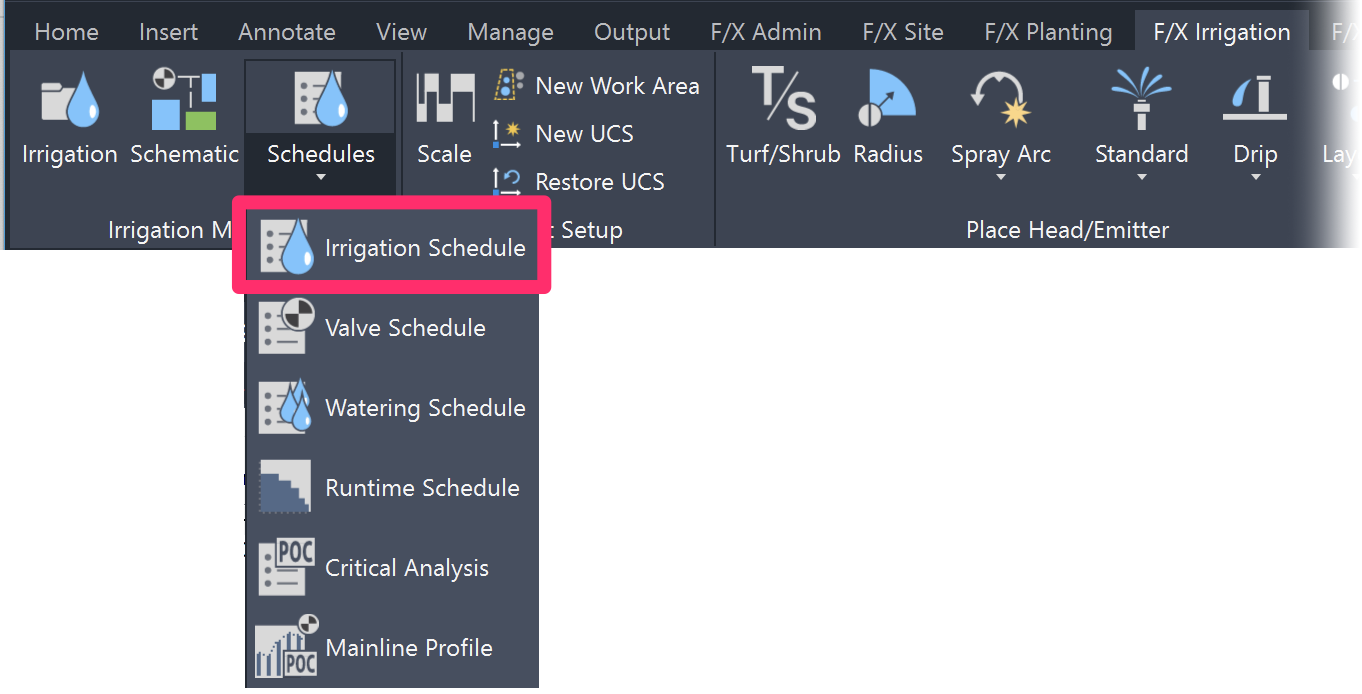
F/X Irrigation ribbon, Irrigation Schedule flyout
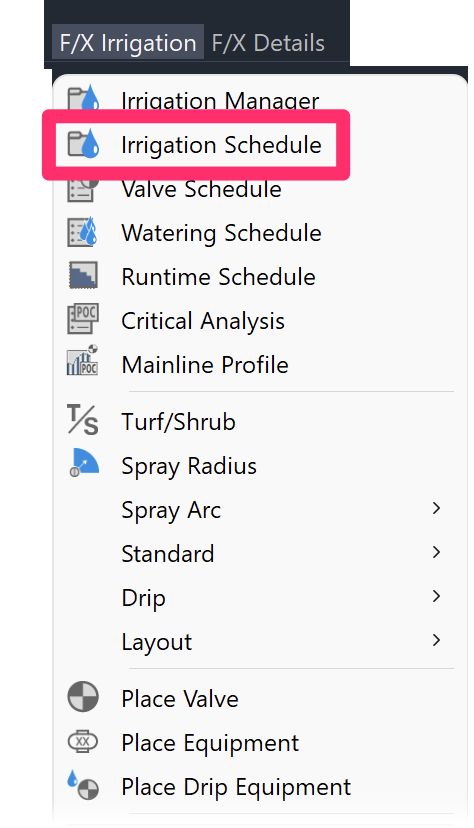
F/X Irrigation menu, Irrigation Schedule option
or type IrrigSchedule in the Command line
The Irrigation Schedule dialog box will open.
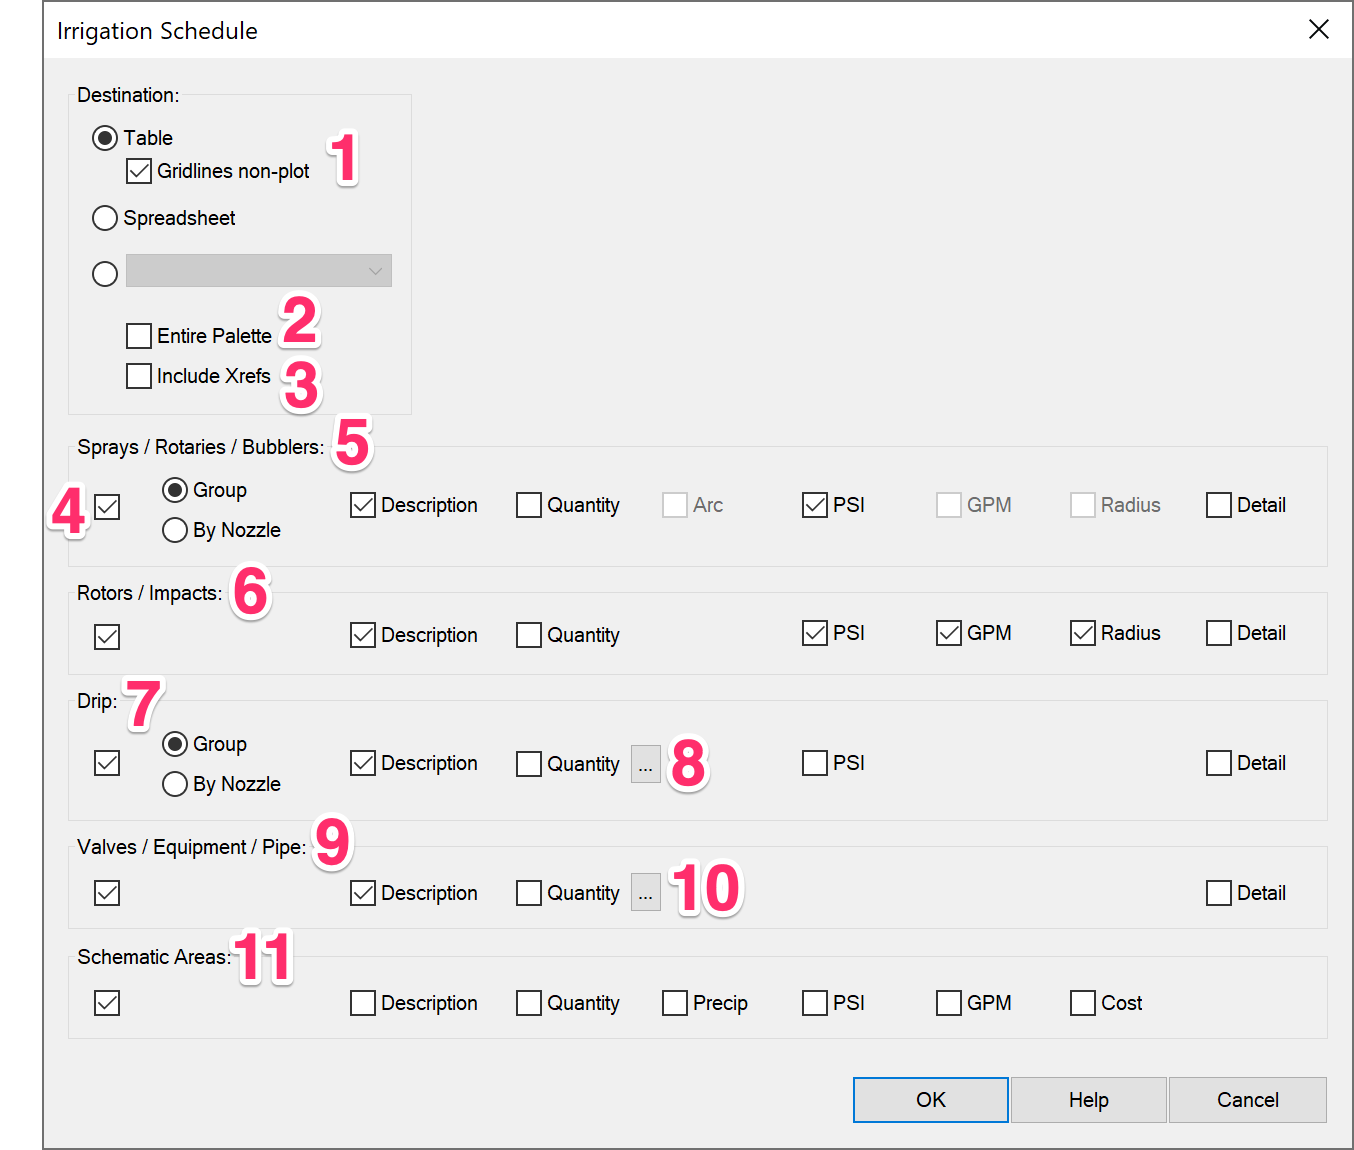
1. Destination: Choose how and where to place or send your schedule.
We've replaced the Drawing and Table options with a single Table option and a Gridlines non-plot checkbox. More information
2. Entire Palette: Create a schedule that lists all irrigation equipment you've added to your project, whether or not you've placed it in your drawing.
3. Include Xrefs: List irrigation equipment within your external references (Xrefs) in the schedule.
4. The section for each of the four equipment types includes a checkbox on the left side of the dialog box. Select this option for each equipment category you want to include in your schedule. Deselect this option for each category you want to omit.
5. Sprays / Rotaries / Bubblers: This section offers the options of placing these components in a Group or By Nozzle.
6. Rotors / Impacts: Rotors and impacts are displayed by individual nozzle.
7. Drip: Display of the drip-related equipment.
8. Click this button to open a dialog box where you can choose to calculate and list dripline by area or length. More information
9. Valves / Equipment / Pipe: Display of auxiliary equipment such as controllers, backflow, point of connection (POC), sensors, etc.
10. Click this button to open a dialog box with quantity options for the Valve / Equipment / Pipe category. More information
11. Schematic Areas: This section controls the display of any Schematic Irrigation usages in the drawing. For more information, see our Schematic Irrigation documentation.
After configuring all the options the way you want them, click OK to place the schedule in your drawing (if you selected the Table option in the Destination) section or send it to a spreadsheet (if you selected Spreadsheet). The Command line will prompt: Upper left corner.
Click to place the schedule in your drawing.
Are you facing a deadline, or simply need to keep using the old schedule format for existing projects? We plan to maintain legacy versions of all schedules for several months after the update, so you can simply type IRRIGSCHEDULE_OLD in the Command line and press Enter to run your familiar version of the schedule code and place a schedule the old way.
To establish the font and point size you want in your schedule, follow our steps to customize our default text styles – specifically the Schedule Text and Schedule Title Text Styles.
You can place an Irrigation Schedule in either Model Space or a Paper Space Layout tab. When placed in Model Space, Irrigation Schedules are sized to the scale of the drawing as established when you Set the scale. When placed in a Paper Space Layout tab, Irrigation Schedules are automatically sized at 1:1 scale.
Destination & Schedule Integration
The Destination section of the Irrigation Schedule dialog box includes several options for how and where you want to place or send your schedule.
- Table: Place the schedule in your drawing as a table.
- Gridlines non-plot: Check this option if you want the lines separating the table cells to be non-plot. Uncheck this option if you want the table lines to plot.
- Spreadsheet: Export the schedule to a spreadsheet program such as MS Excel.


You also have the option to send the schedule directly into another service provider – for instance, your firm's estimating and invoicing system.
You'll first need to set up an Integration Partner using our Schedule Integration feature. In this example, we've set up a hypothetical firm's invoiving department as the recipient of the Irrigation Schedule.
When you select his option, the schedule(s) will go right into your system, where the partner department can do everything from ordering parts to invoicing the client – therefore saving a great deal of time.
When outputting to a spreadsheet file, you'll likely want to expand the sprays by nozzle and include quantities for all items for easy take-offs. Your schedule will be loaded automatically into whichever spreadsheet program you have on your computer.
Why select the Spreadsheet option?
Exporting to a spreadsheet provides a quick way to generate a bill of materials and have complete quantities in a format you can easily edit. It's also the only way to:
- Apply per-unit costs to your irrigation equipment
- Obtain a complete breakdown of your pipe used in total length for each pipe size
Want to customize your schedule even more? You can create a macro in MS Excel that applies specific processes automatically to your schedules.
For an example of an Irrigation Schedule sent to a spreadsheet, see the Sending the Schedule to a Spreadsheet section of our Irrigation Schedule: Examples documentation.
Spray Heads by Group
Select the Group option under the Sprays / Rotaries / Bubblers category to organize the heads in your schedule by general head type regardless of which items of that type were used in the project.
For examples of Irrigation Schedules organized by Group, see the Spray Heads by Group section of our Irrigation Schedule: Examples documentation.

Spray Heads by Nozzle

If you select the By Nozzle option under the Sprays / Rotaries / Bubblers category, each head type you use in your project will be displayed separately within the schedule.
This option generally results in a somewhat longer schedule.
For examples of Irrigation Schedules organized By Nozzle, see the Spray Heads by Nozzle section of our Irrigation Schedule: Examples documentation.
Quantity Options for Drip (Dripline) & Valves / Equipment / Pipe
We've collected the quantity options for the Drip and Valve / Equipment / Pipe sections into their own separate dialog boxes.
If you want to list the quantities of either or both these equipment categories in your schedule, select the Quantity option in the appropriate equipment section, then click the ... button to the right to see your quantity options for that category.
Note that the quantity options in the Drip section apply specifically to dripline.
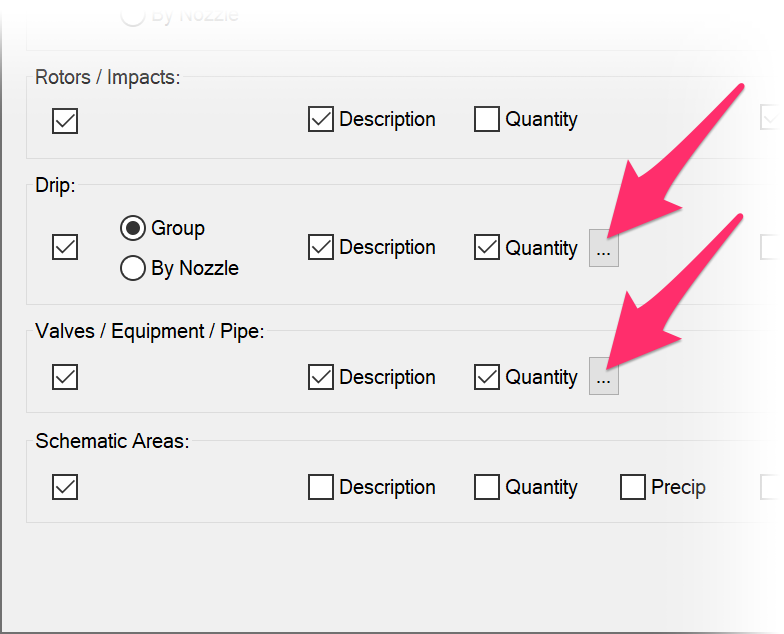
Drip (Dripline) Quantity Options
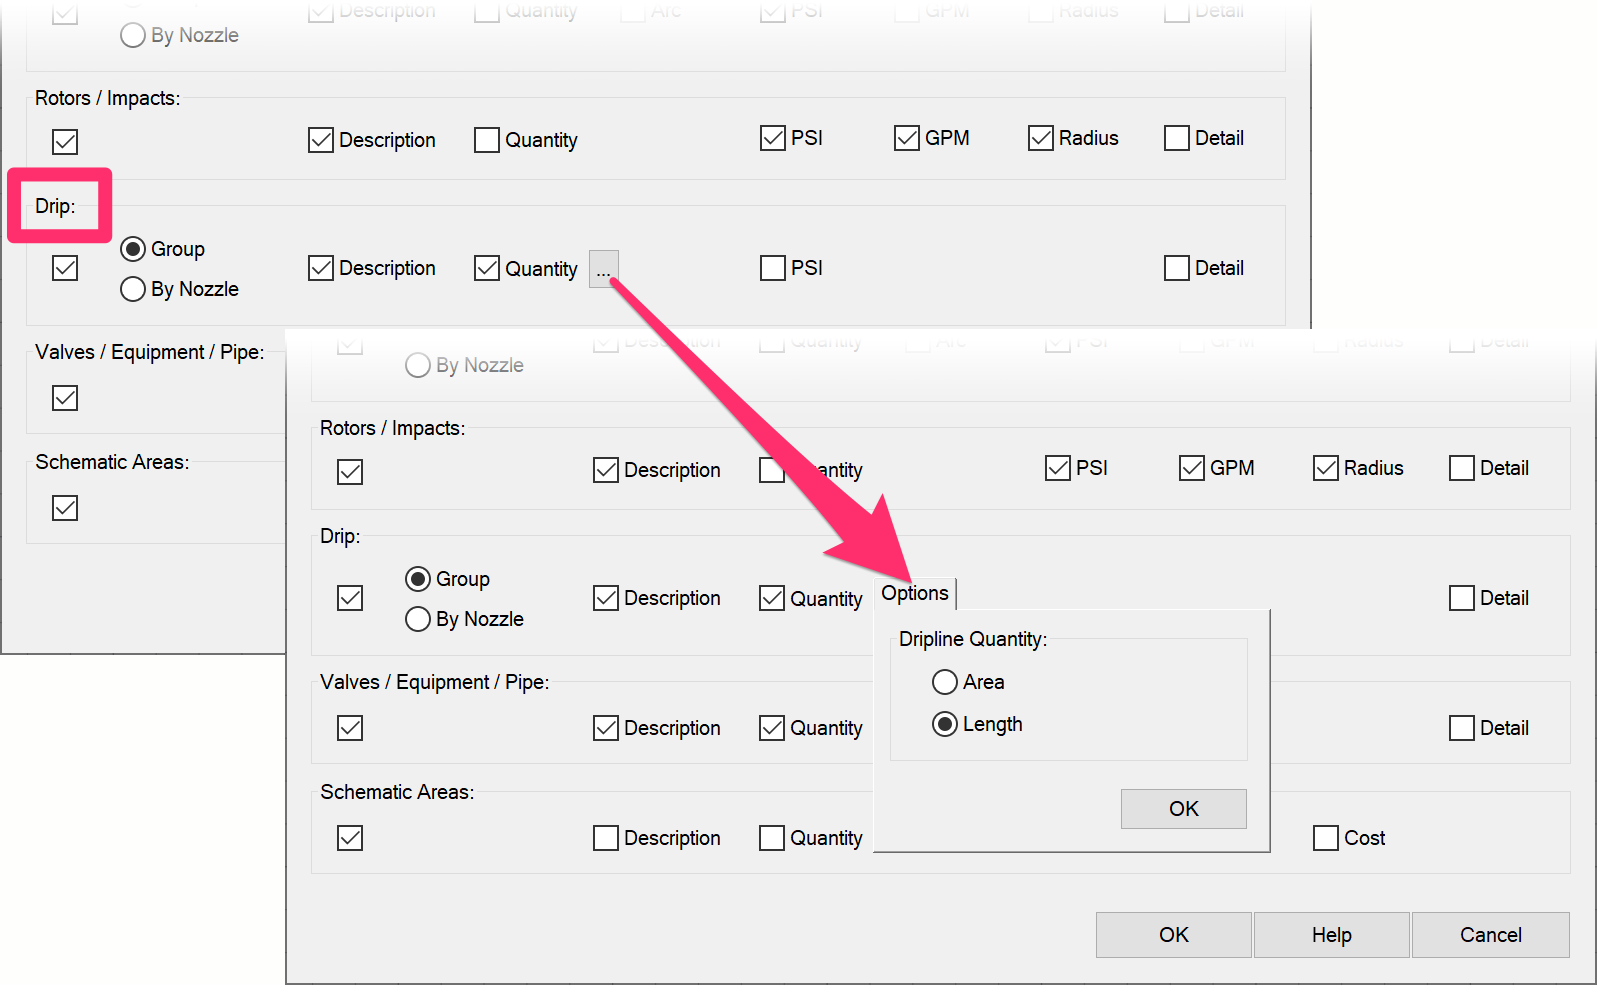
To access the dripline quantity options, click the ... button next to the Quantity checkbox in the Drip section.
You can then choose to list dripline in your schedule by either Area or Length. Click OK after making your selection.
You can only select one of these options.
Valves / Equipment / Pipe Quantity Options
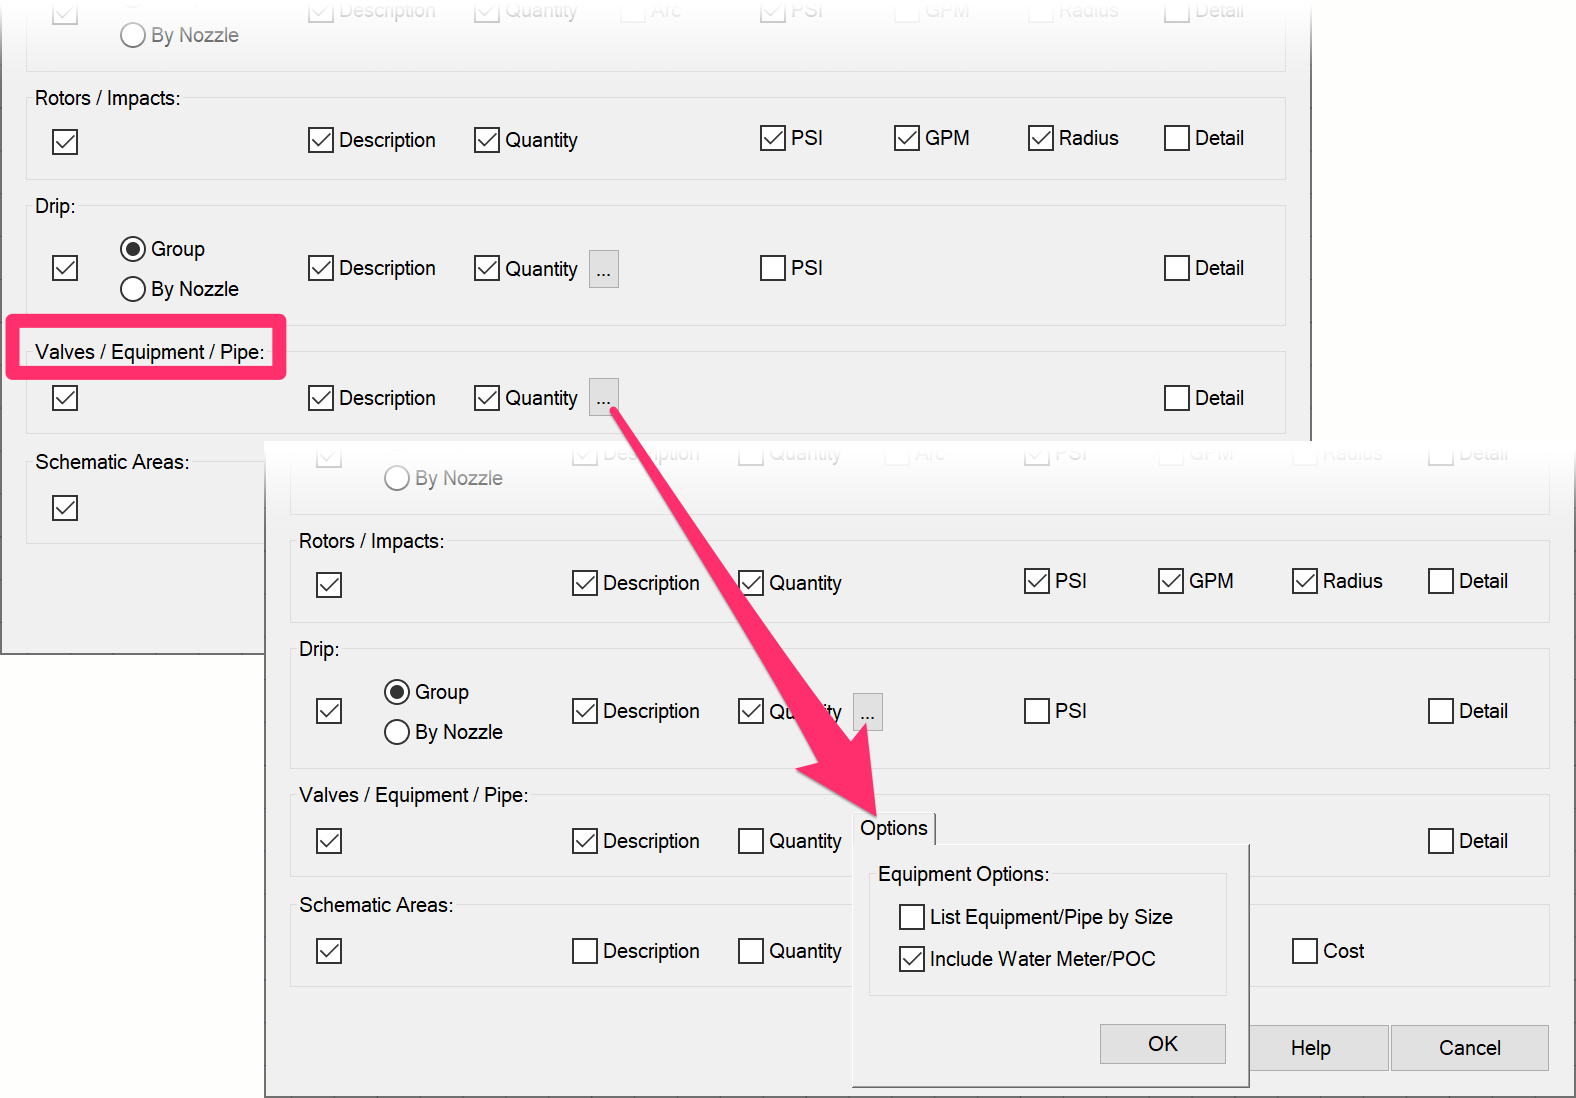
To access the quantity options for valves, auxiliary equipment, and pipe, click the ... button next to the Quantity checkbox in the Drip section.
You'll then see options to:
- List Equipment/Pipe by Size: Select this option to break the schedule into a complete list of all pipe classes and equipment types per size.
- Include Water Meter/POC: Select this option to include the water meter or point of connection (POC) in the schedule.
Click OK after making your selection.
You can choose to select one, both, or neither of these options.
Irrigation Schedule Contents
The Irrigation Schedule includes the following information:
- Symbol: The symbol for each component, or each head type in a model series.
- Manufacturer & Model: The manufacturer and model of a series.
- Description: The second line below the model text includes the general description of the component. This text will wrap to additional lines as necessary, or you can omit it entirely.
- Quantity: If sprays are grouped, the quantity is the sum of any nozzles that were used of that group – for instance, all 12' turf sprays used. For pipe, the quantity is expressed in linear feet counted to each connected item's insertion point (thus not losing any length due to the symbol size).
- Arc Pattern: The arc pattern of the head. For spray heads, the arc pattern will only be listed if you've selected By Nozzle.
- Pressure: The design pressure of the head. For spray heads, the pressure will only be listed if you've selected By Nozzle.
- Flow: The flow for the head at the design pressure. For spray heads, the flow will only be listed if you've selected By Nozzle.
- Radius: The radius of the head at optimal pressure. For spray heads, the radius will only be listed if you've selected By Nozzle.
- Detail: If you've associated a detail with an equipment model or series, the location in the drawing set of that placed detail will be listed.
Using the Irrigation Schedule to Create an Initial Inventory **Highly Recommended**
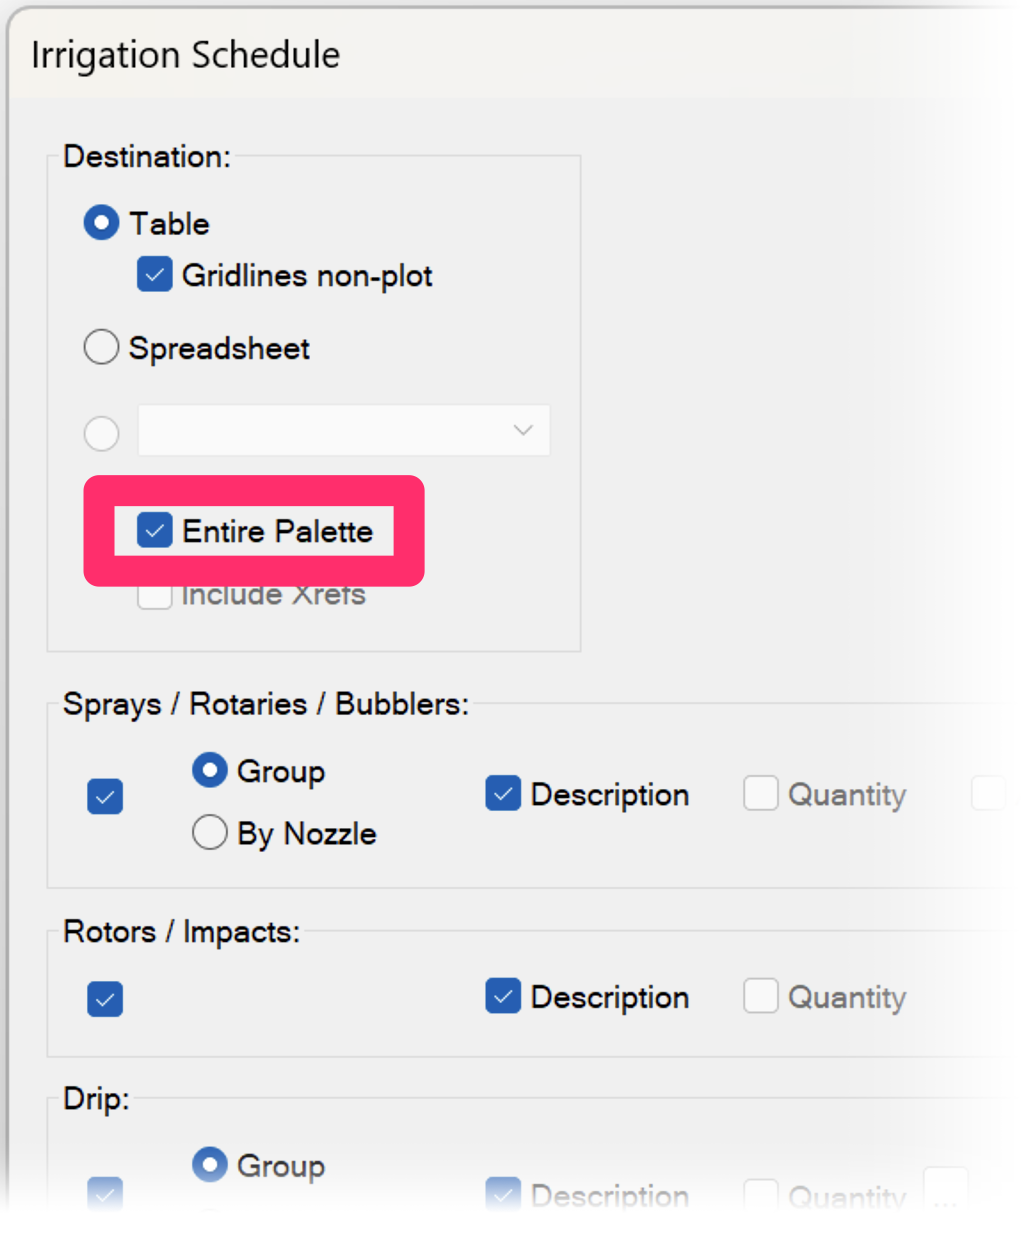
It's always a good idea to run an Irrigation Schedule with the Entire Palette option checked after you've added all your equipment to your project – and before you've placed any equipment in your drawing.
This option will generate a schedule listing all equipment you've added to your project – including exact models and model numbers. Print this schedule, keep it off to the side in your drawing, or otherwise keep it as a reference throughout the life of the project. It will serve as a crucial reference later in the project when you don't necessarily remember each piece of equipment you've added.
Calculating Every Sprinkler Head and Pipe Size Individually

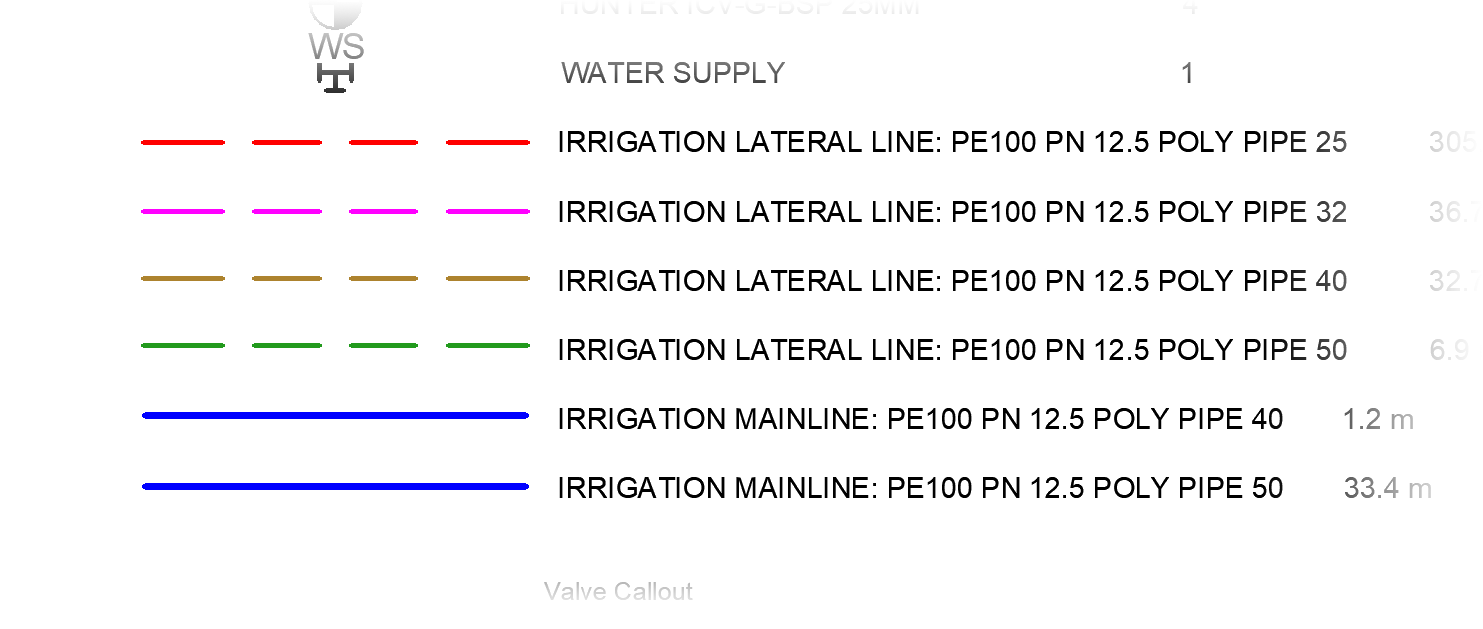
If you need to calculate heads (such as spray heads, rotaries, or bubblers) and pipe sizes individually, you can group the heads By Nozzle and, under Valves/ Equipment, check the box to List Equipment/Pipe by Size.
The heads and pipes will be itemized in the schedule.
When you choose the option to itemize equipment and pipe by size, the pipe blocks in the Irrigation Scheduld will be set to the corresponding pipe colors, as pictured below.
Calculation of Individual Drip Emitters Within Emitter Areas
The Irrigation Schedule now includes quantities of drip emitters within emitter areas.
When you place an Irrigation Schedule in a drawing that includes areas for drip emitters, you'll see an Emitter Notes subsection at the bottom of each emitter area section in the schedule. This Notes subsection will tally all individual emitters within that type of emitter area throughout the drawing. It will also list the plant container size that will receive each type of emitter. (See image below.)
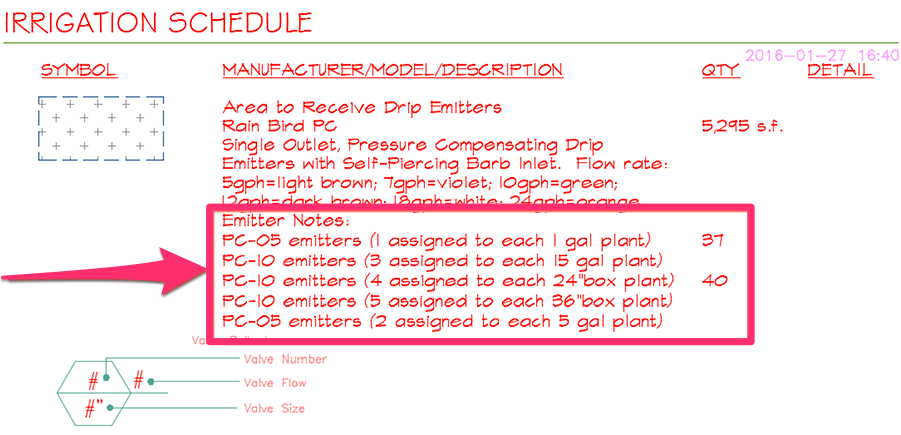
This listing and tallying of emitters occurs automatically when you place an Irrigation Schedule in a drawing that includes emitter areas. It doesn't require you to do anything beyond simply placing a schedule.
Irrigation Schedules and Slope Areas
Slope Areas work with our Slope Callout tool to apply a specific grade percentage or ratio to a closed polyline area in your drawing. Objects represented by any smart hatches within those closed polylines (Slope Areas) will have their quantity, volume, or area recalculated based on that slope percentage or ratio.
If you run an Irrigation Schedule in a drawing that includes one or more Slope Areas, the schedule will scan all Schematic zones, Areas for Dripline, and Areas for Drip Emitters to determine whether they are inside a Slope Area. If so, the schedule will recalculate the square footage/meters of those areas. For Schematic zones and Areas for Dripline (but not for Areas for Drip Emitters), the schedule will also recalculate equipment quantities and flow rates based on the slope.
Slope Areas in Xrefs
Schedules will recognize Slope Callouts in Xrefs, as long as the Xref is on the layer L-SLOPE-AREA and the schedule is configured to include Xrefs. Schedules configured to include Xrefs will also recognize Slope Areas in the live drawing even if the equipment calculated by the schedule is in an Xref.
Multiple POCs
If you have multiple POCs defined in your drawing, you will be prompted to select one or all of them on which to run the schedule, before being prompted to select the upper left corner of the schedule for outputting.
Editing or Regenerating Existing Schedules
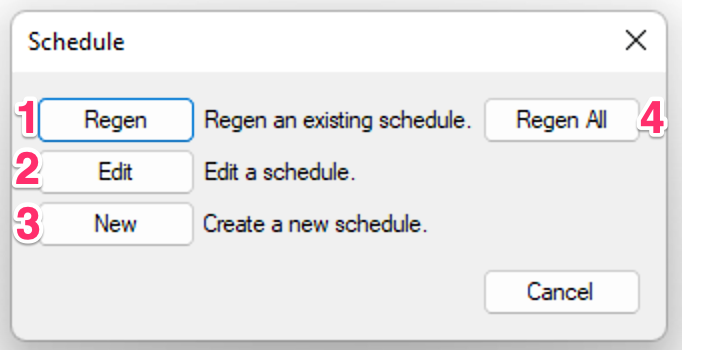
If you open the Irrigation Schedule tool in a drawing that already includes one or more existing Irrigation Schedules, you'll see the Schedule dialog box, which includes the following buttons:
- Regen: Regenerate an existing schedule after making changes in your drawing.
- Edit: Edit the settings of an existing schedule. Clicking this button opens the Irrigation Schedule dialog box, allowing you to reconfigure a selected schedule. Any changes you make to the schedule settings at this point will apply to the selected schedule in your drawing when you click OK.
- New: Create a new Irrigation Schedule.
- Regen All: Regenerate all existing Irrigation Schedules in your drawing after making changes.
Revisions of Equipment
If you need to change or delete a head type at a later date, just run the schedule again. The new schedule will reflect the changed condition.
Advanced Customization of the Irrigation Schedule Width
You can customize the Irrigation Schedule through the USERR2 variable. First type USERR2 in the Command line, and then type 0 to leave it auto-sized (at about 4 inches wide for the description), or enter a value in Paper Space inches.
Applying the Current Schedule Settings as the Default
Once you've configured your Irrigation Schedule the way you want it, you can apply those settings as the defaults under the active Preference Set in the Irrigation Preferences. If you want, you can create different defaults for schedules you place in drawings vs. schedules you export to spreadsheets. You can also create different defaults for different Preference Sets.
For specific instructions, see the Schedule Defaults section of our Irrigation Preferences documentation.
If you opened the Preferences and noticed that the buttons and options are grayed out and you can't make changes, the current Preference Set may be restricted. More information
Limiting the Irrigation Schedule Using Work Areas or Points of Connection (POCs)
You may want to run an Irrigation Schedule for only a specific portion of a drawing, such as an area or phase of your project. In these cases, you can limit the Irrigation Schedule with the help of work areas. For more information, see our Work Areas and Irrigation Schedules documentation. For instructions on creating a work area, see our Work Areas documentation.
For projects that include more than one point of connection (POC), you can also create an Irrigation Schedule that only includes equipment that is connected to a given POC. For more information, see our Limiting the Irrigation Schedule to a Specific POC documentation.
Change Irrigation Schedule Column Widths
You can easily change the widths of your Irrigation Schedule columns using the AutoCAD Block Editor.
Critical Analysis
Critical Analysis is a report placed into your drawing that gives you the same information that was displayed after sizing the mainline. The Critical Analysis will indicate the POC number, the Flow Available, the Pressure Available, and a Design Analysis of the Maximum Station Flow, with the Residual (or leftover) Flow, the pressure loss to provide the Critical Station (most demanding valve), and the Residual (leftover) Pressure.
For more information, see our Critical Analysis documentation.
Rearranging the Column Order in Your Schedule
In the interest of keeping our software easy to use – and limited by some restrictions from the CAD platform – we’ve decided to limit the built-in arrangement options to more widely accepted arrangements. However, you can easily rearrange your schedule columns at will while also keeping the ability to regenerate the schedule.
Schedule Text in Uppercase (or Upper and Lowercase)
You can control whether the text in any of your schedules appears in all uppercase, or in upper and lowercase, from the General Preferences. For instructions, see our Schedule Text in Uppercase article.
This setting will apply to all schedules you place in your drawings, including:
- Plant Schedule
- Irrigation Schedule
- Details Schedule
-
Site schedules such as:
- Reference Notes (RefNotes) Schedule
- Lighting Schedule
- Concept Schedule
- Zoning Schedule
- Site Development Schedule
- Grading Schedule
Create a Background Fill or Mask for your Schedules
Some designers want to give their schedules a background fill to allow it to pop from the rest of the drawing. You can create a background fill for your schedule using the Table Style Manager. Find out how.
Related Webinars
- Irrigation for Beginners: We'll show how to navigate through the Irrigation ribbon and build a familiarity with our conceptual-level tools. You'll also learn the basics of adding equipment to a project, placing, piping, sizing, and scheduling. (1 hr 45 min)
- Getting Started with Irrigation F/X: This tour and tutorial will help you make the most of everything Irrigation F/X has to offer. We start with the fundamentals, such as how to set up your projects and Preferences, before diving into our collection of time-saving irrigation design tools. (59 min)
- Irrigation Tools – What You Need to Know: We'll show you the ins and outs of basic irrigation setup using our software. You'll also learn the essentials of placing equipment such as drip, sprays, and rotors. (1 hr 6 min)
- Excel With The Right Tools: No matter how much you can accomplish in AutoCAD, sometimes MS Excel can do the job better. We’ll give you some examples of how Excel can improve your design process by adding everything from shade analysis reports to MAWA calculations and in-depth watering schedules. (1 hr 5 min)
- Excel With The Right Tools Part 2: Now that we've gone over the basics of what MS Excel can do for you, join us for a more detailed look into the capabilities of this powerful application, including named ranges, templates and reusable macros, and more. (1 hr 5 min)
- Irrigation Tips & Tricks: We'll show you some advanced tools you may or may not know about. You'll also learn techniques and best practices that will help speed up your workflow. (1 hr 3 min)
- Existing Irrigation: Learn the techniques, tools, and tricks you'll need to expand an existing system, including how to use a pipe cap to account for existing flow and add new valves to an existing mainline. (56 min)
- Advanced Irrigation Troubleshooting: Learn to think like a Land F/X irrigation troubleshooter. We'll show you why your symbols don't match, why you would see the message "Error accessing equipment data" (and how to fix these issues, as well as tips on pressure losses and precip rates, pipe caps, system monitors, and flow zones. (1 hr 3 min)
Troubleshooting
Issue: The Irrigation Schedule (Legend) is too wide. Am I having text wrap issues?
Issue: My Irrigation Schedule is too long. How can I break it up?
Issue: The Irrigation Schedule does not show all my equipment
Issue: Can I have multiple Irrigation Schedules?
Issue: How do I create an estimate or add pricing to materials for irrigation?
Issue: Irrigation symbols are showing off center in the Irrigation Schedule
Issue: The Irrigation Schedule shows an incorrect symbol for an irrigation component in my drawing
Issue: Schedule symbols are incorrect or misplaced
Issue: You are unable to send your Irrigation Schedule to an Excel spreadsheet
Issue: Incorrect equipment symbol (block) in the Irrigation Schedule
Issue: Work Areas are not recognizing or calculating an Area for Drip Emitters or Area for Dripline hatch
Issue: Schedule Text or Schedule Title is appearing in the wrong font, point size, etc.
Issue: You need to change the width the columns, or the height of the rows, in your Irrigation Schedule
Issue: Your Watering Schedule or Runtime Schedule is showing incorrect precipitation rates
Issue: The screen flashes several times when you place an Irrigation Schedule in Paper Space
Issue: Text boxes are displaying in your drawing where your Irrigation Schedule text should be
Issue: Text in the Irrigation Schedule columns is overlapping
Issue: The Irrigation Schedule shows a duplicate symbol and quantity for certain equipment
Issue: CAD freezes or lags after you place an Irrigation Schedule
Issue: The Irrigation Schedule is showing the incorrect pipe class for a pipe sleeve
Issue: Your schedule symbols are showing up with transparency when placed in your drawing
Issue: The flow totals for Schematic Areas are appearing incorrectly in the Irrigation Schedule
Issue: The Irrigation Schedule is showing the incorrect quantitiy of remote control valves (RCVs)


